🧢 Beautiful ✨ Detailed πŸ’ Adorable

Lily Bunny Amigurumi Pattern

Lily Bunny Amigurumi Pattern
4.0β˜… Rating
5-7 Hours Time Needed
3.6K Made This
βœ‚οΈ

Intermediate Level

Ideal for those with basic crochet experience, featuring slightly more advanced stitches and techniques to expand your skills.

⏱️

Weekend Treat

Takes 5-7 hours, making it an enjoyable project to finish over a couple of days.

🧸

Cute Companion

An adorable friend to cherish, handcrafted with love to bring comfort and joy for years to come.

About This Lily Bunny Amigurumi Pattern

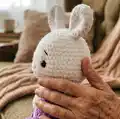
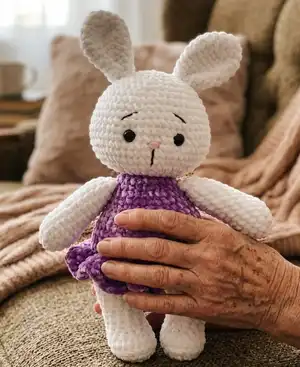
This pattern makes a sweet chenille Lily Bunny amigurumi with a ruffled skirt and embroidered facial details. You will work mostly in single crochet with simple increases and decreases to shape the limbs, body and head. The finished toy measures about 35 cm tall when using the recommended materials.

Lily Bunny Amigurumi Pattern crochet pattern - detailed view of completed project

The pattern uses US terminology and includes step-by-step rounds for each piece, plus assembly and finishing tips. It is designed for crocheters who enjoy a cozy, plush texture and a playful final result.

Why You'll Love This Lily Bunny Amigurumi Pattern

I absolutely love this pattern because it turns soft chenille yarn into a cuddly, timeless bunny with personality. I enjoy how the ruffled skirt adds a playful touch while the simple shaping creates a friendly face. The pattern balances straightforward rounds with a few shaping techniques, which keeps the work relaxing yet rewarding. I also love that the finished bunny is generously sized and perfect for gifting or decorating a nursery.

Lily Bunny Amigurumi Pattern step 1 - construction progress Lily Bunny Amigurumi Pattern step 2 - assembly progress Lily Bunny Amigurumi Pattern step 3 - details and accessories Lily Bunny Amigurumi Pattern step 4 - final assembly and finishing

Switch Things Up

I love how easy it is to customize Lily Bunny with different colors β€” try pastel tones for a baby gift or bold hues for a playful look.

To make a mini keychain version, use thinner yarn and a smaller hook; for a larger cuddly version, swap to bulky yarn and a larger hook.

I sometimes add tiny crocheted accessories like a bow, hat, or little heart to personalize the bunny for the recipient.

Change the skirt style by using single crochet ruffles or a lace edge to create different textures and looks.

Embroider different facial expressions by varying eyebrow shape and mouth length to give your bunny a unique personality.

Try safety eyes in different colors or use French knots for a handcrafted look with embroidered eyes instead.

If you want posable limbs, consider adding thin wire inside the arms and legs before stuffing to allow gentle posing.

Mix yarn textures β€” for example, a velvet chenille body with cotton clothing β€” to highlight the skirt and dress details.

Use contrast topstitching or a small applique on the dress to create a signature finish or to add a name for a personalized gift.

I also recommend experimenting with subtle stuffing levels; slightly firmer in the neck and softer in the limbs gives a very sweet shape.

Common Mistakes & How to Fix Them

βœ— Skipping the stitch marker when joining legs to the body can cause misalignment; place a marker at the join and count stitches to keep the seam centered. βœ— Understuffing the body leaves the toy floppy and misshapen; stuff firmly as you go, especially around the neck and base to maintain structure. βœ— Forgetting to change to back loops only when instructed will alter the skirt placement; switch to BLO exactly on the indicated round to catch the skirt properly. βœ— Pulling your tension too tight on chenille yarn can make stitches hard to work; use a slightly larger hook or relax your tension for smooth stitching. βœ— Cutting yarn too early when finishing ears or arms makes sewing harder; leave a long tail for sewing and assembly for easier placement and stronger seams.

Lily Bunny Amigurumi Pattern

Create a charming Lily Bunny with this easy-to-follow crochet pattern. You will enjoy making a soft chenille bunny with a ruffled skirt and embroidered details. The pattern includes full round-by-round instructions, materials list, and assembly notes so you can finish a delightful 35 cm toy. Perfect for gifting or snuggling, this pattern guides you through every step with care.

Intermediate 5-7 Hours

Materials Needed for Lily Bunny Amigurumi Pattern

β€” Main Fabric

  • 01
    Sport weight chenille yarn - White (Chenille 01) - quantity: enough for head, arms, legs and body (finished toy approx. 35 cm tall)
  • 02
    Sport weight chenille yarn - Purple (Chenille 13) - quantity: enough for dress/skirt and accents
  • 03
    Polyester fiber fill stuffing - sufficient to stuff body, head, limbs firmly
  • 04
    Brown embroidery thread - small amount for eyebrows and muzzle
  • 05
    Pink embroidery thread - small amount for nose
  • 06
    White thread - small amount for head sculpting

β€” Tools Required

  • 01
    Crochet hook 5 mm
  • 02
    Safety eyes 14 mm (2 pcs)
  • 03
    Scissors
  • 04
    Yarn needle for sewing and weaving ends
  • 05
    Stitch markers
  • 06
    Polyester stuffing (fiber fill)
  • 07
    Embroidery needle and threads (brown, pink, white) for facial details
  • 08
    Pins for assembly (optional)

Progress Tracker

0% Complete

β€” Arms :

Info :

Crochet with white yarn. Stuff only 2/3 of the arm.

Round 1 :

6 sc into a magic ring (6)

Round 2 :

6 inc (12)

Round 3 :

(3 sc, inc) * 3 (15)

Round 4-5 :

15 sc (2 rounds)

Round 6 :

(3 sc, dec) * 3 (12)

Round 7-14 :

8 sc (8 rounds)

Round 15 :

(4 sc, dec) * 2 (10)

Round 16 :

10 sc

Info :

Fold the arm in half and crochet 5 sc through both sides. Fasten off and cut the yarn, leaving a tail for sewing.

Info :

Sew the arms two rounds under the beginning of the head.

β€” Legs :

Info :

Crochet with white yarn. Stuff as you go.

Round 1 :

7 sc into a magic ring (7)

Round 2 :

7 inc (14)

Round 3 :

(sc, inc) * 7 (21)

Round 4-5 :

21 sc (2 rounds)

Round 6 :

7 sc, 4 dec, 6 sc (17)

Round 7 :

7 sc, 2 dec, 6 sc (15)

Round 8-10 :

15 sc (3 rounds)

Round 11 :

(4 sc, inc) * 3 (18)

Round 12 :

18 sc

Round 13 :

For the left leg: crochet only 14 sc Fasten off, cut the yarn.

Round 13 :

For the right leg: 18 sc Don't cut the yarn, we will continue with the body:

β€” Body :

Round 1 :

Crochet 7 sc on the right leg; make 3 chains; 18 sc on the left leg; 3 sc on the chain; 18 sc on the right leg ; 3 sc on the chain; put the marker here (42)

Round 2 :

(6 sc, inc) * 6 (48)

Round 3-6 :

48 sc (4 rounds). Change the yarn to pink color:

Round 7 :

48 sc

Round 8 :

back loops only: 48 sc

Round 9 :

(6 sc, dec) * 6 (42)

Round 10-11 :

42 sc (2 rounds)

Round 12 :

(5 sc, dec) * 6 (36)

Round 13-14 :

36 sc (2 rounds)

Round 15 :

(4 sc, dec) * 6 (30)

Round 16-17 :

30 sc (2 rounds)

Round 18 :

(3 sc, dec) * 6 (24)

Round 19 :

24 sc

Round 20 :

(6 sc, dec) * 3 (21)

Info :

Stuff the body firmly, especially in the neck. Cut the pink yarn, we will continue with the head, but first, we need to make the dress.

β€” Skirt :

Info :

Attach the pink yarn to the back of the body in the front loops of round 8. Crochet with the body turned upside down:

Round 1 :

(2 dc in one stitch) * 48 (96)

Round 2 :

96 dc Fasten off, and cut the yarn. Hide the thread inside the body.

β€” Head :

Info :

Change the yarn to white color. Stuff as you go.

Round 1 :

21 sc

Round 2 :

21 inc (42)

Round 3 :

(6 sc, inc) * 6 (48)

Round 4 :

(7 sc, inc) * 6 (54)

Round 5-9 :

54 sc (5 rounds) Insert the safety eyes between rounds 8 and 9 with 8 st between them.

Round 10 :

(7 sc, dec) * 6 (48)

Round 11-13 :

48 sc (3 rounds)

Round 14 :

(6 sc, dec) * 6 (42)

Round 15 :

42 sc

Round 16 :

(5 sc, dec) * 6 (36)

Round 17 :

(4 sc, dec) * 6 (30)

Round 18 :

(3 sc, dec) * 6 (24)

Round 19 :

(2 sc, dec) * 6 (18)

Round 20 :

(sc, dec) * 6 (12)

Round 21 :

6 dec (6)

Info :

Make sure that the head is stuffed firmly. Close the opening and hide the yarn inside. Head sculpting

β€” Ears :

Info :

Crochet with white yarn.

Round 1 :

6 sc into a magic ring (6)

Round 2 :

6 inc (12)

Round 3 :

(sc, inc) * 6 (18)

Round 4 :

(2 sc, inc) * 6 (24)

Round 5-6 :

24 sc (2 rounds)

Round 7 :

(6 sc, dec) * 3 (21)

Round 8 :

(5 sc, dec) * 3 (18)

Round 9 :

(4 sc, dec) * 3 (15)

Round 10-12 :

15 sc (3 rounds) Fasten off and cut the yarn, leaving a tail for sewing.

Info :

Fold the ear in half and sew the ends together. Sew the ears on the top of the head with 4 stitches between them.

Assembly Instructions

  • Fold each arm in half and crochet 5 sc through both sides to close the wrist; fasten off leaving a long tail and sew the arms two rounds under the beginning of the head.
  • Attach the legs to the body by crocheting 7 sc on the right leg, make 3 chains, join left leg and continue as instructed; place a marker at the join to mark the beginning of the round.
  • Attach the skirt by joining pink yarn into the front loops of round 8, work the skirt rounds with the body turned upside down and hide ends inside the body.
  • Insert safety eyes between rounds 8 and 9 of the head with 8 stitches between them; embroider eyebrows, muzzle and nose with brown and pink threads after attaching eyes.
  • Sew ears on top of the head with 4 stitches between them, fold each ear and sew the edges together for shape; finish by head sculpting with white thread and hide ends.

Important Notes

  • πŸ’‘Use stitch markers to keep track of the beginning of rounds and the join between legs and body.
  • πŸ’‘Stuff firmly as you go, especially in the neck and head, to ensure a stable shape and neat assembly.
  • πŸ’‘Change yarn color where indicated and hide yarn tails inside the body to keep the finish tidy.
  • πŸ’‘Insert safety eyes before closing the head and ensure they are securely fastened before continuing.
  • πŸ’‘Fold and pin parts before sewing to check placement and symmetry.

This Lily Bunny is the perfect handmade companion, full of soft chenille charm and a ruffled skirt that adds playful flair. Make one for a nursery decor or a heartfelt gift β€” each stitch brings a smile. Happy crocheting and enjoy creating your own cuddly friend! 🧢🧸

You ask,

we answer.

FAQs

What size will the finished piece be?

The finished amigurumi measures approximately 35 cm tall when using the recommended chenille sport yarn and 5 mm hook.

Can I use different yarn weights for this pattern?

Yes, you can use different yarn weights, but this will affect the final size; adjust your hook accordingly and note that chenille gives a plush texture different from standard yarns.

Do I need prior crochet experience for this pattern?

This pattern is rated intermediate, so basic knowledge of single crochet, increases, decreases, and working in rounds is recommended for best results.

How long does this project typically take to complete?

Most crocheters complete this project in 5-7 hours, though time may vary based on experience level and working pace.

When should I insert the safety eyes?

Insert the safety eyes between rounds 8 and 9 of the head, leaving 8 stitches between them, before closing the head so they can be secured properly.