🧢 Beautiful ✨ Detailed πŸ’ Adorable

Crochet Hook Holder Pattern

Crochet Hook Holder Pattern
4.1β˜… Rating
2-3 Hours Time Needed
2.7K Made This
βœ‚οΈ

Beginner Friendly Level

Perfect for those just starting their crochet journey, with clear instructions and simple techniques

⏱️

Bite-Sized Project

Finishes in 2-4 hoursβ€”perfect for an afternoon of creative relaxation.

✨

Stylish Touch

An elegant detail to elevate any look, combining traditional techniques with contemporary design sensibilities.

About This Crochet Hook Holder Pattern

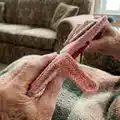
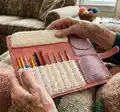
This pattern creates a practical crochet hook holder with multiple pockets, a hook protector flap, and a secure closure. It uses simple single crochet rows so you can focus on assembly and fit. The finished holder rolls up like a book for easy storage and travel. It's perfect for organizing hooks of varying sizes and keeping tools tidy.

Crochet Hook Holder Pattern crochet pattern - detailed view of completed project

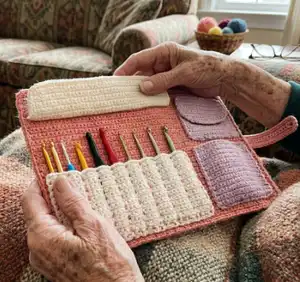
Made with Cotton Cakes yarn in soft pastel tones, the pattern is fast to work up and customizable. You can adjust pocket counts and sizes to fit your personal collection.

Why You'll Love This Crochet Hook Holder Pattern

I absolutely love this pattern because it turns simple stitches into a highly functional, beautiful organizer. I enjoy the satisfaction of assembling each pocket and seeing everything fit perfectly together. The design lets me customize pocket sizes for different brands of hooks, which is something I use every day. Creating something both pretty and practical gives me joy, and I hope you'll feel the same when you finish yours.

Crochet Hook Holder Pattern step 1 - construction progress Crochet Hook Holder Pattern step 2 - assembly progress Crochet Hook Holder Pattern step 3 - details and accessories Crochet Hook Holder Pattern step 4 - final assembly and finishing

Switch Things Up

I love changing the color palette to create different moods for this hook holder; try bold, contrasting shades for a modern look or soft pastels for a calming kit.

I sometimes use a bulkier yarn and a larger hook to make a chunky, cushy holder that's extra protective for delicate hooks.

I also make mini versions by reducing the chain lengths and the number of pocket rows to create compact keychain-sized holders.

I add a fabric lining inside the pockets for extra durability when I use metal hooks that might catch on stitches.

I swap the snap fasteners for buttons or a leather strap for a more rustic or vintage finish depending on the recipient's style.

I adjust pocket counts and widths based on my hook collectionβ€”adding extra columns or combining two slots into one for interchangeable tools.

I often embroider a small label or initials onto the outer layer to personalize the holder as a handmade gift.

I recommend testing pocket spacing with the widest and narrowest hooks you own and then sewing separator lines accordingly to avoid surprises.

For a fancier finish I use a decorative edge around the outer layer with a contrasting color to make the holder pop visually.

I sometimes add a small zippered pocket between layers to stash small notions like stitch markers or tapestry needles safely away.

Common Mistakes & How to Fix Them

βœ— Not testing hook spacing before sewing can result in pockets that are too tight or too loose; insert your tallest hooks and mark the spacing before stitching the separator lines. βœ— Skipping the fasten off step for each pocket can leave loose ends that come undone; fasten off each piece securely and weave in ends as you go to keep things tidy. βœ— Sewing pockets without pinning first may cause misalignment between layers; pin or baste pieces in place on the inner layer before sewing permanently to ensure correct placement. βœ— Using inconsistent tension while making the layers will distort the finished dimensions; maintain even tension throughout and check your gauge occasionally to keep sizes accurate.

Crochet Hook Holder Pattern

Make a neat, portable crochet hook holder to organize your hooks and notions. This pattern teaches you how to crochet pockets, a hook protector flap, and a closure for a tidy roll-up case. You'll love the practical design and simple single crochet construction that makes assembly quick and rewarding. Perfect for gifting or keeping your hooks in one stylish place.

Beginner Friendly 2-3 Hours

Materials Needed for Crochet Hook Holder Pattern

β€” Main Fabric

  • 01
    Yarnspirations Cotton Cakes Yarn (530yd/250g) - Lilac (less than 1 skein)
  • 02
    Yarnspirations Cotton Cakes Yarn (530yd/250g) - Watermelon (less than 1 skein)
  • 03
    Yarnspirations Cotton Cakes Yarn (530yd/250g) - Cream (less than 1 skein)

β€” Tools Required

  • 01
    Crochet hook size 4.0 mm
  • 02
    Scissors
  • 03
    Tapestry needle
  • 04
    Optional: Sew-on snap fasteners (used ones made by Singer)

Progress Tracker

0% Complete

β€” Instructions :

Info :

You can crochet each part separate from each other and then sew them all together at the end.

β€” Outer large pocket/layer :

Instruction :

Using the color Lilac, Ch 84

R1 :

starting from the 2nd ch from the hook: 1 sc in each ch, turn (83sts)

R2 - 52 :

1 sc in each st, turn

Info :

Fasten off.

β€” Inner layer :

Instruction :

Using the color Watermelon, Ch 84

R1 :

starting from the 2nd ch from the hook: 1 sc in each ch, turn (83sts)

R2 - 49 :

1 sc in each st, turn

Info :

Fasten off.

β€” Right bottom pocket :

Instruction :

Using the color Lilac, Ch 21

R1 :

starting from the 2nd ch from the hook: 1 sc in each ch, turn (20sts)

R2 - 25 :

1 sc in each st, turn

Info :

Fasten off.

β€” Right top pocket :

Instruction :

Using the color Lilac, Ch 21

R1 :

starting from the 2nd ch from the hook: 1 sc in each ch, turn (20sts)

R2 - 16 :

1 sc in each st, turn

Info :

Fasten off.

β€” Right top pocket closure :

Instruction :

Using the color Lilac, Ch 21

R1 :

starting from the 2nd ch from the hook: 1 sc in each ch, turn (20sts)

R2 - 8 :

1 sc in each st, turn

R9 - 12 :

1 sc dec, sc in each st, until the last 2 sts, 1 sc dec turn

Info :

Fasten off.

β€” Hook pocket :

Instruction :

Using the color Cream, Ch 47

R1 :

starting from the 2nd ch from the hook: 1 sc in each ch, turn (46sts)

R2 - 25 :

1 sc in each st, turn

Info :

Fasten off.

β€” Hook protector flap :

Instruction :

Using the color Cream, Ch 47

R1 :

starting from the 2nd ch from the hook: 1 sc in each ch, turn (46sts)

R2 - 14 :

1 sc in each st, turn

Info :

Fasten off.

β€” Outside closure loop :

Instruction :

Using the color Lilac, Ch 9

R1 :

starting from the 2nd ch from the hook: 1 sc in each ch, turn (8sts)

R2 :

1 sc in each st

Info :

Fasten off.

β€” Outside closure :

Instruction :

Using the color Lilac, Ch 36

R1 :

starting from the 2nd ch from the hook: 1 sc in each ch, turn (35sts)

R2 - 4 :

1 sc in each st, turn

Info :

Fasten off.

β€” Finishing the Crochet Hook Holder :

Info :

Sew the right bottom pocket to the inner layer. Then sew the top right pocket with flap to the inner layer as well. Next sew the hook pocket to the bottom left corner of the inner layer. Insert your tallest hook so you can see where to sew the protector flap to the inner layer. Finally, sew hook separator lines using a running stitch to the hook pocket in the distance you need for your hooks. Each brand has different hook measurements. So make sure to test it out. I made some smaller hook pockets for thinner hooks (Tunisian hooks) and some larger ones (Furls Hooks). Next, sew the outer layer to the inner layer and the closure loop and closure flap also to the outer layer. Finally I added (sewn with cotton thread) snap fasteners to the closure snap and top right pocket. You can also add snap fasteners for the back pocket (between outer and inner layer) to prevent your patterns/papers/magazines to fall out. Weave in any left-over ends.

Assembly Instructions

  • Sew the right bottom pocket to the inner layer, aligning the bottom edge and securing with small whipstitches so the pocket sits flush.
  • Sew the top right pocket with its flap to the inner layer, positioning it above the bottom pocket and ensuring the flap closure aligns with the outer closure loop.
  • Sew the hook pocket to the bottom left corner of the inner layer and insert your tallest hook to mark where to attach the hook protector flap.
  • Sew hook separator lines across the hook pocket using a running stitch to create individual spaces sized to your hooksβ€”test with different hooks first.
  • Sew the outer layer to the inner layer, then attach the outside closure loop and the outside closure flap to the outer layer; add snap fasteners to the closure and top pocket if desired.

Important Notes

  • πŸ’‘Each brand has different hook measurements, so test spacing with your actual hooks before stitching separator lines to ensure a proper fit.
  • πŸ’‘Make some smaller or larger hook pocket columns if you use specialty hooks such as Tunisian or larger Furls hooks to accommodate different sizes.
  • πŸ’‘Add snap fasteners between the outer and inner layers for a back pocket if you plan to store patterns or magazines and want to prevent them from falling out.
  • πŸ’‘Weave in any leftover ends and securely fasten all sewn seams to ensure pockets hold up to regular use and travel.

This Crochet Hook Holder Pattern is designed to keep your tools tidy and travel-ready. Roll it up like a little book and take your hooks wherever you go. Personalize the pockets and colors to make it uniquely yours. 🧢✨

You ask,

we answer.

FAQs

What size will the finished piece be?

The finished holder measures approximately 10.75 x 15 inches when open and 10.75 x 8 inches when closed, using the recommended yarn and hook size.

Can I use a different yarn weight for this pattern?

Yes, you can use different yarn weights, but the final size and pocket spacing will change; adjust your chain counts and check spacing with your hooks before sewing.

Do I need advanced crochet skills for this pattern?

No, this pattern is rated Beginner Friendly and primarily uses single crochet rows and simple sewing techniques, making it accessible for new crocheters.

How do I customize pocket sizes for my hooks?

Test-fit your hooks on the hook pocket and mark separator lines where needed; you can add or remove rows or columns to make pockets wider or narrower.