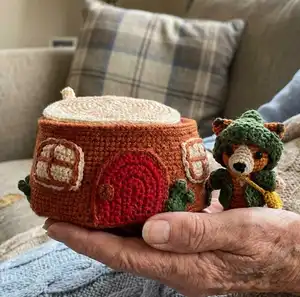
Create a tiny, handcrafted Mr. Fox and his cozy tree-stump house using fine Curio size 10 thread. This pattern guides you step-by-step through crocheting the fox, clothing, tiny accessories, and the detailed stump house so you can make a complete set that looks like it walked out of a storybook. You will enjoy detailed photos and clear instructions for assembly and finishing.
Progress Tracker
0% Complete
— Head :
Round 1 :
with A 8 sc in a mr - 8 sts
Round 3 :
(sc, inc) x 8 - 24 sts
Round 4 - 5 :
sc around - 24 sts (2 rounds)
Round 6 :
1 sc in 4 sts, inc in next 4 sts, 1 sc in 8 sts, inc in next 4 sts, 1 sc in last 4 sts - 32 sts
Round 7 - 9 :
sc around - 32 sts (3 rounds)
Round 10 :
(2 sc, dec) x 8 - 24 sts
Round 11 :
(sc, dec) x 8 - 16 sts
Info :
Stuff the head. You may need to stuff more before finishing Round 12.
— Body :
Info :
Continue with the body from where you stopped with the head (work in spiral).
Round 13 :
(sc, inc) x 4 - 12 sts
Round 14 :
(2 sc, inc) x 4 - 16 sts
Info :
In Round 15, we will start the body and leave space for the arms. Refer to Picture 1B and Picture 1C.
Round 15 :
1 sc in 3 sts; ch 2 and sk 3 sts; 1 sc in 5 sts; ch 2 and sk 3 sts; 1 sc in 2 sts - 14 sts (incl the 4 ch)
Info :
In Round 16, crochet in the BLO of the 4 chains (we will need the front loops to make the arms later) and in both loops of the rest of the stitches.
Round 16 :
(6 sc, inc) x 2 - 16 sts
Round 17 :
(3 sc, inc) x 4 - 20 sts
Round 18 - 20 :
sc around - 20 sts (3 rounds)
Info :
Stuff the body. Leave 7 stitches on either side for legs and mark with thread the middle six (3 at the front and 3 at the back) with thread. Make sure the spaces you leave for legs align with the spaces you left for the arms earlier.
— Leg 1 :
Info :
Continue with the 1st leg from where you stopped with the body.
Round 1 :
1 sc until the 1st stitch marker. Insert hook in same stitch as last sc and in the stitch on the other side. Pictures 1F and 1G. 1 sc. Sc until the end of Round 1. You should have 7 sts.
Round 2 - 3 :
sc around - 7 sts
Info :
Change color - Natural
Round 4 :
sc around - 7 sts
Round :
LEG 2 is made the same way as LEG 1. Join thread at the back of the fox and follow instructions for LEG 1. When you finish both legs, stuff lightly, finish off, and secure the stitches. Sew the 6 stitches between the legs.
— Arms (x 2) :
Info :
The arms are made in the 2 chains and 3 skipped stitches we left earlier. Join Clementine to any one of the stitches you left for arms. Picture 1I. Crochet tight especially in the first round. The arms are not stuffed.
Round 1 :
1 sc in each ch and st - 5 sts
Round 2 - 4 :
sc around - 5 sts
Info :
Change color - Natural
Info :
Fasten off, finish off, and secure the stitches.
— Tail :
Round 1 :
with Natural 6 sc in a mr
Round 2 :
(sc, inc) x 3 - 9 sts
Round 3 :
(2 sc, inc) x 3 - 12 sts
Info :
Change color - Clementine
Round 4 - 6 :
sc around - 12 sts (3 rounds)
Round 7 :
(2 sc, dec) x 3 - 9 sts
Round 8 :
(sc, dec) x 3 - 6 sts
Info :
Fasten off leaving a long tail for sewing
— Muzzle :
Info :
Join rounds with a slip stitch and ch 1.
Round 1 :
with Natural 8 sc in a mr - 8 sts
Round 2 :
(sc, inc) x 4 - 12 sts
Round 3 :
5 sl st, 1 hdc and 1 dc in next st, 1 dc and 1 hdc in next st, 5 sl st
Info :
Fasten off leaving a long tail for sewing and embroidery.
— Ears (x 2) :
Info :
With Clementine, ch 6
Row 1 :
1 sc in 2nd ch from hook, sc until end of row; ch 1 and turn - 5 sts
Row 2 :
dec, sc, dec; ch 1 and turn - 3 sts
Row 3 :
sc in each; ch 1 and turn - 3 sts
Row 4 :
sc3tog; ch 1 and turn - 1 st
Info :
Now go around the ear and sc in each row and stitch. 2 sc in each of the bottom corners and join with a sl st at the top. Your ending tail will be on top. Leaving a long tail for sewing, fasten off and weave in that top tail to bring it to one of the bottom corners of the ear. We will use that tail to sew the ears to the head.
— Assembly (face & head) :
Info :
NOTE: While sewing the pieces together, experiment with eye size. I used 4 mm in some pictures and 3 mm in others; the 3 mm look better at the end.
Item Name (Muzzle Sewing) :
The top (where we did hdc and dc) is sewn in the space between Rounds 5 and 6 and the bottom - in the space between Rounds 11 and 12. Before finishing, stuff the muzzle as much as you can. Once you are done sewing the muzzle, create a little triangle right above with the tail left from sewing. Only sew the dc stitches of the muzzle. Once you create the little triangle, sew a line going up 3 rounds from the top of the triangle. (Picture 2G) I sewed twice. Secure the stitches.
Item Name (Nose) :
Create a little triangle with black thread. Then keep sewing until you fill it completely.
Item Name (Ears placement) :
The ears are sewn at an angle. The top is sewn between Rounds 2 and 3 and the bottom is sewn between Rounds 6 and 7. If the ears are leaning forward, insert the needle through the round of the ear right above the one that we attached to the head and pulling back sew it to the head to bring the ears back up. I used a permanent fabric marker to add the black to the top of the ears. You can also sew it.
Item Name (Tail attachment) :
Sew the tail to close (Picture 2M) and then sew the tail to the back of the body, about 3 spaces above the legs. Picture 2N
Item Name (Chest) :
Using color Natural, cross stitch the chest area. Do 3 cross stitches on Round 14 of the body and 1 cross stitch in Round 15.
— PART 2: Tail, Ears, and Muzzle :
Info :
Tail, muzzle and ears instructions are above. Follow photos for placement and sewing techniques (Pictures 2A - 2Q).
— Jacket :
Info :
With Jalapeno, ch 13
Row 1 :
2 sc in 2nd ch from hook, 2 sc in each st until end of row; ch 1 and turn - 24 sts
Row 2 :
4 sc; ch 2 and sk 5 sts; 6 sc; ch 2 and sk 5 sts; 4 sc; ch 1 and turn - 18 sts (including the 4 chains)
Row 3 :
sc in each st and ch (in BLO of chains); ch 1 and turn - 18 sts
Row 4 :
(2 sc, inc) x 6; turn but do not ch - 24 sts
Row 5 :
sl st until the end of row
Info :
Fasten off and weave in the ends.
— Sleeves (x 2) :
Info :
Earlier we left 2 chains and 5 stitches to make the sleeves. Additionally, on both sides where the chain meets a stitch, there is an extra space. Crochet in that space too. Make sure the sleeves are exactly 10 stitches in each round (total of 3).
Instruction :
Join Jalapeno to one of the chains and 1 sc in that chain. Round 1: 1 sc in each ch, st and space (there should be 2 spaces in each side of the ch where it meets the 5 skipped sts); 1 sc in the same ch where you joined earlier (we already made 1 sc there); sl st to join and ch 1 - 10 sts
Round 2 :
sc around; sl st to join and ch 1 - 10 sts
Round 3 :
sc around; sl st to join - 10 sts
Info :
Note: If the sleeves seem too short, add another round. Fasten off.
— Hat :
Back Piece :
Leave a long beginning tail and ch 13 with Jalapeno
Row 1 :
1 sc in 2nd ch from hook; sc in each; ch 1 and turn - 12 sts
Row 2 :
sc in each st; ch 1 and turn - 12 sts
Row 3 :
sc, dec, 6 sc, dec, sc; ch 1 and turn - 10 sts
Row 4 :
sc, dec, 4 sc, dec, sc; ch 1 and turn - 8 sts
Row 5 :
sc, dec, 2 sc, dec, sc; ch 1 and turn - 6 sts
Row 6 :
sc in each st; ch 1 and turn - 6 sts
Row 7 :
sc, 2 dec, sc ch 1 and turn - 4 sts
Row 8 :
2 dec; ch 1 and turn - 2 sts
Row 9 :
sc in each st; ch 1 and turn - 2 sts
Info :
Fasten off and weave in the end tail. Set aside.
Front Piece :
Leave a long beginning tail and ch 17 with Jalapeno
Row 1 :
1 sc in 2nd ch from hook; sc in each; ch 1 and turn - 16 sts
Row 2 :
sc in each st; ch 1 and turn - 16 sts
Row 3 :
sc, dec 10 sc dec, sc ch 1 and turn - 14 sts
Row 4 :
sc, 2 dec; 4 sc; 2 dec, sc ch 1 and turn - 10 sts
Row 5 :
10 sc; ch 1 and turn - 10 sts
Row 6 :
sc, dec; 4 sc; dec, sc; ch 1 and turn - 8 sts
Row 7 :
sc, dec; 2 sc; dec, sc; ch 1 and turn - 6 sts
Row 8 :
sc, 2 dec, sc; ch 1 and turn - 4 sts
Info :
Fasten off leaving a tail for sewing. Set aside.
Brim :
With Jalapeno ch 5. Rows 1 - 18: hdc in BLO; ch 2 and turn - 3 sts (add more rows if it seems it won't fit around the hat). Fasten off leaving a tail for sewing.
— Pom-Pom :
Round 1 :
with Jalapeno 6 sc in a mr; sl st to join and ch 1 - 6 sts
Round 2 :
6 inc; sl st to join and ch 1 - 12 sts
Round 3 - 4 :
sc around; sl st to join and ch 1 - 12 sts
Info :
Stuff well before finishing next round.
Round 5 :
6 dec; sl st to join - 6 sts
Info :
Fasten off leaving a tail for sewing.
— Bag :
Round 1 :
4 sc, 3 sc in last ch; going around the ch 3 sc and 2 sc in last ch; sl st to join and ch 1 - 12 sts
Round 2 - 3 :
sc around; sl st to join and ch 1
Round 4 :
sc around; sl st to join
Info :
Fasten off leaving a long tail for the handle. Handle: ch 16 (place on fox to check length). Fasten off and weave in the ends.
— PART 1: Inside Wall / Tree Stump House Base :
Info :
BASE (x 2). Join rounds with a slip stitch and chain 1. Round 1: with natural 8 sc in a mr - 8 sts
Round 3 :
(sc, inc) x 8 - 24 sts
Round 4 :
(2 sc, inc) x 8 - 32 sts
Round 5 :
(3 sc, inc) x 8 - 40 sts
Round 6 :
(4 sc, inc) x 8 - 48 sts
Round 7 :
(5 sc, inc) x 8 - 56 sts
Round 8 :
(6 sc, inc) x 8 - 64 sts
Round 9 :
(7 sc, inc) x 8 - 72 sts
Round 10 :
(8 sc, inc) x 8 - 80 sts
Round 11 :
(9 sc, inc) x 8 - 88 sts
Round 12 :
(10 sc, inc) x 8 - 96 sts
Round 13 :
(11 sc, inc) x 8 - 104 sts
Info :
After finishing the first circle, fasten off and weave in the ends. Trace the circle on a piece of plastic (yogurt container, for example). Do not fasten off thread from the second circle. We will continue with the walls from where we stopped in Round 13.
This tiny Mr. Fox and his Tree Stump House pattern brings a miniature storybook scene to life with delicate stitches and tiny accessories. Whether you make one for yourself or as a thoughtful gift, the finished set is bursting with personality and handcrafted charm. You will enjoy the detailed finishing steps and the joy of assembling such a sweet little world. 🧶🐾🍄