🧢 Beautiful ✨ Detailed πŸ’ Adorable

Field of Daisies Crochet Blanket Pattern

Field of Daisies Crochet Blanket Pattern
4.1β˜… Rating
12-15 Hours Time Needed
2.4K Made This
βœ‚οΈ

Beginner Friendly Level

Perfect for those just starting their crochet journey, with clear instructions and simple techniques

⏱️

Multi-Day Project

A rewarding 12+ hour journeyβ€”perfect for dedicated crafters who love detailed work.

πŸ€—

Soft Hug

Gentle, plush, and full of warmth, creating a sense of comfort and coziness wherever they find a home.

About This Field of Daisies Crochet Blanket Pattern

This pattern teaches you how to crochet 120 floral motif squares and assemble them into a bright blanket measuring approximately 57" x 68". It combines classic crochet stitches with a fun daisy motif and optional stuffed flower pompoms for the corners. Clear motif rounds, color assignments, and an assembly diagram make construction straightforward.
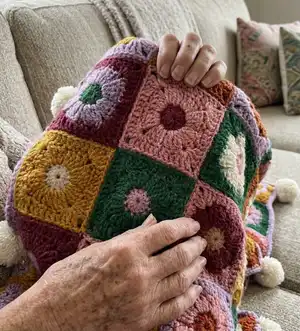
Field of Daisies Crochet Blanket Pattern crochet pattern - detailed view of completed project

Perfect for using up colorful yarn bits, the blanket is finished with a tidy hdc border and four floral pompoms. The pattern includes full motif rounds, edging instructions, and an assembly chart for accurate placement.

Why You'll Love This Field of Daisies Crochet Blanket Pattern

I absolutely love this pattern because it brings joyful color and texture to an everyday blanket using simple motif construction. I adore how the daisy center and petal rounds create instant floral charm without complicated shaping. The layout and assembly diagram make joining the motifs satisfying and quick, and the corner flower pompoms add a playful, handmade finishing touch. I also appreciate that this blanket works well with scrap yarn and encourages creative color play.

Field of Daisies Crochet Blanket Pattern step 1 - construction progress Field of Daisies Crochet Blanket Pattern step 2 - assembly progress Field of Daisies Crochet Blanket Pattern step 3 - details and accessories Field of Daisies Crochet Blanket Pattern step 4 - final assembly and finishing

Switch Things Up

I love changing up the colors to make the blanket my own; try a pastel palette for a softer, nursery-friendly look or bold primaries for maximum impact.

Use leftover sport or DK yarn with an appropriate hook for a lighter, more delicate blanket, or choose a bulkier yarn and larger hook for a cozy, chunky throw.

I often alternate the color order in each motif to create a diagonal or checkerboard effect when assembling the blanket.

Swap the flower center color to metallic or variegated yarn for subtle shimmer and visual interest in each motif.

Instead of sewing motifs through the back loops only, try join-as-you-go variations to reduce finishing time and create a different join appearance.

Add a wider border by repeating the hdc rounds or incorporate a scalloped or picot edge for a decorative finish.

Customize the Flower Pompoms by using different stuffing amounts or using felt circles sewn inside to help hold shape sturdily.

I sometimes embroider simple stems or leaves across motifs with contrasting yarn to tie motifs into a garden theme.

Make smaller versions by reducing the number of motifs for baby-sized blankets, or increase motifs for larger throws or bedspreads.

If you want a reversible look, experiment with joining methods and color placement to produce an attractive back side as well.

Common Mistakes & How to Fix Them

βœ— Skipping the join through the back loops only for motifs can cause the seams to show on the right side; sew motifs together through the back loops only as instructed to hide seams. βœ— Not breaking or changing colors at the correct spot will tangle ends and misplace color positions; follow the color-change points exactly and break Color 1 where instructed to maintain neat joins. βœ— Failing to stuff the Flower Pompoms before finishing the fifth petal will make them limp and flat; stuff lightly before completing the last petal to retain shape. βœ— Ignoring gauge measurements will significantly change the finished blanket size and number of motifs; check the gauge of 12 sc and 15 rows = 4" and make adjustments to hook size if needed.

Field of Daisies Crochet Blanket Pattern

Create a cheerful Field of Daisies blanket featuring colorful crocheted square motifs joined into a cozy throw. This pattern uses medium weight yarn and clear motif instructions so you can mix and match bright contrast colors. Perfect for adding a handmade pop of color to a nursery, bedroom, or gifting to someone special.

Beginner Friendly 12-15 Hours

Materials Needed for Field of Daisies Crochet Blanket Pattern

β€” Main Fabric

  • 01
    Red Heart Super Saver (7 oz/198 g; 364 yds/333 m) - Medium (4) weight yarn
  • 02
    Contrast A Carrot (0256) - 2 balls or 545 yds/498.5 m
  • 03
    Contrast B Gold (0321) - 2 balls or 545 yds/498.5 m
  • 04
    Contrast C Paddy Green (0368) - 2 balls or 545 yds/498.5 m
  • 05
    Contrast D Pale Plum (0579) - 2 balls or 665 yds/608 m
  • 06
    Contrast E Soft White (0316) - 2 balls or 620 yds/567 m
  • 07
    Contrast F Light Raspberry (0774) - 2 balls or 545 yds/498.5 m

β€” Tools Required

  • 01
    Crochet hook size U.S. H/8 (5 mm) Susan Bates Silvalume or size needed to obtain gauge
  • 02
    Susan Bates yarn needle
  • 03
    Fiberfill stuffing for corner Flower Pompoms
  • 04
    Scissors
  • 05
    Stitch markers (recommended)

Progress Tracker

0% Complete

β€” Motifs :

Infos :

Measurements: Approx 57" x 68" [145 x 173 cm]. Gauge: 12 sc and 15 rows = 4" [10 cm]. Motif = 5Β½" [14 cm] square. Motif color assignments: Motif 1: With A as Color 1, F as Color 2, and E as Color 3 - make 20 Motifs. Motif 2: With B as Color 1, E as Color 2, and C as Color 3 - make 20 Motifs. Motif 3: With C as Color 1, D as Color 2, and B as Color 3 - make 20 Motifs. Motif 4: With D as Color 1, C as Color 2, and F as Color 3 - make 20 Motifs. Motif 5: With E as Color 1, B as Color 2, and A as Color 3 - make 20 Motifs. Motif 6: With F as Color 1, A as Color 2, and D as Color 3 - make 20 Motifs.

Info :

See Diagram.

Info :

With Color 1, ch 4. Join with sl st to first ch to form ring.

Round 1 :

Ch 3. 9 dc in ring. Join Color 2 with sl st to top of beg ch 3. Break Color 1. 10 dc.

Round 2 :

With Color 2, ch 3. 1 dc in first dc. *2 dc in next dc. Rep from * around. Join with sl st to beg of ch 3. 20 dc.

Round 3 :

Skip first dc. *(1 dc, 1 tr) in next dc. 3 tr in next dc. (1 tr, 1 dc) in next dc. Sl st in next dc. Rep from * around, ending by joining with sl st to top of ch-3. Fasten off.

Round 4 :

Join Color 3 with sl st to any centre tr of 3-tr group. Ch 1. 1 sc in same sp as sl st. *1 hdc in next tr. 1 dc in each of next 2 sts. 1 tr in same st as sl st from previous (3rd) rnd. 1 dc in each of next 2 sts. 1 hdc in next tr. 1 sc in next tr. Rep from * around, omitting last sc and joining with sl st to first sc.

Round 5 :

Ch 1. 1 sc in same sp as sl st. *1 hdc in next st. 1 dc in next st. 2 dc in next st. (1 tr, ch 1, 1 tr) in next st (corner made). 2 dc in next st. 1 dc in next st. 1 hdc in next st. 1 sc in each of next 3 sts. Rep from * around, ending with 1 sc in each of last 2 sts. Join with sl st to first sc. Fasten off.

β€” Flower "POMPOMS" :

Infos :

FLOWER "POMPOMS" (make 4). Flowers (make 2 for each Pompom). With B, ch 4. Join with sl st to first ch to form ring.

Round 1 :

Ch 3. 9 dc in ring. Join E with sl st to top of beg ch 3. Break B. 10 dc.

Round 2 :

With Color 2, ch 3. 1 dc in first dc. *2 dc in next dc. Rep from * around. Join with sl st to beg of ch 3. 20 dc.

Round 3 :

Skip first dc. *(1 dc, 1 tr) in next dc. 3 tr in next dc. (1 tr, 1 dc) in next dc. Sl st in next dc. Rep from * around, ending by joining with sl st to top of ch-3. Fasten off.

Round 4 :

Join Color 3 with sl st to any centre tr of 3-tr group. Ch 1. 1 sc in same sp as sl st. *1 hdc in next tr. 1 dc in each of next 2 sts. 1 tr in same st as sl st from previous (3rd) rnd. 1 dc in each of next 2 sts. 1 hdc next tr. 1 sc in next tr. Rep from * around, omitting last sc and joining with sl st to first sc. Fasten off.

β€” Assembly :

Info :

Sew Motifs tog through back loops only as shown in Assembly diagram on page 3.

Info :

Edging: 1st rnd (RS). Join D with sl st to any corner. Ch 2. Work 1 rnd of hdc evenly around all sides, working 3 hdc in each corner. Join with sl st to first hdc.

Round 2 :

Ch 2. 1 hdc in each hdc around, working 3 hdc in each corner hdc. Join with sl st to first hdc. Fasten off.

Flower Pompom Assembly :

With 2 Flowers held WS tog, join with sl st anywhere around edge. 1st rnd: Working through both thicknesses and back loops only, sl st around Flowers, stuffing lightly before completing 5th petal. Fasten off.

Info :

Sew one Flower Pompom to each corner of Blanket.

Info :

Notes: Ch 2 at beg of rnd does not count as st. Ch 3 at beg of rnd counts as dc.

Assembly Instructions

  • Sew motifs together through the back loops only following the printed assembly diagram so the front shows uninterrupted flower motifs.
  • Join the edging by joining Color D with a slip stitch at any corner, ch 2 and work 1 rnd of hdc evenly around, placing 3 hdc in each corner, then join with sl st.
  • Work the 2nd rnd of edging: ch 2, 1 hdc in each hdc around, with 3 hdc in each corner hdc; join with sl st and fasten off.
  • Make 4 Flower Pompoms by pairing two flower motifs WS together; join with slip stitch through both thicknesses and back loops only, stuff lightly before completing the final petal.
  • Sew one finished Flower Pompom to each corner of the blanket using a yarn needle and matching yarn, securing firmly with several passes.
  • Weave in all ends neatly on the WS and block the blanket lightly if desired to square and even the motif joins.

Important Notes

  • πŸ’‘Ch 2 at the beginning of a round does not count as a stitch; ch 3 at the beginning of a round counts as a dc.
  • πŸ’‘Sew motifs together through back loops only to keep the right side of the blanket clean and the motif centers uninterrupted.
  • πŸ’‘Stuff the Flower Pompoms lightly before completing the last petal so they keep their round shape without bursting through stitches.

This Field of Daisies blanket pattern brings sunshine and floral charm to any room. The repeating daisy motifs are bright and cheerful, perfect for gifting or decorating your own home. Make a cozy, handmade statement in playful color combos and finish with four cute flower pompoms. 🧢🌼

You ask,

we answer.

FAQs

What size will the finished piece be?

The finished blanket measures approximately 57" x 68" (145 x 173 cm) when made with the recommended yarn and hook size.

Can I use different yarn weights for this pattern?

You can use different yarn weights, but this will change the finished size and drape; check your gauge and adjust the hook size to achieve the gauge or change the number of motifs.

Do I need prior crochet experience for this pattern?

This pattern is rated beginner friendly; basic knowledge of chains, single crochet, half double crochet, double crochet, treble crochet, and slip stitch is recommended.

How long does this project typically take to complete?

Most crafters will spend around 12-15 hours on this blanket depending on experience, speed, and whether you make the optional pompoms.

How many motifs and colors are required?

The pattern uses six motif color combinations, with 20 motifs made of each combination for a total of 120 motifs; exact yarn amounts per listed contrast color are provided in the materials.