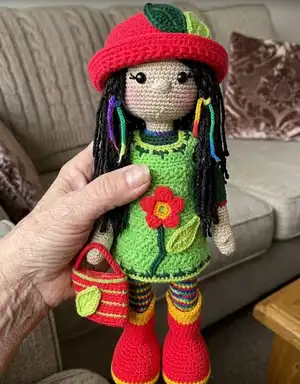
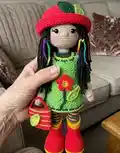
Create a charming 21-inch Emma crochet doll with this detailed intermediate amigurumi pattern. You will find step-by-step rounds, clear photos, and full assembly notes so you can make a beautiful, poseable doll with accessories. Choose your colors and personalize her dress, hair, and accessories for a unique handmade gift or keepsake. Enjoy the process and have fun bringing Emma to life stitch by stitch.
Progress Tracker
0% Complete
— Arms :
Info :
Make 2. Start with color A yarn. Crochet 4 chains. Begin working from the 2nd ch from the hook. Continue working around the foundation chain.
Round 1 :
2 sc, 3 sc in last ch, on the other side of the foundation chain, sc, inc [8]
Round 3 :
(inc, 3 sc) x 2 [10]
Round 4 :
(inc, 4 sc) x 2 [12]
Round 5 :
(inc, 5 sc) x 2 [14]
Round 7 :
3 ch, (continue working on the chain, beginning from the 2nd ch from the hook,), 2 sc, sc in the first st of Rnd 6, 13 sc, 2 sc in the foundation chain free loops [18]
Round 8 :
inc, 16 sc, inc [20]
Round 9 :
dec 3 sc together as 1 sc, 6 sc, dec 3 sc together as 1 sc, 5 sc, dec 3 sc together as 1 sc [14]
Round 10 :
dec, 10 sc, dec [12]
Info :
Stuff with fiberfill.
Round 13 :
(inc, 5 sc) x 2 [14]
Info :
Stuff with fiberfill as you go.
Info :
Invisible color change (2a) Do not forget to skip the color change ss in the next rnd.
Info :
Stuff with fiberfill as you go.
Info :
Finishing a piece worked on the round: Fasten off and weave in ends.
Info :
Work with color C. OCH = Overlay chain yarn over the material (4a)
Round 18B :
OCH 14 yarn over the material [14]
— Legs :
Info :
Make 2. Work with color D. Crochet 9 chains. Begin working from the 2nd ch from the hook. Continue working around the foundation chain.
Round 1 :
7 sc, 5 sc in last ch, turn to work on the other side of the foundation chain, 6 sc, 3 sc in last ch [21]
Round 2 :
7 sc, 5 inc, 7 sc, 2 inc [28]
Round 3 :
8 sc, (inc, sc) x 5, 7 sc, 3 inc [36]
Round 4 :
9 sc, (inc, 2 sc) x 5, 8 sc, inc, 2 sc, inc [43]
Round 5 :
14 sc, (inc, 3 sc) x 3, 12 sc, inc, 3 sc, inc [48]
Round 6 :
12 sc, inc, 13 sc, inc, 21 sc [50]
Info :
Using this sole as a pattern, cut out 1-2 mm smaller sole from cardboard or stiff plastic material (for a washable doll). Make 2.
Info :
Change to color B. Invisible color change.
Round 12 :
10 sc, (2 sc, dec) x 6, 16 sc [44]
Round 14 :
10 sc, (sc, dec) x 6, 16 sc [38]
Info :
Insert the cardboard/plastic sole inside the shoe.
Round 16 :
9 sc, 8 dec, 13 sc [30]
Round 17 :
5 sc, (dec, sc) x 6, 7 sc [24]
Info :
Regular color change (2b). Change to color C. Regular color change.
Round 18 :
BLO 6 sc, 2 dec, sc, 2 dec, 9 sc [20]
Section :
Right Leg: Rnds 19-48: 20 sc [20]. Stuff with fiberfill as you go. Rnd 49: (9 sc, inc) x 2 [22]. Rnd 50: 22 sc [22]. Fasten off and weave in ends.
Info :
Work with color D. Hook orientation top to bottom (5a). Rnd 7B: FLO 50 ss [50] Insert hook top to bottom. Fasten off and weave in ends. Rnd 8B: OCH 50 yarn over the material [50]. Fasten off and weave in ends.
Section :
Left Leg: Work rnds 1-49 as right leg. Rnd 50: 22 sc, 4 ch [26]. Make sure the chains coincide with the center of the inside part of the leg, you may need to work one additional stitch to reach the center. Do not cut the yarn. Make sure you finish both boots before continuing with the hip.
— Rain Boots :
Info :
Work with color B. Connect the yarn on rnd 17 first front loop. Hook orientation bottom to top (5b).
Round 18B :
FLO 24 sc [24] Insert hook bottom to top.
Round 19B :
(11 sc, inc) x 2 [26]
Round 21B :
6 sc, inc, 12 sc, inc, 6 sc [28]
Round 23B :
13 sc, inc, 13 sc, inc [30]
Round 25B :
14 sc, inc, 14 sc, inc [32]
Info :
Change to color D. Invisible color change. Rnd 27B: 32 sc [32]
Round 28B :
5 sc, 8 ch, skip 5 sts, 11 sc, 8 ch, skip 5 sts, 6 sc [38]
Round 29B :
5 sc, 10 sc around the chain, 11 sc, 10 sc around the chain, 6 sc [42]
Info :
Fasten off and weave in ends. Work with color B. Rnd 18C: OCH 24 yarn over the material [24] Fasten off and weave in ends. Rnd 17B: OCH 30 yarn over the material [30] Fasten off and weave in ends.
— Hips :
Info :
Connect chain with sc st to the interior middle side of right leg. Crochet in rounds.
Round 51 :
22 sc, 4 sc (in the chain), 22 sc, 4 sc (in the chain) [52]
Info :
Continue crocheting to the middle of the right leg, 11 sc. Rnd 52 starts at the middle of the right side of the hip.
Round 55 :
(dec, 24 sc) x 2 [50]
Round 57 :
(dec, 23 sc) x 2 [48]
Round 59 :
(dec, 22 sc) x 2 [46]
Round 61 :
(dec, 21 sc) x 2 [44]
Info :
Work with color C to the center of the right side of the waist, 1 sc. Rnd 63 starts at this point.
— Sweater :
Info :
Change to color F. Invisible color change.
Round 63 :
(21 sc, inc) x 2 [46]
Round 65 :
(22 sc, inc) x 2 [48]
Round 81 :
(22 sc, dec) x 2 [46]
Info :
Attach the arms in the next rnd. Pin the right arm on rnd 81, between sts 3 and 7. Pin left arm on rnd 81, between sts 26 and 30.
Round 82 :
2 sc, 5 sc (working together one right arm st with one torso st), 18 sc in the back, 5 sc (working together one left arm st with one torso st), 16 sc in the front [46]
Info :
Do not work on the sts in the armpit. You will work on the shoulder's sts, and torso's front and back sts from now on.
Round 83 :
2 sc, in the outside of the right arm (4 sc, inc, 4 sc), in the back 18 sc, in the outside of the left arm (4 sc, inc, 4 sc), in the front 16 sc [56]
Round 86 :
(26 sc, dec) x 2 [54]
Round 87 :
(7 sc, dec) x 6 [48]
Round 88 :
3 sc, in the right shoulder 5 dec, 14 sc, in the left shoulder 5 dec, 11 sc [38]
Round 89 :
2 sc, 4 dec, 5 sc, dec, 5 sc, 4 dec, 4 sc, dec, 2 sc [28]
Round 90 :
2 sc, 2 dec, 10 sc, 2 dec, 8 sc [24]
Round 91 :
(sc, dec) x 8 [16]
Info :
Keep working to the right shoulder center 3 sts. Rnd 92 starts at this point. Stuff the torso up to the shoulders.
— Neck :
Info :
Tip: To keep the head from tilting, insert a piece of a wide beverage straw into the neck and halfway into the head. Stuff around the straw.
Info :
Change to color A. Invisible color change.
Info :
Fasten off, pass the yarn tail through the loops of the last 8 stitches with the sewing needle, and pull to close the hole. Weave in ends.
— Dress :
Info :
Work with color E. Chain 68. Ss st connecting the last chain with the first one to make a circumference. Work in rounds.
Rounds 3-5 :
34 ws [34 ws]
Round 7 :
(15 sc, dec) x 4 [64]
Rounds 8-10 :
32 ws [32 ws]
Round 12 :
(14 sc, dec) x 4 [60]
Rounds 13-15 :
30 ws [30 ws]
Round 17 :
(8 sc, dec) x 6 [54]
Rounds 18-20 :
27 ws [27 ws]
Round 22 :
(7 sc, dec) x 6 [48]
Rounds 23-25 :
24 ws [24 ws]
Rounds 28-30 :
24 ws [24 ws]
Round 32 :
15 sc, 12 ch, skip 8 sts, 16 sc, 12 ch, skip 8 sts, sc [56]
Round 33 :
15 sc, 14 sc around the chain, 16 sc, 14 sc around the chain, sc [60]
Round 34 :
(8 sc, dec) x 6 [54]
Info :
Change to color F. Invisible color change.
Round 35 :
sc, dec, sc, spike, 3 sc, (spike, sc, dec, sc) x 9, spike [44]
Info :
Change to color G. Invisible color change.
Round 36 :
sc, (spike, 3 sc) x 10, spike, 2 sc [44]
Info :
Fasten off and weave in ends. Work with color F in the foundation chain free loops.
Round 1B :
(3 sc, spike) x 17 [68]
Round 2B :
sc, spike, (3 sc, spike) x 17 [68]
Info :
Fasten off and weave in ends.
— Flower :
Round 1 :
ch 5, ss in first chain to make a ring. Rnd 1: ch, 14 sc around the ring [14]
Info :
TRtog = 2 triple/treble together (9)
Round 2 :
ss in the first sc, 3 ch, (4 TRtog inserting the hook twice in the next sc and twice in the following st, 3 ch, ss in next st, 3 ch) x 3, 4 TRtog inserting the hook twice in the next sc and twice in the following st, 3 ch, ss in first rnd ch
Info :
Fasten off and weave in ends.
Info :
OCH = Overlay chain yarn under the material (4b). Pin the flower to the desired place in the dress and attach it using OCH 30 yarn under the material around the circle with color D. Make sure you feed the yarn from under the material.
— Leaf :
Info :
Work with color G. Chain 14. Begin from 2nd ch from the hook.
Round 1 :
3 sc, 2 hdc, 2 dc, tr, 2 dc, hdc, sc, 3 sc in last ch, continue working in the foundation chain back loops, sc, hdc, 2 dc, tr, 2 dc, 2 hdc, 3 sc [27]
Round 2 :
FLO 13 ss, inc ss, 13 ss [28]
Info :
Fasten off and weave in ends. Pin the leaf to the desired place in the dress and attach it using OCH through the leaf's center. Make sure you feed the yarn from under the material.
— Stem :
Info :
Embroider with color F and OCH yarn under the material a stem connecting the dress front bottom with the leaf and flower. The number of OCH will change depending on the placement of the flower. Double the stem thickness by passing a second time over the same stitches.
Info :
Put the dress on before attaching the head.
— Head :
Round 1 :
6 sc in ring [6]
Round 3 :
(sc, inc) x 6 [18]
Round 4 :
(sc, inc, sc) x 6 [24]
Round 5 :
(3 sc, inc) x 6 [30]
Round 6 :
(2 sc, inc, 2 sc) x 6 [36]
Round 7 :
(5 sc, inc) x 6 [42]
Round 8 :
(3 sc, inc, 3 sc) x 6 [48]
Round 9 :
(7 sc, inc) x 6 [54]
Round 10 :
(4 sc, inc, 4 sc) x 6 [60]
Rounds 11-23 :
60 sc [60] (13 Rnds)
Round 24 :
(4 sc, dec, 4 sc) x 6 [54]
Round 25 :
(7 sc, dec) x 6 [48]
Info :
Insert safety eyes in rnd 16 at the distance of 8 stitches from each other.
This Emma Doll pattern is a joyful mix of colorwork, texture, and personality that makes a wonderful handmade gift or keepsake. Put your own spin on the dress, hair, and accessories to create a truly unique friend. Have fun stitching, customizing, and sharing your finished doll with loved ones. 🧶✨