🧢 Beautiful ✨ Detailed πŸ’ Adorable

Bobby the Bighorn Sheep Amigurumi Pattern

Bobby the Bighorn Sheep Amigurumi Pattern
4.4β˜… Rating
2-3 Hours Time Needed
2.6K Made This
βœ‚οΈ

Intermediate Level

Ideal for those with basic crochet experience, featuring slightly more advanced stitches and techniques to expand your skills.

⏱️

Bite-Sized Project

Finishes in 2-4 hoursβ€”perfect for an afternoon of creative relaxation.

🧸

Cute Companion

An adorable friend to cherish, handcrafted with love to bring comfort and joy for years to come.

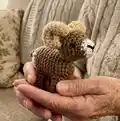
About This Bobby the Bighorn Sheep Amigurumi Pattern

This pattern makes a small, detailed bighorn sheep amigurumi with curled horns and tiny hooves. You will work the head, body, legs, tail and horns separately and assemble them for a clean finish. The design uses worsted weight yarn and basic amigurumi shaping techniques for a sturdy finished toy.

Bobby the Bighorn Sheep Amigurumi Pattern crochet pattern - detailed view of completed project

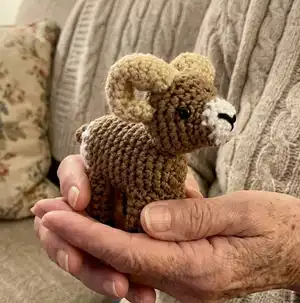
Clear round-by-round instructions are provided with placement notes for eyes and nose. Perfect as a gift or a collectible little animal to add to your handmade menagerie.

Why You'll Love This Bobby the Bighorn Sheep Amigurumi Pattern

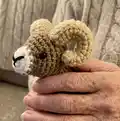
I absolutely love this pattern because it captures the character of a bighorn in a tiny, huggable form. I enjoy the little construction tricks like adding a penny for weight so the sheep stands nicely. The curled horns are a satisfying shaping challenge that really bring Bobby to life. Making several in different colors is one of my favorite ways to personalize the design.

Bobby the Bighorn Sheep Amigurumi Pattern step 1 - construction progress Bobby the Bighorn Sheep Amigurumi Pattern step 2 - assembly progress Bobby the Bighorn Sheep Amigurumi Pattern step 3 - details and accessories Bobby the Bighorn Sheep Amigurumi Pattern step 4 - final assembly and finishing

Switch Things Up

I love how easily this pattern adapts to different colors β€” I often swap the brown for greys or creams to make a little flock with varied shades.

I sometimes change yarn weight and hook size to create mini keychain versions or a larger plush; switching to DK yarn and a smaller hook makes adorable minis.

I add embroidered eyebrows or tiny felt ears for extra personality; these small details can change the expression dramatically.

Try different eye options β€” glass safety eyes for a shiny look or embroidered eyes for a fully soft toy if gifting to small children.

I have added a small length of thin wire inside the horns when I want them poseable β€” just be careful to secure the ends so they don't come loose.

For extra stability, I place a small washer or penny inside the body before final stuffing; it helps the toy stand on its own.

Make a family set by changing yarn colors slightly and adding tiny accessories like a scarf or bell β€” it makes a lovely coordinated gift.

I sometimes crochet longer legs or shorten them to play with proportions; altering rounds 6-7 of the legs changes stance and height.

Swap the horn color to a darker shade or felt-wrap the horns for a textured contrast; adding surface embroidery around the nose adds sweet character.

When sewing pieces on, I pin and test placement constantly β€” I recommend trying different positions before committing so you find the best balance and expression.

Common Mistakes & How to Fix Them

βœ— Skipping the color change at the precise stitch can ruin the nose shape; change colors on the last stitch as indicated so the white nose pieces align correctly. βœ— Not placing eyes in the recommended rows causes an unnatural face; place safety eyes between rows 5 & 6 and space them 8 stitches apart for best proportions. βœ— Understuffing the body and head leads to a floppy toy; stuff firmly and add the penny to the body as instructed to create a stable, well-shaped figure. βœ— Forgetting to change to black yarn for the hooves will lose the contrast; start the legs in black and switch to brown in the 5th stitch so the hooves are defined.

Bobby the Bighorn Sheep Amigurumi Pattern

Make your own little Bobby the Bighorn Sheep with this charming amigurumi crochet pattern. You will enjoy shaping the tiny head, curling horns and sewing the pieces together to create a stable little figure. The pattern is written in US terms and includes clear rounds, materials and assembly steps so you can recreate Bobby with confidence.

Intermediate 2-3 Hours

Materials Needed for Bobby the Bighorn Sheep Amigurumi Pattern

β€” Main Fabric

  • 01
    Worsted weight yarn (#4) - Brown (main body) - small amount
  • 02
    Worsted weight yarn (#4) - Beige (horns) - small amount
  • 03
    Worsted weight yarn (#4) - White (nose and tail detail) - small amount
  • 04
    Worsted weight yarn (#4) - Black (hooves and mouth stitching) - small amount
  • 05
    Fiber fill for stuffing
  • 06
    Small penny or similar coin for body weight (optional)

β€” Tools Required

  • 01
    Crochet hook size 3 mm (for horns only)
  • 02
    Crochet hook size 3.5 mm
  • 03
    6 mm black safety eyes (2 pieces)
  • 04
    Scissors
  • 05
    Stitch markers or stitch counter (if needed)
  • 06
    Sewing needle / yarn needle for sewing pieces and stitching mouth
  • 07
    Polyester stuffing (fiber fill)
  • 08
    Penny or small coin to add weight to body (optional)

Progress Tracker

0% Complete

β€” Supplies & Notes :

Infos :

3 mm crochet hook (for horns only). 3.5 mm crochet hook. 6 mm black safety eyes. Worsted weight yarn in beige, brown, white and black(for stitching on mouth). Fiber fill. Scissors. Stitch markers or stitch counter (if needed). Sewing needle.

Infos :

This pattern is made using US terms. The bighorn sheep can be made smaller by reducing the ply yarn you are using and the hook size. Crochet using a tight stitch and stuff generously so it keeps it shape.

β€” Crochet Abbreviations used in this pattern :

Info :

DEC- decrease. FO- Finish off. INC-increase. MC- Magic Circle. SC- single crochet. SL- Slip stitch.

β€” Head :

Info :

*Start using white yarn

Round 1 :

6 SC in MC (6)

Round 2 :

INC X 6 (12)

Info :

*on the last stitch change color to brown, the remainder of the head will be made using brown yarn.

Round 3 - 4 :

SC around (12)

Round 5 :

6 SC, 6 INC (18)

Round 6 :

SC around (18)

Round 7 :

(2SC, INC) X 6 (24)

Round 8 :

(3SC, INC) X 6 (30)

Info :

*Stop and put eyes in and using your needle stitch in the nose.

Round 9 :

SC around (30)

Round 10 :

(3SC, DEC) x 6 (24)

Round 11 :

(2SC, DEC) x 6 (18)

Info :

*stop and lightly stuff head

Round 12 :

(SC, DEC) x 6 (12)

Info :

*continue stuffing so head will stay nice and firm

Round 13 :

SC around (6)

Info :

*SL, close up hole and leave long tail of yarn for sewing onto body

Info :

**Eyes should be placed in between rows 5 & 6 and be 8 stiches apart. The top of the nose should start between rows 2 and 3 and the bottom should be in the middle of the original magic circle.

β€” Body :

Info :

*Use brown yarn

Round 1 :

6 SC in MC (6)

Round 2 :

INC X 6 (12)

Round 3 :

(SC, INC) X 6 (18)

Round 4 :

(2SC, INC) x 6 (24)

Round 5- 14 :

24 around (24)

Info :

*On last stitch change to white yarn. At this point you lightly stuff and add a penny inside to weigh it down.

Round 15 :

(2SC, DEC) x 6 (18)

Round 16 :

(SC, DEC) x 6 (12)

Info :

*stop and stuff generously so it will stay nice and firm

Round 17 :

DEC x 6 (6), SL and close up hole.

β€” Legs (Make 4) :

Info :

*Start off using black yarn

Round 1 :

5SC in MC (5)

Round 2 :

SC around in BLO (change to brown yarn in 5th stitch)

Round 3 :

INC, 4SC (6)

Round 4 :

SC around (6)

Round 5 :

(2 SC, INC) X 2 (8)

Round 6-7 :

SC around (8)

Info :

*SL, stuff with fiber fill and leave long tail for sewing onto body

β€” Tail :

Info :

*Use brown yarn

Round 1 :

Chain 4

Round 2 :

SC in 2nd chain from hook and next two stitches, SL in last stitch. Leave tail for sewing onto body.

β€” Horns (Make 2) :

Info :

*Use Beige Yarn & 3mm hook

Round 1 :

4SC in MC (4)

Round 2 :

3SC, INC (5)

Round 3 :

4SC, INC (6)

Round 4 :

6 around (6)

Round 5 :

(2 SC, INC) X 2 (8)

Round 6-7 :

SC around (8)

Round 8 :

(3SC, INC) X 2 (10)

Round 9 :

SC around (10)

Round 10 :

4SC, INC X 2 (12)

Round 11 :

12 around (12)

Round 12 :

(2 SC, DEC) X 3 (9)

Round 13 :

SC around (9)

Info :

*Finish off and leave a long tail for sewing onto head. Lightly stuff your horns.

β€” Assembly :

Item 1 (P1) :

Attach head to body between rows 4 and 5. Tail should be sewed on the back 2 rows up.

Item 2 (P1) :

Attach horns between rows 8 & 9 of the head. Looks pretty silly at this point. You will take the horns roll them backward and attach to head.

Item 3 (P1) :

Sew front legs between rows 4- 6. Back legs will go between rows 11- 13.

Item 4 (P1) :

Place safety eyes between rows 5 & 6 and space 8 stitches apart. Stitch nose and mouth details with black yarn using a sewing needle.

Info :

Now your little sheep should be all completed and standing on it’s own!

Assembly Instructions

  • Attach head to body between rows 4 and 5. Tail should be sewed on the back 2 rows up.
  • Attach horns between rows 8 & 9 of the head; roll each horn backward into a curl and sew securely to the head so the curl sits naturally.
  • Sew front legs between rows 4-6 and position them evenly; sew back legs between rows 11-13 ensuring spacing for balance.
  • Place safety eyes between rows 5 & 6 and space them 8 stitches apart; stitch the nose and mouth with black yarn using a sewing needle.
  • Weigh and shape the body by adding a penny and stuffing before closing to ensure the sheep stands steadily.

Important Notes

  • πŸ’‘This pattern is written using US crochet terms; check abbreviations before you start.
  • πŸ’‘Use a tight stitch and stuff generously for best shape and stability.
  • πŸ’‘Place the safety eyes between rows 5 and 6 and space them 8 stitches apart for proper facial proportions.
  • πŸ’‘Change yarn color on the last stitch as directed to ensure clean color transitions for the nose and tail.

This tiny Bobby the Bighorn Sheep is a delightful little amigurumi to make and gift. 🧢 Each curl of the horn and tiny hoof is a sweet detail that brings personality. Whether for a shelf, a keychain set, or a handmade gift, Bobby adds handcrafted charm to any space. πŸ‘βœ¨

You ask,

we answer.

FAQs

What size will the finished piece be?

The finished amigurumi measures approximately 8-11 cm tall depending on yarn tension and hook size; using worsted weight yarn and the recommended hooks will give the size shown.

Can I use different yarn weights for this pattern?

Yes, you can use different yarn weights, but this will affect the final size; if you use bulkier yarn, move up hook sizes and expect a larger sheep.

Do I need prior crochet experience for this pattern?

This pattern is rated intermediate because it includes shaping with increases and decreases and separate parts to sew together; basic knowledge of SC, INC, DEC, and working in BLO is recommended.

How long does this project typically take to complete?

Most crocheters complete this project in 2-3 hours, though time may vary by experience level and how much detailing and sewing you do.