🧢 Beautiful ✨ Detailed πŸ’ Adorable

Mini Monkey Amigurumi Pattern

Mini Monkey Amigurumi Pattern
4.9β˜… Rating
5-7 Hours Time Needed
3.6K Made This
βœ‚οΈ

Intermediate Level

Ideal for those with basic crochet experience, featuring slightly more advanced stitches and techniques to expand your skills.

⏱️

Weekend Treat

Takes 5-7 hours, making it an enjoyable project to finish over a couple of days.

🧸

Cute Companion

An adorable friend to cherish, handcrafted with love to bring comfort and joy for years to come.

About This Mini Monkey Amigurumi Pattern

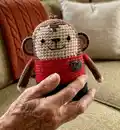
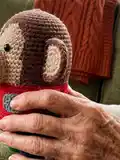
This pattern creates a small, cuddly monkey amigurumi approximately 15cm tall when worked with the recommended yarn and hook. The design uses simple amigurumi construction with color changes to create clothing and facial details. You will work the head, body, legs, arms, ears and a tiny pocket, plus finishing notes for placement and assembly.

Mini Monkey Amigurumi Pattern crochet pattern - detailed view of completed project

Clear step-by-step rounds are provided, including symbol charts for color placement and exact stitch counts. The pattern includes helpful photos and tips to guide finishing and detailing.

Why You'll Love This Mini Monkey Amigurumi Pattern

I absolutely love this pattern because it combines simple amigurumi shaping with playful colorwork that gives the monkey a sweet outfit and personality. I enjoy how the compact size makes it quick to finish yet satisfying to sew together and detail. The design allows for easy customization of colors and small accessories, so every monkey can be unique. Making these little characters brings me joy, and I hope you feel the same pride when your monkey is complete.

Mini Monkey Amigurumi Pattern step 1 - construction progress Mini Monkey Amigurumi Pattern step 2 - assembly progress Mini Monkey Amigurumi Pattern step 3 - details and accessories Mini Monkey Amigurumi Pattern step 4 - final assembly and finishing

Switch Things Up

I love how easy it is to customize this mini monkey by changing yarn colors for the shirt, pants or cheeks to create unique characters.

I sometimes use pastel colors for a softer look or bright primaries for a playful feel depending on who will receive the doll.

If you want a larger or smaller monkey, change your yarn weight and hook size: bulky yarn + larger hook for a chunky pal, or thinner yarn + smaller hook for a tiny keychain version.

I often add embroidered details like buttons, tiny scarves or tiny crocheted hats to add personality and make each piece special.

Try swapping the pocket color or shape and embroider initials for personalized gifts or keepsakes.

I recommend experimenting with different eye types: safety eyes, stitched eyes or small beads each give a different expression.

For a posable version, I sometimes add a small length of wire inside the arms or tail so the monkey can hold little props.

Mix fibers for texture: use a fuzzy yarn for hair tuft details while keeping the body in smooth cotton or acrylic for sturdiness.

To make a set, vary colors across several monkeys to create a playful family collection that looks cute displayed together.

I enjoy creating seasonal versions by swapping shirt and foot tip colors to match holidays or seasonal palettes for a themed set.

Common Mistakes & How to Fix Them

βœ— Skipping the magic ring tightening can leave a visible hole at the top of the head; pull the magic ring tight and close the hole before continuing. βœ— Forgetting stitch markers when dividing the legs will make it hard to find the correct split point; mark the 31st stitch of Round 36 and the 7 stitch gap to divide the legs accurately. βœ— Overstuffing the head or body will distort the shape and make sewing difficult; stuff gradually and firmly but not so much that the stitches stretch apart. βœ— Not changing yarn colors exactly according to the symbol pattern causes mismatched stripes or facial panels; follow the color-change diagrams and swap yarns where indicated to keep the design neat. βœ— Sewing parts without pinning can cause uneven placement of arms or ears; always pin pieces in place and check alignment before stitching. βœ— Cutting tails too short before sewing makes finishing and weaving ends impossible; leave long tails when fastening off for sewing and weaving.

Mini Monkey Amigurumi Pattern

Make a charming mini monkey amigurumi with clear step-by-step instructions and full color-change guidance. This pattern walks you through head, body, legs, arms, ears, and pocket, plus placement tips for eyes and features. Perfect for gifting or keeping as a cute handmade companion you can personalize with different colors.

Intermediate 5-7 Hours

Materials Needed for Mini Monkey Amigurumi Pattern

β€” Main Fabric

  • 01
    Worsted weight yarn (#4) - Brown yarn (head, hair, arms, ears) - quantity: small amount (approx. sample-sized skein)
  • 02
    Worsted weight yarn (#4) - Beige yarn (face and inner ears) - quantity: small amount
  • 03
    Worsted weight yarn (#4) - Black yarn (nose, mouth embroidery) - small amount
  • 04
    Worsted weight yarn (#4) - Green yarn (feet tips) - small amount
  • 05
    Worsted weight yarn (#4) - Red yarn (shirt) - small amount
  • 06
    Worsted weight yarn (#4) - Navy yarn (pants and pocket) - small amount
  • 07
    Worsted weight yarn (#4) - Orange yarn (cheek accents if used) - small amount
  • 08
    Optional: fingering weight yarn if matching size note; size will be approx 15cm using fingering weight on 3mm hook

β€” Tools Required

  • 01
    Crochet hook size 5/0 (3mm)
  • 02
    Yarn needle (weave in the end with it)
  • 03
    Scissors
  • 04
    Stitch markers
  • 05
    Fiberfill for stuffing (polyester stuffing)
  • 06
    Glue (to glue the eyes on the face if not using safety eyes)
  • 07
    5mm black plastic eyes x2 (or safety eyes)

Progress Tracker

0% Complete

β€” Head / Body / Legs :

Rnd Use the Brown yarn to make MAGIC RING :

scx6 in the yarn loop, tighten the loop [6 sts]

Round 2 :

(2-sc inc) x 6 [12]

Round 3 :

(scx1, 2-sc inc) x 6 [18]

Round 4 :

(scx2, 2-sc inc) x 6 [24]

Round 5 :

(scx3, 2-sc inc) x 6 [30]

Round 6 :

(scx4, 2-sc inc) x 6 [36]

Round 7 :

(scx5, 2-sc inc) x 6 [42]

Round 8 :

(scx6, 2-sc inc) x 6 [48]

Rounds 9~36 :

sc in all 48 st [48]

Info :

Do not forget to change the color as shown in the illustration to the right. (Check page 1 for more details.)

DIVIDE THE LEGS :

To make a leg, identify the center space between the legs by the 6 stitches, and each leg identifies the other by 18.(Use stitch markers to help.) Sc at the 31th st of the Rnd 36. *1 This sc is the first st of the first leg (left leg). Continue working on the first leg (left leg).

Round 37-40 :

sc in all 18 st [18]

Round 41 :

(scx1, sc2tog) x 6 [12]

Round 42 :

(sc2tog) x 6 [6]

Info :

Fasten off, leaving a long tail. Stuff the leg. Using a yarn needle, weave the yarn tail through the front loop of each remaining st and pull tight to close.

SECOND LEG (Right leg) :

Rejoin the Navy yarn to 7th back unworked st of Rnd 36. *2 This sc is the first st for the second leg (right Leg). Continue working the second leg (right leg) the same way as the first leg (left leg), from Rnd 37-42. Using a yarn needle, sew the 6 sts between the legs.*3

Info :

Eyes Location: Between Rnd 13 and 14. Cheek Location: Between Rnd 14 and 15. Arms Location: Between Rnd 20 and 21. Pocket Location: Rnd 22 and 24. Hair Location: The crown of the head.

β€” Arms :

Rnd Use the Beige yarn to make MAGIC RING :

scx5 in the yarn loop, tighten the loop [5 sts]

Round 2 :

(2-sc inc) x 5 [10]

Round 3-16 :

sc in all 10 st [10]

Info :

Fasten off, Leaving a long tail for sewing. Flatten the ARM, do not stuff.

β€” Pocket :

Rnd Use the Navy yarn to make 5 chains :

1. hdcx1 in third ch from hook, hdcx2 [4 sts] *ch 2 = hdcx1

Round 2 :

ch 2, turn, hdcx3 [4]

Info :

Fasten off, Leaving a long tail for sewing.

β€” Ear x2 :

Rnd Use the Beige yarn to make MAGIC RING :

scx6 in the yarn loop, tighten the loop [6 sts]

Round 2 :

ch 1, turn, sc, hdc, dcx2, hdc, sc [6]

Round 3 :

ch 1, turn, sc, (2-sc inc) x 4, sc [10]

Info :

Fasten off, and make another Beige ear, two Brown ears by the same way.

Round 4 (Edging) :

Locate beige colored ear part on the brown ear, join the brown yarn into the bottom right corner of both ears and SC together. (Beige: the stitches only through backloop/ Brown: go through both loops). [10]

Info :

Fasten off, Leaving a long tail for sewing.(Fold the ears slightly.)

Assembly Instructions

  • Place and glue or attach 5mm black eyes between Rnd 13 and 14 on the face, using the eye location guide for spacing.
  • Sew the two ears to the sides of the head so the ear centers align between Rnd 14 and 15; fold the ears slightly and sew through both loops of the brown ear and back loop only of the beige center (edging step).
  • Position the arms between Rnd 20 and 21 on either side of the body; pin and sew with a yarn needle using the long tails left when fastening off.
  • Sew the pocket to the front of the body between Rnd 22 and 24 using the long tail left when finishing the pocket.
  • Sew legs together by attaching and stitching the 6 stitches between legs after completing both leg rounds (sew the 6 sts between the legs using a yarn needle).
  • Embroider nose and mouth with black yarn or attach a small black felt/stitched nose centered above the mouth between Rnd 13 and 14.

Important Notes

  • πŸ’‘Use stitch markers to keep track of your rounds and to mark the center points when dividing the legs for accurate shaping.
  • πŸ’‘Stuff firmly but not too tightly for the best shape and structure - overstuffing can distort your doll and make sewing parts together difficult.
  • πŸ’‘Pin all parts in place before sewing to ensure correct positioning and even symmetry across the doll.

This adorable Mini Monkey pattern is a delightful, pocket-sized companion you can finish in a weekend. It mixes simple amigurumi shaping with fun color changes for clothing and details. Make one for yourself or give as a handmade gift that will be cherished. πŸ§ΆπŸ’

You ask,

we answer.

FAQs

What size will the finished piece be?

The finished amigurumi measures approximately 15 cm (5.9 inches) when using fingering weight yarn on a 3mm crochet hook, or similar proportions with worsted on a 3mm hook as suggested.

Can I use different yarn weights for this pattern?

Yes, you can use different yarn weights, but this will affect the final size. If you change yarn weight, select an appropriate hook and expect the finished size to vary accordingly.

Do I need prior crochet experience for this pattern?

This pattern is rated intermediate and assumes you are comfortable with magic ring, single crochet, increases, decreases and basic color changes.

How long does this project typically take to complete?

Most crocheters complete this project in 5-7 hours, though time may vary depending on experience level and how much detailing and sewing you choose to do.