🧢 Beautiful ✨ Detailed πŸ’ Adorable

Creeper Amigurumi Pattern

Creeper Amigurumi Pattern
4.6β˜… Rating
5-7 Hours Time Needed
1.9K Made This
βœ‚οΈ

Intermediate Level

Ideal for those with basic crochet experience, featuring slightly more advanced stitches and techniques to expand your skills.

⏱️

Weekend Treat

Takes 5-7 hours, making it an enjoyable project to finish over a couple of days.

🧸

Cute Companion

An adorable friend to cherish, handcrafted with love to bring comfort and joy for years to come.

About This Creeper Amigurumi Pattern

This pattern creates a kawaii Creeper amigurumi about 15 cm tall using 2.5 mm fine cotton yarn. Clear, round-by-round instructions guide you through each piece: head, body and four feet. The design includes felt eyes and mouth plus embroidered details for a charming finish.

Creeper Amigurumi Pattern crochet pattern - detailed view of completed project

Suitable for confident beginners or intermediate crocheters, the pattern includes materials, abbreviations and step-by-step assembly. Photos and notes help you position and attach facial features and feet accurately.

Why You'll Love This Creeper Amigurumi Pattern

I absolutely love this pattern because it turns a game icon into a soft, huggable kawaii toy with simple stitches and big personality. I designed the proportions to be cute and stable so the finished Creeper sits nicely. The felt details and small embroidered squares let you add handcrafted character without complicated techniques. Every time I make one I enjoy choosing tiny variations in color and expression to make each Creeper unique.

Creeper Amigurumi Pattern step 1 - construction progress Creeper Amigurumi Pattern step 2 - assembly progress Creeper Amigurumi Pattern step 3 - details and accessories Creeper Amigurumi Pattern step 4 - final assembly and finishing

Switch Things Up

I love customizing this pattern by changing the main color to make unique versions; try mint, pastel green or even neon for different looks.

I sometimes make a mini version by using finer yarn and a 1.75 mm hook to create a tiny keychain-sized Creeper.

If you want a chunkier toy, use worsted weight yarn and a 3.5-4 mm hook for a squishier result.

I add wire to the neck or feet if I want a slightly posable versionβ€”just use thin floral wire and insert it carefully inside the stuffing.

Swap felt features for embroidered eyes and mouth if you prefer fully stitched details without glue.

Try adding tiny crocheted accessories like a scarf, hat or tiny pixel props to give your Creeper personality.

I often experiment with different eye sizes and placements to change the expression from cute to mischievous.

For a set, make multiples in varying sizes and arrange them as a Minecraft-inspired display or gift set.

Use contrast yarn for the little dark green squares and try different stitch textures, like surface slip stitch, for variation.

When gifting, personalize with a small embroidered name tag or a felt accessory to make each Creeper unique and special.

Common Mistakes & How to Fix Them

βœ— Skipping the magic ring or starting chain can change the starting stitch count; always begin with a proper magic ring or specified starting method to ensure correct sizing. βœ— Forgetting to stuff as you go will make shaping difficult and lumpy; add stuffing gradually during the decrease rounds to keep a smooth, even shape. βœ— Not counting stitches after increases and decreases causes uneven shaping and mismatched rounds; count stitches at the end of each round, especially after shaping rounds. βœ— Closing the head without leaving a long sewing tail makes attachment harder later; leave a long strand when fastening off so you can sew the head to the body securely and invisibly.

Creeper Amigurumi Pattern

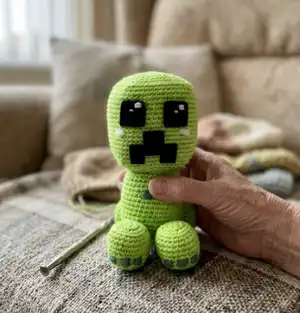
Make a cute Kawaii-style Creeper amigurumi inspired by Minecraft. This pattern walks you through crocheting the head, body and four feet using 2.5 mm cotton yarn with clear round-by-round instructions. Youll get helpful assembly notes and finishing details so your Creeper looks polished and adorable.

Intermediate 5-7 Hours

Materials Needed for Creeper Amigurumi Pattern

β€” Main Fabric

  • 01
    2.5 mm cotton yarn (Rainbow cotton 8/6) - Green lime (main color, approx 30-50g)
  • 02
    2.5 mm cotton yarn (Rainbow cotton 8/6) - Dark green (small amount for squares and details)
  • 03
    2.5 mm cotton yarn - Pink (small amount for blushes)
  • 04
    2.5 mm cotton yarn - White (small amount for eye reflections)
  • 05
    Black felt - for eyes and mouth pieces
  • 06
    Synthetic cotton filling - polyester stuffing for head, body and feet

β€” Tools Required

  • 01
    2.5 mm crochet hook
  • 02
    Yarn needle / tapestry needle for sewing and embroidery
  • 03
    Scissors
  • 04
    Hot glue gun or needle and thread to sew the felt
  • 05
    Stitch markers (optional but recommended)
  • 06
    Pins for positioning pieces during assembly

Progress Tracker

0% Complete

β€” Head :

Info :

With 2.5 mm lime green cotton yarn.

Round 1 :

8 sc in a magic ring (8)

Round 2 :

8 inc (16)

Round 3 :

2 inc, 2 sc (24)

Round 4 :

1 sc, 2 inc, (4 sc, 2 inc) x3, 3 sc (32)

Round 5 :

2 sc, 2 inc, (6 sc, 2 inc) x3, 4 sc (40)

Round 6 :

3 sc, 2 inc, (8 sc, 2 inc) x3, 5 sc (48)

Round 7 :

4 sc, 2 inc, (10 sc, 2 inc) x3, 6 sc (56)

Round 8 :

5 sc, 2 inc, (12 sc, 2 inc) x3, 7 sc (64)

Round 9 :

1 sc BLO (64)

Round 10-26 :

1 sc (64)

Round 27 :

7 sc, 2 dec, (12 sc, 2 dec) x3, 5 sc BLO (56)

Round 28 :

6 sc, 2 dec, (10 sc, 2 dec) x3, 4 sc (48)

Round 29 :

5 sc, 2 dec, (8 sc, 2 dec) x3, 3 sc (40)

Round 30 :

4 sc, 2 dec, (6 sc, 2 dec) x3, 2 sc (32)

Round 31 :

3 sc, 2 dec, (4 sc, 2 dec) x3, 1 sc (24)

Info :

Stuffing

Round 32 :

2 sc, 2 dec (16)

Round 33 :

8 dec (8)

Round 34 :

4 dec (4)

Info :

Fasten off with sl st, cut and hide the strand.

β€” Body :

Info :

With 2.5 mm lime green cotton yarn.

Round 1 :

8 sc in a magic ring (8)

Round 2 :

8 inc (16)

Round 3 :

2 inc, 2 sc (24)

Round 4 :

1 sc, 2 inc, (4 sc, 2 inc) x3, 3 sc (32)

Round 5 :

2 sc, 2 inc, (6 sc, 2 inc) x3, 4 sc (40)

Round 6 :

1 sc BLO (40)

Round 7-18 :

1 sc (40)

Round 19 :

2 sc, 2 dec, (6 sc, 2 dec) x3, 4 sc BLO (32)

Round 20 :

1 sc, 2 dec, (4 sc, 2 dec) x3, 3 sc (24)

Info :

Stuffing

Round 21 :

2 sc, 2 dec (16)

Round 22 :

8 dec (8)

Round 23 :

4 dec (4)

Info :

Fasten off with sl st and leave a long strand to sew to the head.

Info :

Sew with a yarn needle joining R.19 of the body to R.29 of the head.

β€” Feet :

Info :

With 2.5 mm lime green cotton yarn.

Round 1 :

8 sc in a magic ring (8)

Round 2 :

8 inc (16)

Round 3 :

2 inc, 2 sc (24)

Round 4 :

1 sc BLO (24)

Round 5-10 :

1 sc (24)

Round 11 :

2 sc, 2 dec (16)

Info :

Stuffing

Round 12 :

8 dec (8)

Round 13 :

4 dec (4)

Info :

Fasten off with sl st and leave a long strand to sew to the body.

Info :

Join R.4 - R.6 of the feet to R.6 - R.8 of the body.

Info :

Sew two feet to the front and two feet to the back.

β€” Details :

Info :

With 2.5 mm dark green cotton yarn and a yarn needle embroidery three squares in front of each foot in R.9.

Info :

With 2.5 mm dark green cotton yarn and a yarn needle embroidery two squares in the front part of the body, one square in R.14 and another in R.16.

β€” Face :

Info :

Cut out two 2.5 cm eyes with black felt and embroidery two reflections with white cotton yarn and a yarn needle to give it a kawaii touch.

Info :

Glue the eyes between R.13 and R.17 of the head.

Info :

With black felt, cut out a mouth 4.5 cm long and 3 cm high.

Info :

Glue the mouth between R.19 and R.25 of the head.

Info :

With pink cotton yarn and a yarn needle make two blushes in R.19 on the head.

Assembly Instructions

  • Sew with a yarn needle joining R.19 of the body to R.29 of the head, matching the rounds carefully and securing with hidden stitches.
  • Join R.4 - R.6 of each foot to R.6 - R.8 of the body and sew firmly so feet are evenly spaced.
  • Sew two feet to the front and two feet to the back, checking symmetry and adjusting before finishing the stitches.
  • Glue the black felt eyes between R.13 and R.17 of the head, then embroider white reflections with white yarn for a kawaii look.
  • Glue the black felt mouth between R.19 and R.25 of the head and add two pink embroidered blushes in R.19.

Important Notes

  • πŸ’‘Use stitch markers to mark the beginning of each round, especially when working BLO or long rounds for even shaping.
  • πŸ’‘Stuff the head and body gradually during decreasing rounds to maintain smooth shaping and avoid lumps.
  • πŸ’‘Leave long sewing tails when fastening off to make assembly easier and allow for secure invisible joins.
  • πŸ’‘Pin or place pieces before sewing to check placement and symmetry so final assembly looks balanced.

This kawaii Creeper amigurumi pattern makes a lovable, pocket-sized plush thats perfect for Minecraft fans and handmade gift givers. The pattern includes clear rounds, assembly tips and adorable facial details to make your Creeper truly special. Happy crocheting and enjoy making a tiny friend! 🧢✨

You ask,

we answer.

FAQs

What size will the finished piece be?

The finished amigurumi measures approximately 15 cm high when using 2.5 mm cotton yarn and the recommended hook size.

Can I use different yarn weights for this pattern?

Yes, you can change the yarn weight but the final size will vary; use an appropriate hook for your chosen yarn and remember that thicker yarn will produce a larger, chunkier Creeper.

Do I need prior crochet experience for this pattern?

Basic crochet skills are recommended; this intermediate pattern uses increases, decreases, BLO rounds and assembly, so familiarity with those techniques will help.

How long does this project typically take to complete?

Most crocheters complete this project in 5-7 hours, depending on experience and how quickly you work through stuffing and assembly.

How should I attach the felt eyes and mouth?

You can glue the felt shapes in place with a hot glue gun, or sew them on using a needle and thread for a more secure finish; attach eyes between R.13 and R.17 and the mouth between R.19 and R.25 of the head.