🧢 Beautiful ✨ Detailed πŸ’ Adorable

Woof the Dog Amigurumi Pattern

Woof the Dog Amigurumi Pattern
4.8β˜… Rating
5-7 Hours Time Needed
1.9K Made This
βœ‚οΈ

Intermediate Level

Ideal for those with basic crochet experience, featuring slightly more advanced stitches and techniques to expand your skills.

⏱️

Weekend Treat

Takes 5-7 hours, making it an enjoyable project to finish over a couple of days.

🧸

Cute Companion

An adorable friend to cherish, handcrafted with love to bring comfort and joy for years to come.

About This Woof the Dog Amigurumi Pattern

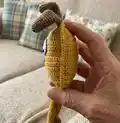
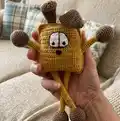
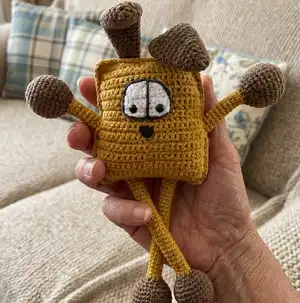
This pattern creates a stretchy dog toy with long, flexible limbs and a squishy body designed for play and sensory development. You will crochet separate parts (eyes, ears, limbs, body) and join them to form a charming dog character. Techniques include working in rounds, shaping with increases and decreases, and simple surface embroidery.

Woof the Dog Amigurumi Pattern crochet pattern - detailed view of completed project

The pattern includes detailed round-by-round instructions, clear stitch counts, and assembly guidance. Suitable for crafters who know basic stitches and want a fun intermediate amigurumi project.

Why You'll Love This Woof the Dog Amigurumi Pattern

I absolutely love this pattern because it turns simple stitches into a playful character full of personality. I enjoy how the stretchy limbs give the toy extra charm and tactile fun for little hands. The design is forgiving and easy to personalize with different yarn colors and face expressions. Making this dog feels quick and rewarding β€” it always brings a smile when finished.

Woof the Dog Amigurumi Pattern step 1 - construction progress Woof the Dog Amigurumi Pattern step 2 - assembly progress Woof the Dog Amigurumi Pattern step 3 - details and accessories Woof the Dog Amigurumi Pattern step 4 - final assembly and finishing

Switch Things Up

I love customizing this pattern by switching yarn colors to create different personalities; try muted neutrals for a vintage look or bright shades for playful characters.

I sometimes use a slightly thicker yarn and larger hooks to make a chunkier, cuddlier version that works as a small pillow toy.

For a mini keychain version, use thinner yarn and a 1.5–2 mm hook and reduce the chain for the body to make it compact and portable.

I often embroider different mouth shapes or add tiny felt accessories like a bow tie or collar to vary expressions and styles across a set.

If you want posable limbs, add thin craft wire inside the limbs before stuffing so arms and legs can be posed safely.

Try attaching the ears in different positions β€” higher, lower, or folded β€” to change the character of the dog dramatically.

Swap the safety eyes for embroidered eyes for a baby-safe version suitable for young children, and sew all details securely.

I like to mix yarn textures (cotton body, acrylic limbs) for tactile contrast that kids enjoy touching and exploring.

Experiment with different stuffing levels: firmer stuffing gives structure while softer stuffing makes the toy squishier and more huggable.

Consider making matching mini accessories like a tiny scarf or hat to turn this into a themed gift set that feels extra special.

Common Mistakes & How to Fix Them

βœ— Skipping the turning chain at the end of each row will change stitch counts and row alignment; always make the 1 turning CH as instructed. βœ— Forgetting to stuff the limb bulbs tightly will make them floppy and uneven; stuff the brown heads firmly while shaping before continuing. βœ— Not placing the arm-leg piece between the correct body rows can misalign seams; insert the arm-leg between rows 11 and 15 as specified. βœ— Changing hook sizes mid-piece without adjusting tension alters finished size and proportions; follow recommended 2 mm and 3 mm hooks for the designated parts. βœ— Leaving very short yarn tails when finishing will make sewing parts together difficult; leave long tails for sewing and secure attachments properly.

Woof the Dog Amigurumi Pattern

Make a stretchy, playful dog toy that encourages fine motor skills and imaginative play. This amigurumi features long stretchy limbs, cute facial details, and easy assembly. Perfect as a handmade gift or a cozy companion you can customize with different colors.

Intermediate 5-7 Hours

Materials Needed for Woof the Dog Amigurumi Pattern

β€” Main Fabric

  • 01
    YarnArt Jeans 50gr/160 m; 55% cotton, 45% acrylic - shade 40 (brown)
  • 02
    YarnArt Jeans 50gr/160 m; 55% cotton, 45% acrylic - shade 28 (black)
  • 03
    YarnArt Jeans 50gr/160 m; 55% cotton, 45% acrylic - shade 84 (gold)
  • 04
    YarnArt Jeans 50gr/160 m; 55% cotton, 45% acrylic - shade 03 (white)
  • 05
    Fiber filler for stuffing
  • 06
    8 mm safety eyes (2 pieces)

β€” Tools Required

  • 01
    Crochet hook size 2 mm
  • 02
    Crochet hook size 3 mm
  • 03
    8 mm safety eyes (2 pieces)
  • 04
    Fiber filler
  • 05
    Scissors
  • 06
    Large eye needle
  • 07
    Markers if necessary

Progress Tracker

0% Complete

β€” Eyes (make 2) :

Info :

Begin crocheting in white with 2 mm hook. Chain 10, and starting into the 2nd stitch from hook work 9 SC. Make 1 turning CH at the end of each row.

Round 1-3 :

3 rows straight: 9 SC

Round 4 :

1 SC, DEC, 3 SC, DEC, 1 SC (7)

Round 5 :

1 SC, DEC, 1 SC, DEC, 1 SC (5)

Info :

Install safety eyes between rows 2 and 3, 1 SC away from the left and right edges. Leave a long yarn tail for sewing.

β€” Arms and Legs (make 2) :

Info :

Arms and legs are crocheted in one piece. Begin crocheting in brown with 2 mm hook.

Round 1 :

6 MR (6)

Round 2 :

INC*6 (12)

Round 3 :

(1 SC, INC)*6 (18)

Round 4 :

(2 SC, INC)*6 (24)

Round 5 :

(3 SC, INC)*6 (30)

Round 6-9 :

4 rnds straight: 30 SC

Round 10 :

(DEC, 3 SC)*6 (24)

Round 11 :

(DEC, 2 SC)*6 (18)

Round 12 :

(DEC, 1 SC)*6 (12)

Info :

Stuff tightly.

Round 13 :

(DEC, 4 SC)*2 (10)

Info :

Switch to gold yarn. Go on crocheting. Don\'t stuff the gold piece.

Round 14-65 :

52 rnds straight: 10 SC. Switch to black yarn.

Round 66 :

(INC, 4 SC)*2 (12)

Round 67 :

(1 SC, INC)*6 (18)

Round 68 :

(2 SC, INC)*6 (24)

Round 69 :

(3 SC, INC)*6 (30)

Round 70-73 :

4 rnds straight: 30 SC

Round 74 :

(DEC, 3 SC)*6 (24)

Round 75 :

(DEC, 2 SC)*6 (18)

Round 76 :

(DEC, 1 SC)*6 (12)

Info :

Stuff the piece.

Round 77 :

DEC*6 fasten off.

β€” Ears (make 2) :

Info :

Work in brown with 2 mm hook. Don\'t stuff.

Round 1 :

6 MR (6)

Round 2 :

(1 SC, INC)*3 (9)

Round 3 :

1 rnd straight: 9 SC (9)

Round 4 :

(2 SC, INC)*3 (12)

Round 5 :

(3 SC, INC)*3 (15)

Round 6-11 :

6 rnds straight: 15 SC

Round 12 :

(4 SC, INC)*3 (18)

Round 13-20 :

8 rnds straight: 18 SC

Round 21 :

(DEC, 4 SC)*3 (15)

Round 22-24 :

3 rnds straight: 15 SC

Round 25 :

(DEC, 3 SC)*3 (12)

Round 26-28 :

3 rnds straight: 12 SC

Info :

Fold in half and single crochet 6 through both edges. Leave a long yarn tail for sewing.

β€” Body (make 2) :

Info :

Work in gold with 3 mm hook. Chain 25, and starting into the 2nd stitch from hook work 24 SC. Make 1 turning CH at the end of each row.

Round 1-19 :

19 rnds straight: 24 SC.

Round 20 :

1 SC, DEC, 18 SC, DEC, 1 SC (22)

Round 21 :

1 rnd straight: 22 SC

Round 22 :

1 SC, DEC, 16 SC, DEC, 1 SC (20)

Round 23-25 :

3 rnds straight: 20 SC.

Info :

Fasten off and cut yarn.

β€” Assembly :

Info :

Begin joining the body parts together from the right upper corner using 2 mm hook. Put the two parts together and work 19 SC through both parts\' stitches, work 2 SC to the corner stitch.

Info :

Get to the side edge. You are going to insert the arm-leg piece here. It should go between rows 11 and 15. I worked 10 SC through both parts\' stitches, then 3 SC across the front part of the body only (skip 3 stitches on the back body part), put the arm-leg piece and go on crocheting across both body parts 11 SC, 2 SC to the corner stitch.

Info :

Get to the bottom edge. 5 SC through both parts\' stitches, 3 SC across the front part only, put the arm-leg piece, 6 SC across both body parts, 3 SC across the front part only, put the second arm-leg piece, 5 SC, 2 SC to the corner stitch. Stuff the body.

Info :

Work the other side alike (11 SC across both body parts, 3 SC across the front part only, stuff the body, 10 SC through both parts\' stitches).

β€” Decoration :

Item Name (Ears) :

Attach the ears on the back, 4 SC away from the left and right edges. Bend the ears in the middle slightly if desired.

Item Name (Eyes) :

Sew on between rows 16 - 22 in the middle. Stitch around the eyes contour and in the middle as shown in the photo with black yarn.

Item Name (Nose) :

Embroider a nose between rows 13-15 in black.

Item Name (Mouth) :

Embroider a mouth between rows 7-8 in black.

Assembly Instructions

  • Begin joining the two rectangular body pieces from the right upper corner using a 2 mm hook; place parts together and work 19 SC through both parts' stitches, then work 2 SC to the corner stitch.
  • At the side edge insert the arm-leg piece between rows 11 and 15; work 10 SC through both parts' stitches, then 3 SC across the front part only (skip 3 stitches on the back part), position the arm-leg piece and continue across both parts 11 SC, then 2 SC to the corner stitch.
  • At the bottom edge work 5 SC through both parts' stitches, 3 SC across the front part only, position the arm-leg piece, then 6 SC across both parts, 3 SC across the front part only, place the second arm-leg piece, then 5 SC and 2 SC to the corner stitch; stuff the body before closing.
  • Work the opposite side in the same way: 11 SC across both parts, 3 SC across the front part only, stuff the body, then finish with 10 SC through both parts' stitches to close.
  • Attach ears to the back 4 SC away from the left and right edges and bend slightly in the middle if you prefer the folded look.
  • Sew eyes on between rows 16-22 in the middle and embroider around the eye contour and center with black yarn as shown in photos.

Important Notes

  • πŸ’‘Use a stitch marker to mark the first stitch of each round to keep track of rounds and color changes accurately.
  • πŸ’‘Stuff limb bulbs and head pieces firmly while shaping, but avoid overstuffing the body to maintain a soft, squishy shape.
  • πŸ’‘Leave long yarn tails for sewing parts together and weave in ends securely after assembly to prevent unraveling.
  • πŸ’‘Follow hook size recommendations (2 mm for details and limbs, 3 mm for body) to achieve correct proportions and gauge.

This playful Woof the Dog amigurumi brings a stretch of fun to playtime and display. Make one in original shades or personalize with your favorite colors to create a unique friend. Perfect for gifting, decorating, or creating a small collection of charming characters. 🧢🐢✨

You ask,

we answer.

FAQs

What size will the finished piece be?

The finished toy measures approximately 30 cm from ears to feet when made with the recommended YarnArt Jeans and hook sizes.

Can I use different yarn weights for this pattern?

Yes, you can use different yarn weights, but the final size and texture will change; adjust hook sizes accordingly and expect differences in limb stretch and body firmness.

Do I need prior crochet experience for this pattern?

This pattern is rated intermediate and assumes you know basic stitches (SC, INC, DEC, MR); it does not include beginner stitch lessons.

How long does this project typically take to complete?

Most crocheters complete this project in 5-7 hours, though time may vary based on experience level and how comfortable you are with assembly and embroidery details.

Where should I attach the limbs and eyes?

Insert arm-leg pieces between rows 11 and 15 of the body during assembly; sew eyes between rows 16-22 in the middle and embroider details around them as shown.