🧢 Beautiful ✨ Detailed πŸ’ Adorable

Mini Whale Amigurumi Pattern

Mini Whale Amigurumi Pattern
4.2β˜… Rating
1-2 Hours Time Needed
4.0K Made This
βœ‚οΈ

Beginner Friendly Level

Perfect for those just starting their crochet journey, with clear instructions and simple techniques

⏱️

Quick Make

Complete in under 2 hoursβ€”lightning fast fun for instant gratification and quick gifts.

🎁

Tiny Treasure

Small, sweet, and gift-worthy creations that fit perfectly in the palm of your hand with detailed charm.

About This Mini Whale Amigurumi Pattern

This pattern teaches you how to crochet a mini whale amigurumi using worsted weight yarn and simple stitches. You will make a small body, a belly circle, and a tiny tail, then assemble them into a delightful little whale. It is perfect for making quick gifts, ornaments, or a collection of tiny sea friends.

Mini Whale Amigurumi Pattern crochet pattern - detailed view of completed project

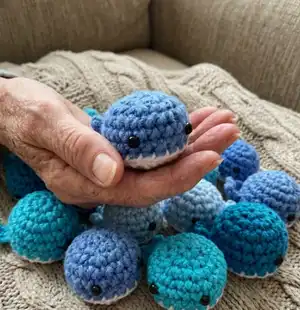
All instructions are written in rounds with clear abbreviations and counts. The pattern includes placement notes for safety eyes and simple assembly tips to finish neatly.

Why You'll Love This Mini Whale Amigurumi Pattern

I absolutely love this pattern because it creates an instant smile with just a few simple rounds. I enjoy how quickly you can make a little family of whales in different colors for gifts or decoration. The structure is forgiving and perfect for practicing basic amigurumi shaping without getting overwhelmed. I also love that it uses minimal materials so you can use scrap yarn and still get charming results. Finishing and assembly are fast, making this pattern highly satisfying to complete.

Mini Whale Amigurumi Pattern step 1 - construction progress Mini Whale Amigurumi Pattern step 2 - assembly progress Mini Whale Amigurumi Pattern step 3 - details and accessories Mini Whale Amigurumi Pattern step 4 - final assembly and finishing

Switch Things Up

I love customizing these mini whales by changing the color palette; try ombre blues or pastel shades for a different vibe.

I sometimes substitute safety eyes for embroidered eyes to make the toy fully baby-safe and soft.

I like using bulkier yarn and a larger hook to make a chunky, cuddlier version that works well as a small pillow or decor piece.

To make keychains, I add a short chain loop and a metal keyring before finishing the body so it hangs securely.

I often embroider a tiny smile or blush marks under the eyes to give each whale a unique personality and expression.

Try making a matching set with alternating belly colors for a coordinated pod display or mobile.

I also experiment with different tail shapes by adjusting the number of chains and slip stitches to create more playful fins.

If I want a flatter whale, I reduce stuffing and flatten slightly before sewing the belly on for a plush, disc-like shape.

For festive versions, I add small crochet hats or bows sewn to the top of the whale to turn them into holiday ornaments or party favors.

I recommend testing one small variation first to see how changes affect size and shaping before making multiple whales in a new style.

Common Mistakes & How to Fix Them

βœ— Skipping the magic of placing safety eyes precisely; attach safety eyes between the 5th and 6th rows, 4 stitches apart to keep symmetry and a balanced look. βœ— Not stuffing gradually while assembling can lead to lumps and misshapen curves; stuff the body about half-way before sewing the belly, then finish stuffing to keep an even shape. βœ— Weaving in ends only at the end causes a messy finish; weave in ends as you finish each piece to make seaming and finishing neat and quick. βœ— Forgetting to leave long tails for sewing makes assembly difficult; leave a long tail on the belly and tail pieces specifically for easy, secure sewing. βœ— Rushing increases can change the shape of the body; count stitches after increase rounds to ensure you have the correct stitch count and even shaping.

Mini Whale Amigurumi Pattern

Make a tiny, adorable crochet whale you can finish quickly and gift with a smile. This pattern uses simple amigurumi techniques and minimal pieces so you can enjoy fast results. Perfect for practicing basic increases and simple assembly while creating a charming little keepsake.

Beginner Friendly 1-2 Hours

Materials Needed for Mini Whale Amigurumi Pattern

β€” Main Fabric

  • 01
    Worsted weight yarn (Red Heart Soft Yarn was used for these)

β€” Tools Required

  • 01
    One pair of 6mm safety eyes
  • 02
    Polyfil Stuffing

Progress Tracker

0% Complete

β€” Body :

Round 1 :

Using the color for the body, ch 2. Sc 6 into 2nd ch from hook. (6)

Round 2 :

Inc in each st around. (12)

Round 3 :

*Sc in next st, inc. Repeat from * around. (18)

Round 4 :

Sc in each st around. (18)

Rounds 5-6 :

repeat Round 4. F/o, weave in ends.

Info :

*attach safety eyes in between the 5th and 6th rows, 4 st apart.*

β€” Belly :

Round 1 :

Using the color for the belly, ch 2. Sc 6 into 2nd ch from hook. (6)

Round 2 :

Inc in each st around. (12)

Round 3 :

*Sc in next st, inc. Repeat from * around. (18)

Info :

F/o and leave long tail for sewing.

β€” Tail :

Tail (make 1) :

Ch 3. Turn, sc into 2nd ch from hook. Sc in next st. Ch 3, sc in 3rd st from hook, sl st into the side of the next st. Ch 3, sc in 3rd st from hook, and sl st into the next st. Continue making sl st until you reach the bottom of your very first st. F/o and leave tail for sewing.

β€” Assembly :

Info :

Sew the belly to the body, begin stuffing about half-way through. Weave in ends. Sew the tail in the 6th row of the body, directly behind the two eyes on the opposite side of the whale.

Info :

Enjoy! Follow us on Instagram @crocheting or find our etsy shop "The Crocheting" for more!

Assembly Instructions

  • Sew the belly to the body, begin stuffing about half-way through to create a smooth curve and secure fit.
  • Weave in ends after attaching the belly so that seams are neat and tails are secured.
  • Sew the tail in the 6th row of the body, directly behind the two eyes on the opposite side of the whale for correct orientation.
  • Attach safety eyes between the 5th and 6th rows, spaced 4 stitches apart to achieve the intended facial placement.

Important Notes

  • πŸ’‘Attach safety eyes before fully closing rounds so you can secure them between the 5th and 6th rows easily.
  • πŸ’‘Stuff the body gradually and begin stuffing when sewing the belly to avoid lumps and to shape the whale smoothly.
  • πŸ’‘Leave long tails on the belly and tail pieces for sewing so you have enough yarn to securely attach and weave in ends.
  • πŸ’‘Weave in ends immediately after finishing each piece to avoid loose yarn and to make final finishing easier.

This tiny whale is a perfect quick make for gift-giving or small home displays. πŸ‹ The pattern is compact and friendly for new crocheters while producing a super cute result. 🧢✨ Make a whole pod in different colors for a charming collection!

You ask,

we answer.

FAQs

What size will the finished piece be?

The finished mini whale measures approximately 3-4 cm wide depending on yarn and hook size when using worsted weight yarn and the recommended tension.

Can I use different yarn weights for this pattern?

Yes, you can use different yarn weights; changing the yarn weight and hook will alter the final size, so adjust expectations and eye size accordingly.

Do I need prior crochet experience for this pattern?

This pattern is beginner friendly and uses basic stitches like single crochet and increases, so basic crocheting experience is helpful but not required.

How long does this project typically take to complete?

Most crocheters can finish a single mini whale in under 2 hours, depending on experience and how much time is spent on assembly and finishing.