About This Mini Pumpkin Man Amigurumi Pattern
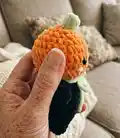
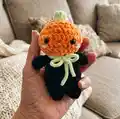
This pattern creates a charming Mini Pumpkin Man amigurumi made with velvet yarn for a soft plush texture. The design includes a rounded pumpkin head with carved dents, a simple body with legs and arms, and a tiny stem on top. It uses continuous rounds and basic increases and decreases to shape each piece.

Perfect for gifting or seasonal decor, the pumpkin features 8 mm safety eyes and optional blush and mouth details. The pattern is concise and suited to crafters who know basic single crochet, increases and decreases.
Why You'll Love This Mini Pumpkin Man Amigurumi Pattern
I absolutely love this pattern because it transforms simple stitches into a delightfully expressive pumpkin character that feels cozy and charming. I enjoy the tactile results you get with velvet yarn — it makes the doll extra soft and squishy. The denting technique gives the pumpkin its signature look, which I find satisfying to sew in and see come to life. I also love how quick it is to make a complete toy in just a few hours, perfect for last-minute gifts or seasonal projects.
Switch Things Up
I love how easy it is to customize this Mini Pumpkin Man by changing yarn colors — swap the orange for pastel tones to create a whimsical pumpkin friend.
I often try different yarn textures: a chenille or plush velvet gives a soft plush look while sport weight makes a tighter, firmer toy.
You can make a larger version by using thicker yarn and a larger hook, or a tiny keychain by using thinner yarn and a smaller hook.
I like to embroider different mouth shapes to change expressions — a smile, a surprised O, or a tiny V all change the character instantly.
Try swapping the black body for a cozy sweater color to create themed outfits or holiday variations.
I sometimes add felt accessories like a tiny hat or scarf glued or sewn on for seasonal flair and personalization.
Consider using safety eyes of different sizes to shift the look from cute to more realistic — always follow safety guidelines for toys intended for small children.
For a playful twist, add a loop at the top of the stem to turn the pumpkin into an ornament or keyring charm.
I also enjoy combining different yarns in the dents and lines (sport weight for lines, velvet for body) to make the texture pop visually.
Finally, experiment with embroidered freckles, tiny stitched buttons, or a miniature crocheted bow to give each pumpkin its own personality.
Common Mistakes & How to Fix Them
✗ Not placing the eyes at the correct position can ruin facial symmetry; insert the 8 mm safety eyes between R7-R8, five stitches apart, on the long side of the R1 oval to keep the face balanced.
✗ Forgetting to stuff as you go makes shaping difficult; begin stuffing the head at the R9-R10 stage and finish stuffing before closing to maintain even form.
✗ Cutting the yarn too early when making legs will make joining tricky; after finishing the first leg cut the yarn, but when crocheting the second leg do not fasten off and attach directly by crocheting into the first leg stitches.
✗ Skipping the dent sewing step will lose the pumpkin texture; drag a long piece of orange yarn from top to bottom to create five dents as shown, pulling gently to form each dent before moving on.
✗ Overstuffing the body and legs can distort the pumpkin shape; stuff firmly but gradually, checking shape frequently to avoid bulging or uneven seams.