🧢 Beautiful ✨ Detailed πŸ’ Adorable

Mini Cherry Bakewell Amigurumi Pattern

Mini Cherry Bakewell Amigurumi Pattern
4.3β˜… Rating
2-3 Hours Time Needed
3.0K Made This
βœ‚οΈ

Beginner Friendly Level

Perfect for those just starting their crochet journey, with clear instructions and simple techniques

⏱️

Bite-Sized Project

Finishes in 2-4 hoursβ€”perfect for an afternoon of creative relaxation.

🎁

Tiny Treasure

Small, sweet, and gift-worthy creations that fit perfectly in the palm of your hand with detailed charm.

About This Mini Cherry Bakewell Amigurumi Pattern

This pattern makes a mini Cherry Bakewell β€” a tiny crocheted pastry with a flat iced top and a little cherry. You will work three small pieces: an iced top, a tiny cherry and a pastry base, then join them together for a realistic finish. The design uses basic crochet techniques and is ideal for making sets.

Mini Cherry Bakewell Amigurumi Pattern crochet pattern - detailed view of completed project

Yarn amounts listed are for one mini bakewell and use Paintbox Simply DK colours for a neat finish. The finished pastry measures approximately 6.5cm diameter and 3cm high.

Why You'll Love This Mini Cherry Bakewell Amigurumi Pattern

I absolutely love this pattern because it combines simple crochet stitches with charming, realistic details that make each tiny bakewell feel special. I enjoy how quick and satisfying it is to make a whole box of these little pastries. The pattern is forgiving for beginners but still looks impressive when completed. Making them in sets is one of my favourite ways to gift a thoughtful, handmade treat to friends.

Mini Cherry Bakewell Amigurumi Pattern step 1 - construction progress Mini Cherry Bakewell Amigurumi Pattern step 2 - assembly progress Mini Cherry Bakewell Amigurumi Pattern step 3 - details and accessories Mini Cherry Bakewell Amigurumi Pattern step 4 - final assembly and finishing

Switch Things Up

I love experimenting with colourways for these little pastries; try pastel icing for a vintage look or bright candy colours for a playful set.

I sometimes use a finer yarn and smaller hook to make tiny keychain-sized bakewells perfect for bags and gifts.

If you want a chunkier version, use a bulkier yarn and larger hook to create a more squishy, cuddly pastry.

I like to add tiny embroidered sprinkles or a small felt label to personalise each bakewell as a gift.

Try changing the cherry colour to make different fruit tarts β€” a dark blue cherry makes a little blueberry topper look cute.

I often present them in small clear boxes or cupcake liners to make a charming handmade gift set.

For extra realism, stitch a thin ring of contrasting yarn around the base edge to mimic pastry crimping.

If you want posable treats for display, glue a small circle of felt to the underside so they sit perfectly flat on shelves.

I sometimes layer cotton batting circles instead of toy stuffing to achieve the flat iced top described in the pattern.

Make a themed collection by combining different icing colours and cherry styles β€” they look lovely grouped on a plate or in a little box.

Common Mistakes & How to Fix Them

βœ— Using a larger hook than recommended can make gaps appear in the stitches; switch to a slightly smaller hook to create tighter stitches and avoid stuffing showing through. βœ— Not leaving a long enough tail when fastening off the cherry makes sewing difficult; cut a long tail and use it to sew the cherry securely into the iced top before hiding the end. βœ— Overstuffing the pastry will distort the neat flat iced top; stuff gradually and stop when the shape is firm but still slightly compressible to maintain clean edges. βœ— Skipping the back loop-only round on the pastry base will change the ridge effect and fit; work the specified back loop-only round carefully to create the correct pastry edge. βœ— Forgetting to join top and base with right sides out can hide the iced top detail; hold the pieces right sides out and work through the base loops and top back loops as instructed.

Mini Cherry Bakewell Amigurumi Pattern

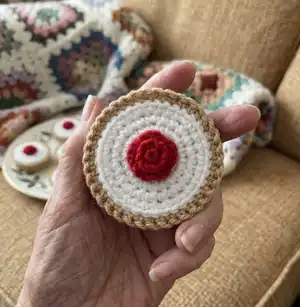
Make a tiny, adorable cherry bakewell pastry you can keep, gift, or display. This compact crochet pattern walks you through a neat iced top, a tiny cherry and a realistic pastry base so you can create a sweet, handmade miniature. Perfect for making sets, keychain-sized treats, or a playful desk display.

Beginner Friendly 2-3 Hours

Materials Needed for Mini Cherry Bakewell Amigurumi Pattern

β€” Main Fabric

  • 01
    Paintbox Yarns Simply DK (100% Acrylic; 276m/302yds per 100g ball)
  • 02
    A: Paper White - 5g (for iced top)
  • 03
    B: Pillar Red - 5g (for cherry)
  • 04
    C: Light Caramel - 10g (for pastry base)
  • 05
    Note: Yarn amounts are for ONE mini bakewell; make adjustments for sets

β€” Tools Required

  • 01
    Crochet hook size 3.5 mm (E/4)
  • 02
    Stuffing
  • 03
    Tapestry needle for sewing in ends
  • 04
    Scissors

Progress Tracker

0% Complete

β€” Iced top :

Round 1 :

with A dc7 into magic circle, join with ss to 1st dc (7).

Round 2 :

ch1, 2dc into same st, 2dc into each st around, join with ss to 1st dc (14).

Round 3 :

ch1, dc into same st, 2dc in next st, *dc, 2dc in next st* repeat from * to * 6 times, join with ss to 1st dc (21).

Round 4 :

ch1, dc into same st, dc, 2dc in next st, *dc2, 2dc in next st* repeat from * to * 6 times, join with ss to 1st dc (28).

Round 5 :

ch1, dc into same st, dc2, 2dc in next st, *dc3, 2dc in next st* repeat from * to * 6 times, join with ss to 1st dc (35). Fasten off and sew in ends.

β€” Cherry :

Round 1 :

with B dc5 into magic circle, join with ss to 1st dc (5).

Round 2 :

ch1, 2dc into same st, 2dc into each st around, join with ss to 1st dc (10).

Round 3 :

ch1, dc into same st, dc into each st around, join with ss to 1st dc (10). Fasten off and cut a tail long enough to sew the cherry to the iced top. Sew in the tail from the magic circle, but instead of cutting the yarn just push it inside the dome of the cherry (instead of using stuffing). Sew the cherry onto the iced top, fasten off and sew in ends.

β€” Pastry base :

Round 1 :

with C dc7 into magic circle, join with ss to 1st dc (7).

Round 2 :

ch1, 2dc into same st, 2dc into each st around, join with ss to 1st dc (14).

Round 3 :

ch1, dc into same st, 2dc in next st, *dc, 2dc in next st* repeat from * to * 6 times, join with ss to 1st dc (21).

Round 4 :

ch1, dc into same st, dc, 2dc in next st, *dc2, 2dc in next st* repeat from * to * 6 times, join with ss to 1st dc (28).

Round 5 :

ch1, dc into back loop only of same st, dc into back loop only of each stitch around, join with ss to 1st dc (28).

Round 6 :

ch1, dc into same st, dc into each st around, join with ss to 1st dc (28).

Round 7 :

ch1, dc into same st, dc2, 2dc in next st, *dc3, 2dc in next st* repeat from * to * 6 times, join with ss to 1st dc (35).

Round 8 :

ch1, dc into same st, dc into each st around, join with ss to 1st dc (35).

Round 9 :

join top and base together: with iced top and pastry base held together, right sides out, ch1 and dc into same st of base as well as through back loop only of top. Join base and top by working dc around the edge, making sure to hook through both loops of each base stitch and back loop only of each stitch around the top. When you have joined about 2/3, stuff before completing to close. Join with ss to 1st dc, fasten off and sew in ends.

Info :

Stuffing Tip: instead of regular toy stuffing, you could use quilt padding cut into small circles and layered to fill your pastry. This will give really straight edges, and a beautifully flat iced top!

Assembly Instructions

  • Sew the cherry onto the iced top using the long tail from the magic circle, pushing the yarn tail into the cherry dome rather than stuffing.
  • Join the iced top and the pastry base with right sides out, working DCs through both loops of the base and the back loop only of the top to create a neat ridge.
  • When joining the top and base, stop after joining about two thirds and stuff the pastry before completing the seam to ensure a flat iced top.
  • Fasten off and sew in all loose ends securely after joining, making sure the joins are neat and the edges are smooth.
  • If making a set, repeat the process for each bakewell and weave in ends as you go to keep finishing quick and tidy.

Important Notes

  • πŸ’‘Yarn amounts listed are for ONE mini bakewell; plan ahead if you intend to make a set and purchase extra yarn.
  • πŸ’‘Specific tension is not critical but should be consistent between top and base so that they fit together correctly.
  • πŸ’‘If using a different yarn, consider a slightly smaller hook than recommended to avoid gaps where stuffing could show through.
  • πŸ’‘Stuff gradually and stop stuffing before completely closing so you can shape and compress the top for a flat iced finish.

This Mini Cherry Bakewell pattern brings a tiny, delicious pastry to life with simple crochet stitches and charming detail. Make a single sweet treat or a whole box to giftβ€”each one looks delightful on display or as a playful keepsake. Happy crocheting and enjoy creating your own miniature bakewell collection! πŸ§πŸŽ€

You ask,

we answer.

FAQs

What size will the finished piece be?

The Mini Cherry Bakewell measures approximately 6.5cm diameter and 3cm high when using the recommended yarn and hook size.

Can I use different yarn weights for this pattern?

Yes, but changing yarn weight will affect the final size and look; use an appropriate hook size and consider working with a slightly smaller hook to avoid gaps.

Do I need prior crochet experience for this pattern?

This pattern is beginner friendly, but basic knowledge of working in the round, DC, chains and slip stitch will help you follow the instructions smoothly.

How long does this project typically take to complete?

Most crocheters finish one mini bakewell in 2-3 hours; making a set will of course take longer depending on how many you want to make.