🧢 Beautiful ✨ Detailed πŸ’ Adorable

Farm Finger Puppet Amigurumi Pattern

Farm Finger Puppet Amigurumi Pattern
4.8β˜… Rating
12-15 Hours Time Needed
3.5K Made This
βœ‚οΈ

Intermediate Level

Ideal for those with basic crochet experience, featuring slightly more advanced stitches and techniques to expand your skills.

⏱️

Multi-Day Project

A rewarding 12+ hour journeyβ€”perfect for dedicated crafters who love detailed work.

🎁

Tiny Treasure

Small, sweet, and gift-worthy creations that fit perfectly in the palm of your hand with detailed charm.

About This Farm Finger Puppet Amigurumi Pattern

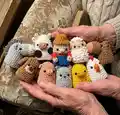
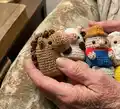
This pattern pack teaches you how to crochet a set of 10 farm-themed finger puppets including Old McDonald, cow, chicken, cat, duck, pig, dog, horse, donkey, and lamb. Each puppet is worked mostly in back loop only (BLO) for a flat, thin shape, with small add-on parts and simple embroidery for features. The designs use basic stitches and small components so theyre quick to make and easy to customize.

Farm Finger Puppet Amigurumi Pattern crochet pattern - detailed view of completed project

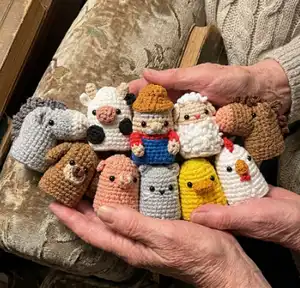
Perfect for making a complete set for playtime or gifting, these puppets are tiny and portable. Photo references and clear assembly steps help you place eyes, noses, and accessories accurately.

Why You'll Love This Farm Finger Puppet Amigurumi Pattern

I absolutely love this pattern because it turns simple crochet into a delightful set of tiny characters that spark imaginative play. I enjoy how quick each puppet is to make, yet how expressive the small details become with a bit of sewing and embroidery. The set is versatile β€” you can change colors to match your favorite farm scene or make multiples as gifts. Creating the mane, wattle, or patches by hand gives each puppet a handmade personality I always treasure.

Farm Finger Puppet Amigurumi Pattern step 1 - construction progress Farm Finger Puppet Amigurumi Pattern step 2 - assembly progress Farm Finger Puppet Amigurumi Pattern step 3 - details and accessories Farm Finger Puppet Amigurumi Pattern step 4 - final assembly and finishing

Switch Things Up

I love how easy it is to customize these puppets with color swaps β€” you can change the cow spots, make the pig pinker, or convert the duck to a chick with a brighter yellow.

Want a softer look? Use a fuzzy or boucle yarn for the lambs fur and work the loops loose to create a fluffy texture instead of the looped fur described.

If youd like bigger puppets, switch to a bulkier yarn and a larger hook; the same stitch counts will create a chunkier, more tactile puppet perfect for toddlers.

For tiny keychains, use thinner yarn and a 2.5mm hook to make miniatures that attach to a ring β€” reduce stuffing and secure beads carefully.

I sometimes embroider expressive eyebrows or tiny freckles to give more personality; these small changes make each puppet unique.

You can substitute safety eyes for beads on adult-made display puppets, but for childrens play consider embroidered or stitched eyes for safety.

Try adding tiny crocheted accessories like scarves, hats, or a little felt barn to build a themed playset β€” the hat pattern here adapts nicely to many characters.

If you prefer no-sew assembly, experiment with fabric glue for small parts but test for durability first; sewing is always the most secure option for toys.

I recommend mixing yarn textures within one puppet for contrast β€” smooth cotton body with a wool mane for the horse creates a nice visual distinction.

Finally, make sets in color palettes (pastels, autumn tones, or bright primary colors) for cohesive gifts or classroom sets that children will love to collect and play with.

Common Mistakes & How to Fix Them

βœ— Skipping the Back Loop Only (BLO) instruction will change the flat shape of the puppet; always work the rounds in BLO where indicated to achieve the thin, finger-fit profile. βœ— Not changing colors exactly at the round indicated will misalign stripes or clothing details; switch yarn at the end of the exact round noted to keep color bands neat. βœ— Forgetting to place the eyes on the correct round causes facial features to look too high or low; count rounds carefully and mark the center stitches before attaching beads. βœ— Sewing on parts without pinning first can lead to crooked placement; pin or temporarily tack nose, ears, and patches and check from different angles before permanently sewing. βœ— Stuffing too much into small nose or snout pieces will distort shapes and make sewing difficult; use minimal stuffing and add very small amounts gradually until the shape is right.

Farm Finger Puppet Amigurumi Pattern

Make a charming set of 10 tiny farm finger puppets with this friendly crochet pattern. Youll create Old McDonald and his animal friends using simple single crochet shapes and small embroidered details. The patterns are small, portable, and perfect for gifting or storytime play. Follow step-by-step rounds and clear assembly notes to finish each puppet with personality.

Intermediate 12-15 Hours

Materials Needed for Farm Finger Puppet Amigurumi Pattern

β€” Main Fabric

  • 01
    Cream yarn - small amounts for faces and details
  • 02
    Grey yarn - small amounts for cat, donkey, and accents
  • 03
    Orange yarn - small amounts for beaks and hat
  • 04
    Red yarn - small amounts for clothing detail and combs
  • 05
    Blue yarn - small amounts for Old McDonalds overalls
  • 06
    White yarn - main body color for cow, chicken, lamb
  • 07
    Dark Grey yarn - accents for mane and donkey
  • 08
    Pink yarn - small amounts for pig nose and cheeks
  • 09
    Black yarn - small amounts for spots and stitched details
  • 10
    Brown yarn - main body for dog, horse, and donkey accents
  • 11
    Dark brown yarn - accents for mane and hooves
  • 12
    Yellow yarn - main body for duck and chick

β€” Tools Required

  • 01
    Crochet hook no. 3
  • 02
    Needle to sew
  • 03
    Small black beads for eyes (pairs for each puppet)
  • 04
    Yarn for main shapes and details
  • 05
    Sewing thread in black, red, pink, orange, brown as needed
  • 06
    Toy stuffing for noses and optional filling
  • 07
    Yarn needle for sewing parts together

Progress Tracker

0% Complete

β€” Old McDonald :

Info :

Start with grey yarn

Round 1 :

5 sc in a magic ring [5]

Round 2 :

inc x 5 [10]

Round 3 :

(sc, inc) x 5 [15]

Round 4 :

(sc 2, inc) x 5 [20]

Round 5 :

(sc 3, inc) x 5 [25]

Info :

Change to cream yarn

Round 6-8 :

sc around [25]

Info :

Change to red yarn

Round 9 :

sc around [25]

Info :

Change to blue yarn

Round 10-14 :

sc around [25]

Round :

slst

Item Name (Hands) :

Start with cream yarn. Rnd 1: 4 sc in a magic ring [4]. Rnd 2: inc, sc, inc, sc [6]. Change to red yarn. Rnd 3: sc 6 [6]. Rnd 4: sc 6 [6]. slst

Item Name (Hat) :

Start with orange yarn. Rnd 1: 4 sc in a magic ring [4]. Rnd 2: inc x 4 [8]. Rnd 3: (sc, inc) x 4 [12]. Rnd 4: sc around [12]. Rnd 5: (sc 2, inc) x 4 [16]. Rnd 6: (sc 3, inc) x 4 [20]. slst

Item Name (Nose) :

Start with cream yarn. Rnd 1: 4 sc in a magic ring [4]. slst

β€” Cow :

Info :

Start with white yarn

Round 1 :

5 sc in a magic ring [5]

Round 2 :

inc x 5 [10]

Round 3 :

(sc, inc) x 5 [15]

Round 4 :

(sc 2, inc) x 5 [20]

Round 5 :

(sc 3, inc) x 5 [25]

Round 6-13 :

sc around [25]

Round :

slst

Item Name (Nose) :

Start with pink yarn. Rnd 1: 4 sc in a magic ring [4]. Rnd 2: inc x 4 [8]. slst

Item Name (Ears) :

make two. Ear 1: Start with white yarn. Make a chain [3], turn. Row 2: sc 2, slst. Ear 2: Start with black yarn. Make a chain [3], turn. Row 2: sc 2, slst.

Item Name (Horns) :

make two. Start with cream yarn. Rnd 1: 3 sc in a magic ring [3]. Rnd 2: sc x 3 [3]. Rnd 3: sc x 3 [3]. slst

Item Name (Black Patch) :

make two. Patch 1: Start with black yarn. Rnd 1: 3 sc in a magic ring [3]. Rnd 2: inc x 3 [6]. slst. Patch 2: Start with black yarn. Rnd 1: 4 sc in a magic ring [4]. Rnd 2: inc x 4 [8]. slst

β€” Chicken :

Info :

Start with white yarn

Round 1 :

5 sc in a magic ring [5]

Round 2 :

inc x 5 [10]

Round 3 :

(sc, inc) x 5 [15]

Round 4 :

(sc 2, inc) x 5 [20]

Round 5 :

(sc 3, inc) x 5 [25]

Round 6-13 :

sc around [25]

Round :

slst

Item Name (Chicken Beak) :

Start with orange yarn. Make a chain [4], turn. Row 2: sc 2, inc, sc 2, slst

Item Name (Chicken Comb) :

Start with red yarn. Make a chain [6], turn. Row 2: sc, dc, slst, dc, sc, slst

β€” Cat :

Info :

Start with grey yarn

Round 1 :

5 sc in a magic ring [5]

Round 2 :

inc x 5 [10]

Round 3 :

(sc, inc) x 5 [15]

Round 4 :

(sc 2, inc) x 5 [20]

Round 5 :

(sc 3, inc) x 5 [25]

Round 6-13 :

sc around [25]

Round :

slst

Item Name (Ears) :

make two. Start with grey yarn. Make a chain [3], turn. Row 2: sc 2, slst

β€” Duck :

Info :

Start with yellow yarn

Round 1 :

5 sc in a magic ring [5]

Round 2 :

inc x 5 [10]

Round 3 :

(sc, inc) x 5 [15]

Round 4 :

(sc 2, inc) x 5 [20]

Round 5 :

(sc 3, inc) x 5 [25]

Round 6-13 :

sc around [25]

Round :

slst

Item Name (Beak) :

Start with orange yarn. Make a chain [5], turn. Rnd 1: sc 3, inc, sc 3 [8]. slst

β€” Pig :

Info :

Start with pink yarn

Round 1 :

5 sc in a magic ring [5]

Round 2 :

inc x 5 [10]

Round 3 :

(sc, inc) x 5 [15]

Round 4 :

(sc 2, inc) x 5 [20]

Round 5 :

(sc 3, inc) x 5 [25]

Round 6-13 :

sc around [25]

Round :

slst

Item Name (Nose) :

Start with pink yarn. Rnd 1: 4 sc in a magic ring [4]. Rnd 2: inc, sc, inc, sc [6]. slst

Item Name (Ears) :

make two. Start with pink yarn. Make a chain [3], turn. Row 2: sc 2, slst

β€” Dog :

Info :

Start with brown yarn

Round 1 :

5 sc in a magic ring [5]

Round 2 :

inc x 5 [10]

Round 3 :

(sc, inc) x 5 [15]

Round 4 :

(sc 2, inc) x 5 [20]

Round 5 :

(sc 3, inc) x 5 [25]

Round 6-13 :

sc around [25]

Round :

slst

Item Name (Ears) :

Start with brown yarn. Rnd 1: 4 sc in a magic ring [4]. Rnd 2: inc x 4 [8]. Rnd 3-5: sc around [8]. slst

Item Name (Snout) :

Start with cream yarn. Make a chain [4], turn. Row 2: sc, sc, inc, sc, sc, inc [8]. Rnd 3: sc around [8]. slst

Item Name (Nose) :

Start with brown yarn. Rnd 1: 4 sc in a magic ring [4]. slst

β€” Horse :

Info :

Start with brown yarn

Round 1 :

5 sc in a magic ring [5]

Round 2 :

inc x 5 [10]

Round 3 :

(sc, inc) x 5 [15]

Round 4 :

(sc 2, inc) x 5 [20]

Info :

Change to brown yarn

Round 5-7 :

sc around [20]

Round :

slst

Item Name (Nose) :

Start with pink yarn. Rnd 1: 5 sc in a magic ring [5]. Rnd 2: inc x 5 [10]. Rnd 3: (sc, inc) x 5 [15]. Rnd 4: (sc 2, inc) x 5 [20]. Change to brown yarn. Rnd 5-7: sc around [20]. slst

Item Name (Ears) :

make two. Start with brown yarn. Make a chain [3], turn. Row 2: sc 2, slst

β€” Donkey :

Info :

Start with grey yarn

Round 1 :

5 sc in a magic ring [5]

Round 2 :

inc x 5 [10]

Round 3 :

(sc, inc) x 5 [15]

Round 4 :

(sc 2, inc) x 5 [20]

Info :

Change to grey yarn

Round 5-7 :

sc around [20]

Round :

slst

Item Name (Nose) :

Start with white yarn. Rnd 1: 5 sc in a magic ring [5]. Rnd 2: inc x 5 [10]. Rnd 3: (sc, inc) x 5 [15]. Rnd 4: (sc 2, inc) x 5 [20]. Change to grey yarn. Rnd 5-7: sc around [20]. slst

Item Name (Ears) :

make two. Start with grey yarn. Make a chain [3], turn. Row 2: sc 2, slst

β€” Lamb :

Info :

Start with white yarn

Round 1 :

5 sc in a magic ring [5]

Round 2 :

inc x 5 [10]

Round 3 :

(sc, inc) x 5 [15]

Info :

Change to cream yarn

Round 4 :

(sc 2, inc) x 5 [20]

Round 5 :

(sc 3, inc) x 5 [25]

Round 6-7 :

sc around [25]

Info :

Change to white yarn

Round 8-13 :

sc around [25]

Round :

slst

Item Name (Ears) :

make two. Start with cream yarn. Make a chain [3], turn. Row 2: sc 2, ch 1, slst

Assembly Instructions

  • Sew the nose in the center on the 7th round for Old McDonald and other puppets that specify the 7th round; secure with small stitches so the nose sits centered.
  • Sew the eyes 1-4 stitches apart according to each animal's instruction (Old McDonald: 7th round, 1 stitch apart; Cat: 5th round, 4 stitches apart; Lamb: 6th round, 4 stitches apart).
  • Attach ears and horns by sewing them on the designated rounds and spacing (for cows and horses, place ears 2 stitches apart from the eyes when instructed).
  • Sew small parts like beaks, snouts, and patches flat against the body on the round indicated (for example, chicken beak on 5th round, cow patches on the body round shown).
  • Embroider small facial details (moustache, whiskers, mouth) with sewing thread before finishing assembly to ensure neat placement.
  • Pin pieces in place before final sewing to check symmetry and use small, tidy stitches to attach parts permanently.

Important Notes

  • πŸ’‘Work in Back Loop Only (BLO) where indicated to create a flat, thin puppet body suitable for finger puppets.
  • πŸ’‘Use small black beads for eyes and sew them securely from the inside with a knot to prevent loosening.
  • πŸ’‘Change yarn colors at the ends of rounds exactly as instructed to keep color bands and clothes neat and aligned.
  • πŸ’‘Leave minimal stuffing in small parts like noses and snouts so shapes stay defined and are easy to sew onto the body.
  • πŸ’‘Pin all parts before sewing to ensure correct placement and symmetry across the face and body.

Create a little farm full of handmade charm with this Farm Finger Puppet set β€” perfect for tiny hands and big imaginations. These miniature amigurumi make sweet pocket-sized gifts and storytime companions for kids and collectors alike. Crochet them all and mix colors for unique characters. πŸ§ΆπŸ„βœ¨

You ask,

we answer.

FAQs

What size will the finished piece be?

Each finger puppet measures approximately 4-6 cm tall (finger size) when using the recommended hook no. 3 and the yarns listed.

Can I use different yarn weights for this pattern?

Yes, you can use different yarn weights but this will change the final size; choose an appropriate hook for the yarn and expect the puppet to be larger or smaller.

Do I need prior crochet experience for this pattern?

This pattern is rated intermediate, so basic knowledge of single crochet, increases, and simple shaping will help you follow the rounds and assembly.

How long does this project typically take to complete?

Making the full 10-puppet set typically takes about 12-15 hours; individual puppets can be completed in 30-90 minutes each depending on details.

Are the puppets safe for children?

Use embroidered eyes and stitched details instead of beads for very young children; small beads can be a choking hazard and should be secured or substituted.