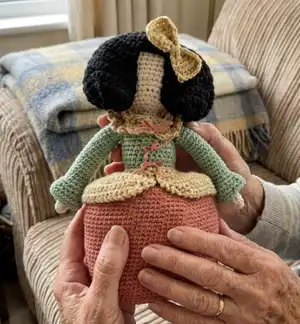
Create charming "Ladies in Waiting" dolls with this detailed amigurumi pattern. You will enjoy shaping the body, head, hair and layered skirts while learning useful assembly techniques. The pattern uses organic cotton and a 2.5mm hook for tidy stitch definition and a neat finish. Perfect for gifting or display, these dolls are full of handmade personality.
Progress Tracker
0% Complete
— Arms :
Info :
Make both the same. With flesh colour
Row 1 :
4 sc in a magic ring
Row 2 :
(1 inc) x 4 ........ (8sc)
Info :
Cut the thread and close. Leave aside until later
— Body :
Info :
With the colour chosen for the body, make 28 chains and close with a sl.st.
Info :
Cut the thread and weave in the loose ends.
Info :
With the flesh colour, on top of the last row make a row of slip stitches.
Row 13 :
28 slip stitches.
Info :
On the next row join the arms to the body. Make single crochets in the back loop BLO of the slip stitch on the previous row.
Info :
Take one of the arms and make 6sc around the top. Leave the loose strand at the bottom.
Row :
3sc, 1 dec, 4sc, 1 dec, 3sc,
Info :
Take the other arm and work 6sc. Leave the strand at the bottom to use later.
Row :
3sc, 1 dec, 2sc. (36 sts)
Info :
With a darning needle sew the hole inside the arms, using the attached strand.
Row 15 :
(4sc, 1 dec) x 6 (30 sts)
Row 16 :
2sc, 1 dec, (5sc and 1 dec) x 5, 3sc........ (36 sts)
Row 17 :
(4sc, 1 dec) x 6............. (30 sts)
Row 18 :
(3sc, 1 dec) x 6 .......(24 sts)
Row 19 :
(2sc and 1 dec) x 6 ........(18 sts)
— Head :
Row 1 :
1 inc in every stitch (24 sts)
Row 2 :
(3sc, 1 inc) x 6 (30 st)
Row 3 :
(1 inc, 4sc) x 6 (36 sts)
Row 4 :
2sc, 1 inc, (5sc, 1 inc) x 5 , 3sc....... (42 sts)
Row 5 :
(6sc, 1 inc) x 6 ........(48 sts)
Row 15 :
(6sc, 1 dec) x 6 (42 sts)
Row 16 :
2sc, 1 dec, (5sc and 1 dec) x 5, 3sc........ (36 sts)
Row 17 :
(4sc, 1 dec) x 6............. (30 sts)
Row 18 :
(3sc, 1 dec) x 6 .......(24 sts)
Row 19 :
(2sc and 1 dec) x 6 ........(18 sts)
Row 20 :
(1sc and 1 dec) x 6 ..........(12 sts)
Info :
Cut the yarn and close the head.
Info :
Fill the body and sew closed along the bottom.
— Skirt :
Info :
Use a colour different from the body. Make 30 ch and close the loop with a sl.st. Leave a long strand to sew the skirt to the body
Row 3 :
5sc, 6 inc, 9sc, 6 inc, 4sc (42 sts)
Row 4 :
5sc, 1 inc, 2sc, 1 inc, 4sc, 1 inc, 2sc, 1 inc, 4sc, 1 inc, 9sc, 1 inc, 2sc, 1 inc, 4sc (50 sts)
Row 5 :
5sc, 1 inc, 4sc, 1 inc, 4sc, 1 inc, 4sc, 1 inc, 4sc, 1 inc, 9sc, 1 inc, 4sc (58 sts)
Row 6 :
7sc, 1 inc, 4sc, 1 inc, 4sc, 1 inc, 4sc, 1 inc, 13sc, 1 inc, 4sc, 1 inc, 4sc, 1 inc, 4sc, 1 inc, 6sc. (66 sts)
Row 7 :
11sc, 1 inc, 3sc, 1 inc, 2sc, 1 inc, 3sc, 1 inc, 21sc, 1 inc, 3sc, 1 inc, 2sc, 1 inc, 3sc, 1 inc, 10sc (74 sts)
Row 8 :
14sc, 1 inc, 3sc, 1 inc, 7sc, 1 inc, 3sc, 1 inc, 13sc, 1 inc, 3sc, 1 inc, 7sc, 1 inc, 3sc, 1 inc, 13sc (82 sts)
Info :
Now place this part of the skirt on a piece cardboard and draw round the outline. Trim and leave until later.
Info :
Cut the yarn and weave in the loose ends.
— Overskirt :
Info :
If you want to make the Lady in waiting in two colours, make the overskirt with the same colour as used for the body. If you want to make the Lady in waiting in three colours, make the overskirt with a third colour. Make 32ch. Leave a long strand to sew on to the body. Finish all rows with 1ch and turn. From the 2nd ch from the hook.
Row 3 :
5sc, 6 inc, 9sc, 6 inc, 5sc (43 sts)
Row 4 :
5sc, 1 inc, 2sc, 1 inc, 4sc, 1 inc, 2sc, 1 inc, 9sc, 1 inc, 2sc, 1 inc, 4sc, 1 inc, 2sc, 1 inc, 5sc (51 sts)
Row 5 :
5sc, 1 inc, 4sc, 1 inc, 4sc, 1 inc, 4sc, 1 inc, 9sc, 1 inc, 4sc, 1 inc, 4sc, 1 inc, 5sc (59 sts)
Row 6 :
7sc, 1 inc, 4sc, 1 inc, 4sc, 1 inc, 4sc, 1 inc, 13sc, 1 inc, 4sc, 1 inc, 4sc, 1 inc, 7sc. (67 sts)
Row 7 :
11sc, 1 inc, 12sc, 1 inc, 18sc, 1 inc, 12sc, 1 inc, 11sc, 11sc (71 sts)
Row 8 :
14sc, 1 inc, 10sc, 1 inc, 20sc, 1 inc, 10sc, 1 inc, 14sc (75sts)
Rows 9 to 11 :
skip the 1st stitch then make a single crochet in every stitch of the row until the last and finish with a sl.st
Info :
Cut the yarn and weave in the loose thread. Now start at one end and work a row of crab stitch.
Info :
If you are making the Lady in waiting in two colours, work a row of sl.sts on the row of starting chains.
— Dress Base :
Info :
In a magic circle make, 6 p.b. (6 sc)
Row 2 :
(1sc, 1 inc) x 6 (18 sts)
Row 3 :
(2sc, 1 inc) x 6 (24 sts)
Row 4 :
(3sc, 1 inc) x 6 (30 sts)
Row 5 :
5sc, 6 inc. 9sc, 6 inc. 4sc (42 sts)
Row 6 :
5sc, 1 inc., 2sc, 1 inc, 4sc, 1 inc, 2sc, 1 inc, 4sc, 1 inc, 2sc, 1 inc, 4sc, 1 inc, 9sc, 1 inc, 2sc, 1 inc, 4sc (50 sts)
Row 7 :
5sc, 1 inc, 4sc, 1 inc, 4sc, 1 inc, 4sc, 1 inc, 4 pb, 1 aum. 9sc, 1 inc, 4sc, 1 inc, 4sc, 1 inc, 4sc (58 sts)
Row 8 :
7sc, inc, 4sc, 1 inc, 4sc, 1 inc, 4sc, 1 inc, 13sc, 1 inc, 4sc, 1 inc, 4sc, 1 inc, 6sc. (66 sts)
Row 9 :
11sc, 1 inc, 3sc, 1 inc, 2sc, 1 inc, 3sc, 1 inc, 21sc, 1 inc, 3sc, 1 inc, 2sc, 1 inc, 3sc, 1 inc, 10sc (74 sts)
Row 10 :
14sc, 1 inc, 3sc, 1 inc, 7sc, 1 inc, 3sc, 1 inc, 13sc, 1 inc, 3sc, 1 inc, 7sc, 1 inc, 3sc, 1 inc, 13sc (82 sts)
Row 11 :
10sc, 4hdc, 1 inc.(hdc) 3hdc, 1 inc (hdc), 7hdc, 1 inc (hdc), 3hdc, 1 inc (sc), 20sc, 1 inc (sc), 3hdc, 1 inc (hdc) 7hdc, 1 inc (hdc) 3hdc, 1 inc (hdc), 4hdc, 10sc. (90sts)
Info :
Cut the yarn and weave in the loose ends. Lightly iron the base of the dress. Adjust the size of the cardboard to the base. The crochet base must be wider than that of the cardboard, so you can then sew it to the skirt easily. Pour some white glue into the cardboard and stick to the base. Let dry.
— Hair :
Info :
The first 8 rows are worked in a spiral, end them by making 1 sl.st, 1ch turn and work in the other direction. The rest of the rows will end with 1ch and turn. In magic circle make 6sc,
Row 1 :
6 inc, 1ch and turn (12 sts)
Row 2 :
(1sc, 1 inc) x 6 (18 sts)
Row 3 :
(2sc, 1 inc) x 6 (24 sts)
Row 4 :
(3sc, 1 inc) x 6 (30 sts)
Row 5 :
(4sc, 1 inc) x 6 (36 sts)
Row 6 :
(5sc, 1 inc) x 6 (42 sts)
Row 7 :
(6sc, 1 inc) x 6 (48 sts)
Row 8 :
10sc (1 inc,1sc) x 6, 11sc, (1 inc, 1sc) x 6, 3sc (60sts)
Row 9 :
54sc The 6 unworked stitches will form the fringe.
Row 10 :
1sc, 1 inc, 50sc, 1 inc, 1sc (56sts)
Row 12 :
1sc, 1 inc, 52sc, 1 inc, 1sc (58 sts)
Row 14 :
1sc, 1 inc, 48sc, 1 sl.st. (7 stitches remaining.) turn
Row 15 :
Skip the 1st sl.st and make 42sc, - 1sl.st. (8 stitches remaining) turn
Row 16 :
skip the 1st sl.st and make 48sc, - now work the sl.st that was skipped on the previous row - 1 inc, 1sc.
Row 17 :
60sc and work the sl.st skipped on the previous row.
Row 18 :
1sc , 1 inc, 48sc,1sl.st. Turn. 9 stitches remaining
Row 19 :
skip the 1st sl.st and work 40sc, 1sl.st. 10 stitches remaining.
Row 20 :
skip the 1st sl.st, 48sc, - now work the sl.st that was skipped on the previous row - 1 inc, 1sc.
Row 21 :
62sc now work the sl.st that was skipped on the previous row
Row 22 :
1sc,1inc,58sc,1 inc,1sc.
Row 24 :
3 double decs, (2sc, 1 dec) x 11, 2sc, 3 double decs. 41 sts
Row 25 :
1 double decs, (1sc, 1 dec ) x 11 , 2sc, 1 double decs. Cut the yarn and weave in loose ends.
— Lady in Waiting Type A - Sleeve :
Info :
With the colour of yarn used for the body make 10ch and close the circle with a sl.st.
Row 5 :
(3sc, 1 dec) x 4 (16 sts)
Row 7 :
(2sc, 1 dec) x 4 (12sts)
Info :
Cut the yarn and weave in the starting thread. The thread at the end will be used to attach the sleeve to the body
— Lace For The Neckline :
Row 3 :
(1sc, 1dc, 1sc in the same stitch, 1sl.st in the next stitch) repeat until the end of the row.
Info :
Now with slip stitches position yourself at the height of the initial chain and make: *3ch, skip 1ch. and sl.st into the next stitch.*. Repeat from *a* until all the chain is covered. Weave in one of the loose ends, the other one will be use to sew it onto the body.
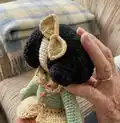
— Bow :
Info :
10 ch. – The last 3 count as 1dc. Work 5 rows each with 7dc. Cut the yarn and weave in the ends. Wind a strand of yarn wind two or three times around the middle of the loop, to shape it. Use the same strand to sew it onto the hair.
— Flower :
Info :
Using a colour that will stand out on the colour of the dress and the hair make 15ch. *Skip a chain and in the next make 1sc, 1hdc, 1sc.* Repeat * to * 7 times. Roll up the petals and make a few stitches at the back hold them together
— To Make Up (Assembly) :
Info :
Once all the elements have been made you will need to sew them together. Pull the sleeve over the arm and sew to the shoulder. Sew the collars around the neckline (style A or B). Hold in position with pins first to get it even.
Info :
Now you must add the skirt. With pins position around the waist and sew to the body. Do the same with the overskirt.
Info :
Now we will have to fill the skirt and to help the Lady in waiting stay upright, especially the head, insert a stick, skewer type that goes from the base to the head.
Info :
To attach the base to the skirt use the crochet hook, taking a chain from the base and another chain of the skirt and making slip stitches. Check that the skirt is filled enough before completely closing.
Info :
Position the hair and hold in place with pins the "face". And to finish position the bow or flower in one of the corners of the fringe.
The crochet base is attached to a cut piece of cardboard so the doll stands perfectly upright and the skirt keeps its shape. Glue the cardboard to the base and let it dry fully before sewing the skirt to it. This little structural step makes a big difference for display and helps the head stay steady when you add the skewer. 🧷🧵