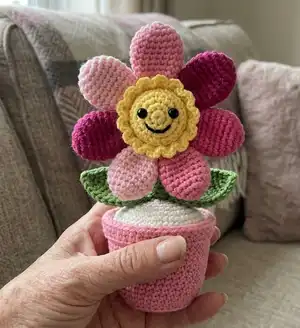
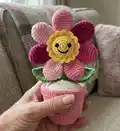
Make a charming Little Floweret stuffed toy with clear, step-by-step crochet instructions. This pattern uses cotton-blend yarn and small hooks to create a sweet flower character with petals, leaves, a removable collar and a tiny flower pot. Youll love how the pieces assemble into a cheerful, gift-ready toy that brightens any shelf or nursery. Perfect as a handmade present or a colorful decor piece.
Progress Tracker
0% Complete
— Legs :
Info :
Stuff as you go. Worked in nude color.
Round 1 :
6 sc into an AMR (6)
Round 3 :
(1 sc, 1 inc) 6 times (18)
Round 4 :
(2 sc, 1 inc) 6 times (24)
Round 5 :
1 sc each in every stitch (24)
Round 6 :
5 sc, 7 dec, 5 sc (17)
Round 7 :
1 sc each in every stitch (17)
Info :
On the first leg, break the working yarn, secure the last stitch, and hide the end. On the second leg, work 4 sc more to get to the inside (crotch side) of the leg. Do not break the working yarn, continue to work the body with it.
— Body :
Info :
Take up the first leg, and insert the crochet hook into the stitch on the inside of the leg (I counted off 4 sts from the beginning of the round towards the right - in the photo, the spot is marked with a black pin) – this will be the beginning of the round for the body; mark this spot with a piece of contrasting yarn or a stitch marker.
Info :
Work over the stitches of both legs. Stuff as you go.
Round 1 :
5 inc, 7 sc, 10 inc, 7 sc, 5 inc (54)
Round 2 :
1 sc each in every stitch (54)
Round 3 :
4 sc, 1 inc, (8 sc, 1 inc) 5 times, 4 sc (60)
Round 4 :
(9 sc, 1 inc) 6 times (66)
Round 5 :
5 sc, 1 inc, (10 sc, 1 inc) 5 times, 5 sc (72)
Info :
Take up a piece of nude-colored yarn, thread it through the remaining opening in the crotch area, cinch from the inside to pull the opening closed, and secure with a knot.
Round 6-15 :
10 rounds total – 1 sc each in every stitch (72)
Round 16 :
24 sc, 12 dec, 24 sc (60)
Round 17 :
(8 sc, 1 dec) 6 times (54)
Round 18 :
1 sc each in every stitch (54)
Round 19 :
(7 sc, 1 dec) 6 times (48)
Round 20 :
1 sc each in every stitch (48)
Round 21 :
(6 sc, 1 dec) 6 times (42)
Round 22 :
1 sc each in every stitch (42)
Round 23 :
(5 sc, 1 dec) 6 times (36)
Round 24 :
1 sc each in every stitch (36)
Round 25 :
(4 sc, 1 dec) 6 times (30)
Info :
Break the working yarn, leaving an end long enough for seaming. Stuff the piece with fiberfil.
Info :
Using a piece of nude-colored yarn, cinch the posterior for shaping. 1. Attach the yarn in the back between the legs (the tail of the yarn outside). 2. Insert the needle 12 rows up. 3. Pull the yarn inside the body and exit the needle in the spot where you started. 4. Pull at the yarn with medium strength towards you to create the strand for the "crack". Then make two more stitches like the first one over the first strand (steps 2 to 4): insert the needle 12 rows up and exit the needle between the legs below again, don't forget to pull at the yarn every time. Fasten the yarn, and hide the end on the inside.
— Petals (make 6) :
Info :
Worked in Pink. (I used two shades of Pink – you can make all petals the same color if you prefer.)
Round 1 :
6 sc into an AMR (6)
Round 3 :
(1 sc, 1 inc) 6 times (18)
Round 4 :
(2 sc, 1 inc) 6 times (24)
Round 5 :
(3 sc, 1 inc) 6 times (30)
Round 6-8 :
3 rounds total – 1 sc each in every stitch (30)
Round 9 :
(8 sc, 1 dec) 3 times (27)
Round 10 :
1 sc each in every stitch (27)
Round 11 :
(7 sc, 1 dec) 3 times (24)
Round 12 :
1 sc each in every stitch (24)
Round 13 :
(2 sc, 1 dec) 6 times (18)
Info :
Stuff the piece with fiberfil to fill half of the petal. Fold the piece in half, and crochet the edges of both layers together with 8 sc. Break the working yarn, and hide the tail on the inside.
— Head :
Info :
Begin with dark yellow – this will be the center. Crochet a chain of ch5 + ch1 for height adjustment.
Round 1 :
4 sc, 3 sc into the last chain. Continue into the unused loops on the opposite side of the chain: 3 sc, 1 inc into the first chain. (12)
Round 2 :
1 inc, 3 sc, 3 inc, 3 sc, 2 inc (18)
Round 3 :
1 sc, 1 inc, 3 sc, (1 sc, 1 inc) 3 times, 3 sc, (1 sc, 1 inc) 2 times (24)
Round 4 :
2 sc, 1 inc, 3 sc, (2 sc, 1 inc) 3 times, 3 sc, (2 sc, 1 inc) 2 times (30)
Round 5 :
3 sc, 1 inc, 3 sc, (3 sc, 1 inc) 3 times, 3 sc, (3 sc, 1 inc) 2 times (36)
Round 6 :
4 sc, 1 inc, 3 sc, (4 sc, 1 inc) 3 times, 3 sc, (4 sc, 1 inc) 2 times (42)
Round 7 :
blo – 1 sc each in every stitch (42)
Round 8 :
joining the petals: Step 1 Insert the hook through both the second st of the petal + the blo of the flower head center = work 1 sc.
Round 8 Step 2 :
Work the next 5 sc, always grasping the sts of the petal + the blo of the flower head center.
Round 8 Step 3 :
Insert the hook through both the last st of the petal + into the first st of the next petal + the blo of the flower head center = work 1 sc.
Round 8 Step 4 :
Work the next 6 sc, always grasping the sts of the petal + the blo of the flower head center.
Round 8 Step 5 :
Insert the hook into the last st of the petal + into the first st of the next petal + the blo of the flower head center = work 1 sc. Repeat Steps 4 and 5 all around to the end of the round, until the circle has been completed.
Info :
Change yarn to Green.
Round 9 :
in Green – (6 sc, 1 inc) 6 times (48)
Info :
Now, insert the safety eyes, and attach the washers from the inside of the head, then embroider the cheeks and mouth (see photo).
Info :
Attach new working yarn in color light green to the first loop (half stitch) of Rnd 6. Crochet a chain of ch3, and work a sl-st into the same stitch. Again, ch3, and work a sl-st into the next st. Work in this way to the end of the round. Break the working yarn, thread the tails through to the wrong side, and secure them there.
Info :
Attach new working yarn in yellow to the first loop (half stitch) of Rnd 7 of the flower head center. Crochet a chain of ch4, and work a sl-st into the same stitch. Again, ch4, and work a sl-st into the next st. Work in this way to the end of the round. Break the working yarn, and secure the end.
Round 10-17 :
8 rounds total – 1 sc each into every st (48)
Round 18 :
3 sc, dec, (6 sc, 1 dec) 5 times, 3 sc (42)
Round 19 :
(5 sc, 1 dec) 6 times (36)
Round 20 :
2 sc, dec, (4 sc, 1 dec) 5 times, 2 sc (30)
Round 21 :
(3 sc, 1 dec) 6 times (24)
Info :
Stuff the piece with fiberfil.
Round 22 :
1 sc, dec, (2 sc, 1 dec) 5 times, 1 sc (18)
Round 23 :
(1 sc, 1 dec) 6 times (12)
Info :
Add more stuffing. Cinch the remaining opening closed, and hide the yarn tail.
— Leaf (make 2) :
Step 1 :
Crochet a chain of ch11 + ch1 for height adjustment.
Step 2 :
Work 11 sl-st along the chain, ch1.
Step 3 :
Without turning work, work into the unused loops on the opposite side of the chain: 2 sc into the same st, 1 hdc, 6 dc, 1 hdc, 2 sc, ch2.
Step 4 :
You will now repeat the same stitch sequence mirror-inverted (=backwards) on the other side of the leaf: Insert the hook under the loop (half stitch) of the stitch which is located under the center "braid", and work: 2 sc, 1 hdc, 6 dc, 1 hdc, 2 sc into the same st.
Step 5 :
1 sl-st each into every st around. Break the working yarn, leaving an end long enough for seaming.
— Collar :
Info :
Worked in Green in back-and-forth-rows with turning.
Info :
Crochet a chain of ch36 + ch1 for height adjustment.
Row 1 :
1 sc each in every stitch, ch3, turn work.
Row 2 :
alternate (dc, dc-inc) to the end of the round, then ch3, sl-st into the same st.
Info :
Without breaking the working yarn, crochet a chain of ch30, then work 36 sl-st along the upper edge of the collar, again crochet a chain of ch30, sl-st into the last st. Break the working yarn, and secure.
— Flower Pot :
Info :
Crochet a chain of ch5 + ch1 for height adjustment.
Round 1 :
4 sc, 3 sc into the last chain. Continue into the unused loops on the opposite side of the chain: 3 sc, 1 inc into the first chain. (12)
Round 2 :
1 inc, 3 sc, 3 inc, 3 sc, 2 inc (18)
Round 3 :
1 sc, 1 inc, 3 sc, (1 sc, 1 inc) 3 times, 3 sc, (1 sc, 1 inc) 2 times (24)
Round 4 :
2 sc, 1 inc, 3 sc, (2 sc, 1 inc) 3 times, 3 sc, (2 sc, 1 inc) 2 times (30)
Round 5 :
3 sc, 1 inc, 3 sc, (3 sc, 1 inc) 3 times, 3 sc, (3 sc, 1 inc) 2 times (36)
Round 6 :
4 sc, 1 inc, 3 sc, (4 sc, 1 inc) 3 times, 3 sc, (4 sc, 1 inc) 2 times (42)
Round 7 :
5 sc, 1 inc, 3 sc, (5 sc, 1 inc) 3 times, 3 sc, (5 sc, 1 inc) 2 times (48)
Round 8 :
6 sc, 1 inc, 3 sc, (6 sc, 1 inc) 3 times, 3 sc, (6 sc, 1 inc) 2 times (54)
Round 9 :
7 sc, 1 inc, 3 sc, (7 sc, 1 inc) 3 times, 3 sc, (7 sc, 1 inc) 2 times (60)
Info :
Cut a circle from cardboard to reinforce the bottom.
Round 10 :
blo – 1 sc each in every stitch (60)
Round 11 :
1 sc each in every stitch (60)
Round 12 :
(19 sc, 1 inc) 3 times (63)
Round 13 :
1 sc each in every stitch (63)
Round 14 :
(20 sc, 1 inc) 3 times (66)
Round 15 :
1 sc each in every stitch (66)
Round 16 :
1 sl-st each into every stitch (66)
Round 17 :
insert the hook at the same time under the blo of Rnd 16 + under the st of Rnd 15 (under the "braid") – (10 hdc, hdc-inc) 6 times (72)
Round 18 :
1 hdc each into every stitch. (72)
Round 19 :
(11 hdc, hdc-inc) 6 times (78)
Rounds 20-22 :
3 rounds total – 1 hdc each into every stitch. (78)
Round 23 :
blo – 1 hdc each into every stitch. (78)
Round 24 :
1 hdc each into every stitch. (78)
Info :
Break the working yarn, and secure the end.
Info :
Place the flower pot with the bottom away from you. Join new working yarn to the last front loop of Rnd 24. Crochet a chain of ch4, then work 1 tr each into every stitch around. Break the working yarn, leaving a long tail for seaming. Fold the brim away from you, and sew it to the unused loops of the sts located 2 rnds below. Insert the cardboard circle.
— Finishing and Embellishing :
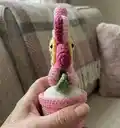
Info :
Sew on the head. Sewing on will be easier if a double-pointed knitting needle is inserted through head and body to hold them together. After inserting the DPN, pin the head in place using tailor pins.
Info :
Sew on the leaves at the sides, 4 rnds below the seam. (The leaves will be its "arms"). Place the collar around the neck, and tie it in the back.
Info :
Blush the posterior cheeks with dry pastel chalk. Apply the pastel chalk first to a piece of soft cloth, then rub them onto the highest spots on the cheeks with the cloth.
Info :
Your cute little floweret is finished! Now, you can give it away as a present.
This delightful Little Floweret is a small, joyful amigurumi that makes a perfect handmade gift. It combines neat shaping, removable collar details, and a sturdy flower pot base for display. Make one in bright colors or soft pastels to suit any room or recipient. 🌸🧵