🧢 Beautiful ✨ Detailed πŸ’ Adorable

Carrot Lip Balm Holder Amigurumi Pattern

Carrot Lip Balm Holder Amigurumi Pattern
4.6β˜… Rating
1-2 Hours Time Needed
1.4K Made This
βœ‚οΈ

Beginner Friendly Level

Perfect for those just starting their crochet journey, with clear instructions and simple techniques

⏱️

Quick Make

Complete in under 2 hoursβ€”lightning fast fun for instant gratification and quick gifts.

🎁

Tiny Treasure

Small, sweet, and gift-worthy creations that fit perfectly in the palm of your hand with detailed charm.

About This Carrot Lip Balm Holder Amigurumi Pattern

This pattern creates a small crocheted carrot lip balm holder designed to fit standard lip balm tubes. The carrot is worked in continuous rounds and comes in two pieces: the main pointed body and a removable top/lid. Youll add green yarn strands to finish the carrot top for a realistic look.

Carrot Lip Balm Holder Amigurumi Pattern crochet pattern - detailed view of completed project

Clear, photo-backed instructions walk you through every round so you can follow along easily. Ideal for making quick gifts, party favors, or a cute decorative accessory.

Why You'll Love This Carrot Lip Balm Holder Amigurumi Pattern

I absolutely love this pattern because it is fast, satisfying, and results in a charming, useful gift. I enjoy how the continuous rounds create a smooth, tapered carrot shape with minimal sewing. The removable lid design makes it practical for hiding a lip balm or rolled bills, which is always a fun surprise for recipients. I also love that the pattern uses basic stitches so it is accessible yet still rewarding to make.

Carrot Lip Balm Holder Amigurumi Pattern step 1 - construction progress Carrot Lip Balm Holder Amigurumi Pattern step 2 - assembly progress Carrot Lip Balm Holder Amigurumi Pattern step 3 - details and accessories Carrot Lip Balm Holder Amigurumi Pattern step 4 - final assembly and finishing

Switch Things Up

I love how easily this pattern can be customized by color and size; try brighter or paler oranges to match seasons or themes.

You can change the yarn weight and hook to create different sizes: a bulky yarn makes a chunky carrot while a fingering yarn makes a tiny keychain version.

I sometimes add a small embroidered smile or French-knot eyes on the top for extra personality and to turn the carrot into a tiny character.

Swap the green strands for longer leaves, or braid several strands together for a fuller top; trimming at different lengths changes the overall look.

If you want a more secure lid, stitch the top to the body with small whipstitches so it stays attached but can still be removed with care.

I often use variegated orange yarn for a rustic, textured carrot effect that looks very handmade and cozy.

You can add a small loop at the top to turn this into a zipper pull or bag charm by leaving a longer tail and forming a loop before trimming.

I recommend trying different yarn fibers (acrylic for easy care, cotton for a firmer fabric) to see which drape and feel you prefer.

Consider making a set in different sizes to create a nest of carrots for spring decorations or a themed gift box.

I also like adding tiny accessories like a ribbon around the top or a small safety eye if making a toy-like carrot for display.

Common Mistakes & How to Fix Them

βœ— Skipping stitch markers when learning continuous rounds can lead to losing your place; use a stitch marker to mark the first stitch of each round to keep track easily. βœ— Not closing the magic ring tightly will leave a hole at the tip of the carrot; pull the ring closed and weave in the tail at the start to secure the center. βœ— Forgetting to count after increases results in incorrect shaping and sizes; count your stitches after each increase round to make sure they match the pattern. βœ— Pulling yarn too tightly on small pieces makes the finished item stiff and uneven; maintain even, relaxed tension so the fabric remains smooth and the shape forms correctly. βœ— Trimming green strands too short or unevenly makes the top look messy; measure and trim evenly after attaching to achieve a polished finish.

Carrot Lip Balm Holder Amigurumi Pattern

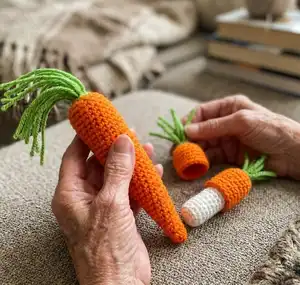
Make a charming carrot lip balm holder that fits standard lip balm tubes and doubles as a fun money gift holder. This quick crochet project uses simple continuous rounds and basic stitches to create a cute, pocket-sized carrot with a removable top and green strands. Perfect for gifting or making multiples for seasonal favors, the pattern includes step-by-step rounds and clear photo-based instructions. Youll love how fast it comes together and how adorable the final piece looks.

Beginner Friendly 1-2 Hours

Materials Needed for Carrot Lip Balm Holder Amigurumi Pattern

β€” Main Fabric

  • 01
    Worsted weight (4) yarn in Orange - approx 20-30g (I used Red Heart Super Saver Pumpkin)
  • 02
    Worsted weight (4) yarn in Green - small amount for green strands (I used Red Heart Super Saver Spring Green)

β€” Tools Required

  • 01
    Crochet hook size F/5/3.75mm (or size needed to obtain gauge)
  • 02
    Scissors
  • 03
    Tapestry needle for weaving ends and closing magic rings
  • 04
    Measuring tape
  • 05
    Stitch markers (optional)

Progress Tracker

0% Complete

β€” Materials :

Info :

Size F/5/3.75mm crochet hook or size needed to obtain gauge. Worsted weight (4) yarn in Orange (I used Red Heart Super Saver yarn in Pumpkin). Worsted weight (4) yarn in Green (I used Red Heart Super Saver yarn in Spring Green). Scissors. Tapestry needle. Measuring tape. Optional: stitch markers.

β€” Abbreviations :

Infos :

ch = chain. chs = chains. sc = single crochet. slst = slip stitch. st = stitch. sts = stitches.

β€” Gauge :

Info :

5 sc = 1 inches; 6 rounds = 1 inch

β€” Pattern Notes :

Info :

The carrot is made in continuous rounds. Do not join round with a slip stitch unless otherwise indicated. Simply work the first stitch of a round in the first stitch from the previous round. You may wish to use stitch markers to mark the beginning of each row to keep track more easily. Close the magic ring and weave in the loose end at the beginning since it gets very narrow as you work and it will be difficult to weave in at the end.

β€” Bottom of Carrot (Large Pointed Section) :

Info :

*The carrot is made in continuous rounds. Do not join rounds with a slip stitch. Simply make the first stitch of a round in the first stitch of the previous round.

Info :

*Make sure to pull the magic ring closed and weave in/secure end at closure at the beginning.

Info :

*Use your orange worsted weight yarn.

Round 1 :

Make a magic ring, ch 1, work 4 sc in magic ring, pull ring closed. (4 sc)

Round 2 :

Sc in each st around. (4 sc)

Round 3 :

Sc in each st around. (4 sc)

Round 4 :

2 sc in first st, sc in next st, 2 sc in next st, sc in next st. (6 sc)

Round 5 :

Sc in each st around. (6 sc)

Round 6 :

Sc in each st around. (6 sc)

Round 7 :

2 sc in first st, sc in next 2 sts, 2 sc in next st, sc in next 2 sts. (8 sc)

Round 8 :

Sc in each st around. (8 sc)

Round 9 :

Sc in each st around. (8 sc)

Round 10 :

2 sc in first st, sc in next 3 sts, 2 sc in next st, sc in next 3 sts. (10 sc)

Round 11 :

Sc in each st around. (10 sc)

Round 12 :

Sc in each st around. (10 sc)

Round 13 :

2 sc in first st, sc in next 4 sts, 2 sc in next st, sc in next 4 sts. (12 sc)

Round 14 :

Sc in each st around. (12 sc)

Round 15 :

Sc in each st around. (12 sc)

Round 16 :

Sc in each st around. (12 sc)

Round 17 :

Sc in each st around. (12 sc)

Round 18 :

Sc in each st around. (12 sc)

Round 19 :

Sc in each st around. (12 sc)

Round 20 :

Sc in each st around, slst to first st of round, fasten off, weave in end. (12 sc)

Info :

***You should now have the main portion of your carrot complete. Follow the directions below to make the top/lid of the carrot.

β€” Top/Lid of Carrot :

Info :

*The carrot top is also made in continuous rounds. Do not join rounds with a slip stitch. Simply make the first stitch of a round in the first stitch of the previous round.

Info :

*Make sure to pull the magic ring closed and weave in/secure end at closure at the beginning.

Info :

*Use your orange worsted weight yarn.

Round 1 :

Make a magic ring, ch 1, work 6 sc in magic ring, pull ring closed. (6 sc)

Round 2 :

2 sc in each st around. (12 sc)

Round 3 :

Sc in each st around. (12 sc)

Round 4 :

Sc in each st around. (12 sc)

Round 5 :

Sc in each st around. (12 sc)

Round 6 :

Sc in each st around. (12 sc)

Round 7 :

Sc in each st around. (12 sc)

Round 8 :

Sc in each st around, slst to first st of round, fasten off, weave in end. (12 sc)

Info :

**You should now have a completed orange top to your carrot. Follow the directions below to attach the green strands on the top.

β€” Attaching Green Strands to Carrot Top :

Item Name (P1) :

1. Cut 4 strands of green yarn that are each 6 inches long.

Item Name (P2) :

2. Holding the green strands together, fold them in half.

Item Name (P3) :

3. Insert your hook under the closed magic ring (first round) of the carrot top and pull through a loop (the fold of the green strands). Bring the ends of the green strands through the loop and pull tightly against the top of the carrot. The green strands should now be attached to the carrot top.

Item Name (P4) :

4. Trim the green strands so they are even.

Assembly Instructions

  • You should have two pieces: the main pointed bottom (Rounds 1-20) and the top/lid (Rounds 1-8); fit the top over the open end of the bottom to ensure it slides on as a lid before finishing placement.
  • Attach green strands to the top using the folded-loop method: fold 4 strands of green yarn (6" each), insert hook under the closed magic ring of the top, pull the fold through, bring ends through the loop and tighten to secure.
  • Weave in and secure all loose ends with a tapestry needle after closing the magic rings to prevent gaps at the tip and top; trim any excess yarn for a neat finish.
  • If you want the top to be removable but secure, position it on the carrot and use small whipstitches around the edge of the top and body to tack it lightly in place so it can still be removed if desired.
  • Insert your lip balm into the pointed bottom portion and place the top over it as a lid; adjust the green strands and trim evenly for the final look.

Important Notes

  • πŸ’‘Work in continuous rounds; do not join rounds with a slip stitch unless indicated.
  • πŸ’‘Close the magic ring and weave in the starting tail at the beginning since the tip becomes very narrow and is hard to secure later.
  • πŸ’‘Use stitch markers to mark the first stitch of each round to avoid losing your place during increases and shaping.
  • πŸ’‘Maintain consistent tension for even shaping; avoid pulling yarn too tightly on small rounds to keep a smooth finish.

This little carrot lip balm holder is a delightful quick-make gift that fits in the palm of your hand! 🎁 It makes a charming party favor or seasonal treat and is a fast project for any yarn stash. I hope this pattern brings you joy and bright, crafty moments as you stitch these tiny carrots. 🧢✨

You ask,

we answer.

FAQs

What size will the finished piece be?

The finished carrot measures approximately 5 inches long (not including the green strands) and about 3 inches around where the lip balm sits using the recommended yarn and hook size.

Can I use a different yarn weight?

Yes, you can change yarn weight, but it will affect the final size; choose an appropriate hook for your yarn and expect a larger or smaller finished carrot accordingly.

Do I need to join rounds with a slip stitch?

No, this pattern is worked in continuous rounds; do not join with a slip stitch unless the instructions explicitly say to do so.

How long does this project take to complete?

Most crafters complete a single carrot in under 2 hours, depending on experience and how quickly you work through continuous rounds.