🧢 Beautiful ✨ Detailed πŸ’ Adorable

Bunny Hand Puppet Amigurumi Pattern

Bunny Hand Puppet Amigurumi Pattern
4.4β˜… Rating
2-4 Hours Time Needed
2.0K Made This
βœ‚οΈ

Intermediate Level

Ideal for those with basic crochet experience, featuring slightly more advanced stitches and techniques to expand your skills.

⏱️

Bite-Sized Project

Finishes in 2-4 hoursβ€”perfect for an afternoon of creative relaxation.

🧸

Cute Companion

An adorable friend to cherish, handcrafted with love to bring comfort and joy for years to come.

About This Bunny Hand Puppet Amigurumi Pattern

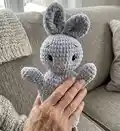
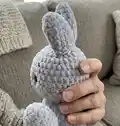
This pattern creates a soft, plush bunny hand puppet using super bulky plush yarn and basic amigurumi shaping. You will crochet the head, ears, arms and body, then embroider facial details and assemble them into a cuddly puppet. The instructions include how to indent eyes and close holes for a neat, professional finish.

Bunny Hand Puppet Amigurumi Pattern crochet pattern - detailed view of completed project

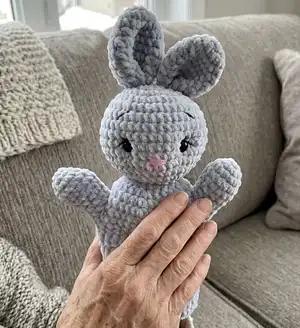
Step-by-step rounds and helpful photos guide you through each section, from magic ring starts to sewing pieces together. The finished puppet measures approximately 28 cm (11") tall using the recommended yarn and hook.

Why You'll Love This Bunny Hand Puppet Amigurumi Pattern

I absolutely love this pattern because it turns simple materials into a charming, tactile puppet that kids and adults adore. I enjoyed designing the ear shaping and indented eyes technique to give the bunny a sweet, expressive face. I love that the pattern is modular β€” you make separate pieces and assemble them, which makes fitting and positioning easy. The plush yarn creates a wonderfully soft texture that feels delightful to hold and play with.

Bunny Hand Puppet Amigurumi Pattern step 1 - construction progress Bunny Hand Puppet Amigurumi Pattern step 2 - assembly progress Bunny Hand Puppet Amigurumi Pattern step 3 - details and accessories Bunny Hand Puppet Amigurumi Pattern step 4 - final assembly and finishing

Switch Things Up

I love changing the yarn color to make a whole family of puppets; try pastel shades for a nursery set or bright colors for playful characters.

I often swap the super bulky plush yarn for a worsted or DK yarn with a smaller hook to create a smaller, more detailed mini puppet.

I sometimes replace plastic safety eyes with embroidered eyes for baby-safe toys and a softer look.

I add little crocheted accessories β€” like scarves, tiny hats, or pockets β€” to give each puppet its own personality and play value.

I experiment with facial expressions by adjusting eyebrow placement and eyelash length to create happy, sleepy, or surprised faces.

I like to vary ear shapes and sizes: longer floppy ears or rounder ears change the character immediately.

I use different embroidery threads for nose and mouth textures; a satin stitch nose gives a neat finish while a few French knots add charm.

I sometimes insert a bit of wire in the ears or arms for posability, securing the wire ends well inside so they are safe.

I create matching small props β€” like a mini carrot or tiny blanket β€” to extend play possibilities and make gift sets more special.

I always recommend trying a tension swatch and a test head to ensure your chosen yarn and hook give you the look and size you want before making the full puppet.

Common Mistakes & How to Fix Them

βœ— Not placing safety eyes at the correct rounds will make the face look off-center; mark the stitch positions and place the eyes between rounds 10 and 11 with 9 sc between them. βœ— Skipping to stuff the head until late can make shaping difficult; stuff the head gradually, especially before closing rounds 15-17, to keep even fullness. βœ— Forgetting to leave tails for sewing on the ears and body will complicate assembly; always leave long tails when instructed for easier attachment and secure sewing. βœ— Tension inconsistency between head and body yarn may cause mismatched sizes; use the recommended 4.5 mm hook and maintain even tension across all pieces. βœ— Stitch counting errors during increases and decreases cause shape issues; count stitches after each round and use markers for round starts and key placement points.

Bunny Hand Puppet Amigurumi Pattern

Make an adorable Bunny Hand Puppet using plush yarn and simple amigurumi techniques. This pattern guides you through step-by-step rounds, ear shaping, embroidery details, and assembly so you can create a soft, huggable puppet in one fun project. Perfect for gifting or playtime, the finished puppet measures about 28 cm (11") tall.

Intermediate 2-4 Hours

Materials Needed for Bunny Hand Puppet Amigurumi Pattern

β€” Main Fabric

  • 01
    Super bulky plush yarn - Himalaya Dolphin Baby (120 m - 100 g) or (131 yd - 3.52 oz) - gray color (1 skein, β„– 80351)
  • 02
    Sport cotton yarn - Yarn Art Jeans (160 m - 50 g) or (175 yd - 1.76 oz) - black color yarn for embroidery (eyebrows and eyelashes)
  • 03
    Sport cotton yarn - Yarn Art Jeans - pink color yarn for embroidery nose
  • 04
    Sport cotton yarn - Yarn Art Jeans - gray color yarn for sewing pieces (tail/assembly threads)
  • 05
    Fiber filler for stuffing the head
  • 06
    Plastic safety eyes 8 mm (1 pair)

β€” Tools Required

  • 01
    Crochet hook size 4.5 mm
  • 02
    Large needle (for embroidery and sewing)
  • 03
    Knitting markers (stitch markers)
  • 04
    Scissors
  • 05
    Yarn needle for sewing and weaving in ends
  • 06
    Pins for positioning pieces (optional)

Progress Tracker

0% Complete

β€” Head :

Info :

Use the gray plush yarn, hook 4.5 mm.

Round 1 :

7 sc in MR (7)

Round 2 :

inc * 7 (14)

Round 3 :

inc * 14 (28)

Round 4 :

(3 sc, inc) * 7 (35)

Round 5 :

(4 sc, inc) * 7 (42)

Round 6 :

(13 sc, inc) * 3 (45)

Round 7-11 :

45 sc (5 rounds)

Round 12 :

(13 sc, dec) * 3 (42)

Round 13 :

(4 sc, dec) * 7 (35)

Round 14 :

(3 sc, dec) * 7 (28)

Info :

Insert safe plastic eyes. Fix eyes between 10 and 11 rounds from the head's top. The distance between the eyes is 9 sc.

Info :

Stuff the head with fiber filler.

Round 15 :

(2 sc, dec) * 7 (21)

Round 16 :

(1 sc, dec) * 7 (14)

Round 17 :

dec * 7 (7)

Info :

Draw the yarn through 7 loops and tighten. Cut and secure the yarn.

Info :

HOW TO CLOSE A HOLE IN AMIGURUMI: https://youtu.be/DdqCijfLtXA

β€” Ears (2 details) :

Info :

Use the gray plush yarn and crochet hook 4.5 mm.

Round 1 :

7 sc in MR (7)

Round 2 :

inc * 7 (14)

Round 3 :

sc (14)

Round 4 :

(1 sc, inc) * 7 (21)

Round 5-8 :

21 sc (4 rounds)

Round 9 :

(1 sc, dec) * 7 (14)

Round 10 :

14 sc, sl st

Info :

Leave the tail for sewing. Cut the yarn. Don't stuff the piece. Make 2 details.

Info :

Fold in half and then quadruple and sew on top of the head at a distance of 1-2 cm from each other.

Info :

HOW TO INDENT AMIGURUMI EYES https://youtu.be/ta3Hl1hU8SY

Info :

Use the gray cotton yarn. Take the thread. Pull it through the back of the head and pull it out above the left eye. Leave the tail on back head's part.

Info :

Pass the needle from below under the left eye and pull out under the right eye. Make sure that the yarn falls from the inside of the left eye.

Info :

Next, pass the needle from above the right eye, making sure that the thread lies on the inside of the eye. And pull out the needle in the same place behind the head.

Info :

Tighten both threads so that the eyes are sunken. Tie a knot, hide the tail inside the head.

β€” Embroidery :

Info :

Use the pink yarn and a large needle. Embroider nose as shown on photos.

Info :

Use the thin black yarn and a large needle. Embroider eyelashes as shown on photos. Embroider eyebrows as shown on photos.

β€” Arms :

Info :

Use the gray plush yarn. Crochet hook 4.5 mm.

Round 1 :

6 sc in MR (6)

Round 2 :

inc * 6 (12)

Round 3 :

(2 sc, inc) * 4 (16)

Round 4-5 :

16 sc (2 rounds)

Round 6 :

(2 sc, dec) * 4 (12)

Round 7-9 :

12 sc (3 rounds)

Info :

Make sl st, cut the yarn. Don't stuff. Make 2 pieces.

β€” Body :

Info :

Use the gray plush yarn. Crochet hook 4.5 mm. Leave the tail for sewing, begin crochet without sl st. Make 24 ch, sl st in the first loop. Make a circle.

Round 1 :

24 sc

Round 2 :

(3 sc, inc) * 6 (30)

Round 3 :

(4 sc, inc) * 6 (36)

Round 4 :

(5 sc, ins) * 6 (42)

Round 5 :

crochet together with arm - 7 sc, 13 sc only on the body, 7 sc together with another arm, 15 sc only on the body (42)

Info :

Crochet sc2tog on both sleeves sides to avoid holes. HOW TO CROCHET SC2TOG https://youtu.be/tZqOHv2NJhM

Round 6 :

sc2tog, crochet only on the arm - 4 sc, sc2tog, 12 sc only on the body, sc2tog, 4 sc only on the another arm, sc2tog, 14 sc only on the body (38)

Round 7 :

dec, 2 sc, dec, 12 sc, dec, 2 sc, dec, 14 sc (34)

Round 8 :

34 sc, ch

Round 9-14 :

34 dc (6 rounds)

Info :

Sew the body to the head as shown in the photos.

β€” Finishing :

Info :

Sew ears to the top of the head at a distance of 1-2 cm from each other. Attach arms to the body with the crochet-together rounds as described. Embroider nose, eyelashes and eyebrows. Hide all tails and weave in ends securely.

Info :

CONGRATULATIONS! Your hand puppet is ready.

Assembly Instructions

  • Attach safety eyes between rounds 10 and 11 of the head with 9 single crochet stitches between them; secure and use the indenting method with gray cotton yarn as described to sink the eyes.
  • Fold each ear in half, fold again (quadruple), and sew onto the top of the head approximately 1-2 cm apart for correct placement and symmetry.
  • Sew the body to the head by aligning the head opening with the top of the body and whipstitching around the edge, matching stitches so the seam is neat and even.
  • Attach the arms during round 5 of the body as instructed: crochet together with the arm for 7 sc, then work body-only stitches, then join the second arm, ensuring arms are positioned symmetrically before fastening off.
  • Embroider the nose using pink yarn and a large needle, then embroider eyelashes and eyebrows with thin black yarn as shown in the photos for facial expression.
  • Tidy all tails by hiding them inside the head or body and weave ends securely so pieces do not come loose during play.

Important Notes

  • πŸ’‘Use stitch markers to mark the beginning of rounds and key placement points like eye and ear positions to keep your work symmetrical.
  • πŸ’‘Do not stuff the ears or arms; only stuff the head firmly for shapeβ€”overstuffing can distort the puppet's look.
  • πŸ’‘Leave long tails where indicated for sewing pieces together to make assembly easier and stronger.
  • πŸ’‘Work with consistent tension and the recommended 4.5 mm hook to achieve the stated size (about 28 cm / 11").
  • πŸ’‘Use safety eyes securely and follow the indentation method shown to keep eyes sunken and safe for display pieces; for toys for small children consider embroidered eyes instead of plastic ones.

This sweet Bunny Hand Puppet pattern gives you a cozy, handmade companion to love and play with. The plush yarn creates a soft, touchable texture and the step-by-step instructions make assembly straightforward. Make one for yourself or gift it to someone special β€” little smiles guaranteed! 🐰🧢

You ask,

we answer.

FAQs

What size will the finished piece be?

The finished hand puppet measures approximately 28 cm (11") tall when using the recommended plush yarn (Himalaya Dolphin Baby) and a 4.5 mm crochet hook.

Can I use different yarn weights for this pattern?

Yes, you can use different yarn weights, but the final size and texture will change; adjust the hook size accordingly and note that plush yarn gives a very soft, fuzzy finish that thinner yarns won't replicate exactly.

Do I need prior crochet experience for this pattern?

This pattern is rated intermediate β€” basic amigurumi skills like magic ring, increases, decreases, and working in rounds are required for best results.

How long does this project typically take to complete?

Most crocheters finish this bunny hand puppet in 2-4 hours, depending on experience and how much time you spend on embroidery and assembly.

Are the eyes safe for young children?

The pattern uses 8 mm plastic safety eyes, which should be secured properly; for toys intended for babies or very young children we recommend embroidering the eyes instead of using plastic safety eyes for added safety.