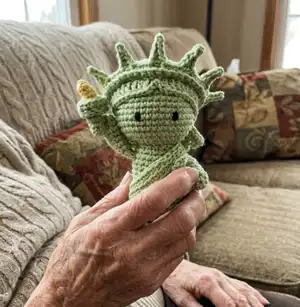
Make a charming Lady Liberty amigurumi with clear, step-by-step instructions designed to guide you from the first stitch to final assembly. This pattern features a sculpted crown, tiny torch and book, and simple sewn details to bring personality to your mini statue. Youll enjoy the compact size and approachable shaping while practicing surface details and small-piece assembly.
Progress Tracker
0% Complete
— Dress :
Info :
With pale green chain 26 and start crocheting in the first chain, closing a circle. For the first round, you will crochet in the third loop of the chain (if you don't know where is located the third loop, watch the minute 0:52 of this video).
Round 7 :
5 sc, 1 dec, 12 sc, 1 dec, 5 sc (Total 24 sts)
Round 13 :
(2 sc, 1 dec) repeat 6 times (Total 18 sts)
Info :
Join with a slip stitch. Cut the yarn and fasten it off.
— Dress Detail :
Info :
With pale green chain 35. Start crocheting in the first chain, closing a circle.
Round 2-3 :
10 blsl, 25 blsc
Info :
Join with a sl. Cut the yarn and fasten it off. Leave a small tail for sewing it.
— Body :
Info :
With pale green yarn start
Round 1 :
6 sc in a magic ring (6)
Round 2 :
6 inc (Total 12 sts)
Info :
Cut the yarn and fasten it off. Make another one following the same instructions. Don’t fasten off the second leg and connect the two legs by inserting the loop of the needle inside one stitch of the first leg, following,
Round 6 :
24 sc (12 from each leg) (24)
Round 11 :
(6 sc, 1 dec) repeat 3 times (Total 21 sts)
Round 15 :
(5 sc, 1 dec) repeat 3 times (Total 18 sts)
Info :
Stop here for adding stuffing material before continuing. For the next round, you will crochet together with the dress.
Info :
For the next round, you will work only in the remaining front loop of the previous round.
Round 19 :
FL (1 sc, 1 inc) repeat 9 times (Total 27 sts)
Round 20 :
(2 sc, 1 inc) repeat 9 times (Total 36 sts)
Round 21 :
(5 sc, 1 inc) repeat 6 times (Total 42 sts)
Round 30 :
(5 sc, 1 dec) repeat 6 times (Total 36 sts)
Round 31 :
(4 sc, 1 dec) repeat 6 times (Total 30 sts)
Round 32 :
(3 sc, 1 dec) repeat 6 times (Total 24 sts)
Round 33 :
(2 sc, 1 dec) repeat 6 times (Total 18 sts)
Info :
Stop here for finish stuffing the doll.
Round 34 :
(1 sc, 1 dec) repeat 6 times (Total 12 sts)
Info :
Cut the yarn, fasten it off and hide the remaining tail inside the toy.
— Arms :
Info :
Continue working with the green.
Round 1 :
6 sc in a magic ring (6)
Round 2 :
(2 sc, 1 inc) repeat 2 times (Total 8 sts)
Round 9 :
4 sc (crocheting the sides together, closing the arms)
Info :
Cut the yarn and fasten it off. Leave a small tail for sewing it.
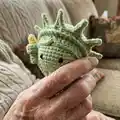
— Crown :
Info :
With pale green chain 28. Skip the first chain and start,
Row 1 :
27 sc, chain 1, turn
Row 2 :
1 blsc, (chain 5, skip the first chain, 1 sl, 1 sc, 1 hdc, 1 dc, skip one st from the foundation, 3 blsc) repeat 7 times, 1 blsc
Info :
Cut the yarn and fasten it off. Leave a tail for sewing it.
— Hair :
Info :
With pale green yarn start,
Round 1 :
6 sc in a magic ring (6)
Round 2 :
6 inc (Total 12 sts)
Round 3 :
(1 sc, 1 inc) repeat 6 times (Total 18 sts)
Round 4 :
(2 sc, 1 inc) repeat 6 times (Total 24 sts)
Round 5 :
(3 sc, 1 inc) repeat 6 times (Total 30 sts)
Round 6 :
(4 sc, 1 inc) repeat 6 times (Total 36 sts)
Round 7 :
(5 sc, 1 inc) repeat 6 times (Total 42 sts)
Round 12 :
chain 2, 12 dc, chain 2, 1 sl, chain 2, 12 dc, chain 2, 1 sc, (chain 7, skip the first chain, 6 sc, join with sc) repeat 16 times.
Info :
Cut the yarn and fasten it off. Leave a long tail for sewing it.
— Torch :
Info :
With pale green start,
Round 1 :
4 sc in a magic ring (4)
Round 3 :
(1 inc, 1 sc) repeat 2 times (Total 6 sts)
Round 5 :
6 FL inc (Total 12 sts)
Info :
Join with a sl. Cut the yarn, fasten it off and leave a small tail for sewing.
— Flame :
Round 1 :
6 sc in a magic ring (6)
Round 4 :
(2 sc, 1 inc) repeat 2 times (Total 8 sts)
Info :
Cut the yarn and fasten it off. Sew the flame inside the torch.
— Book :
Info :
Chain 5. Skip the first chain and start,
Row 1-4 :
4 sc, chain 1 and turn.
Info :
After the row 4, crochet the contour around the detail following 3 sc in the corner, 4 sc going down, 3 sc in the next corner, 3 sc, 3 sc in the next corner, 4 sc. Join with a sl.
— Assembly :
Item 1 :
Place the hair on Lady Liberty's head, use pins to fasten the hair to prevent moving while sewing it. Sew all around the hair.
Item 2 :
Sew the crown above the round with the double crochet.
Item 3 :
Sew the left arm between rounds 7 and 11 of the body.
Item 4 :
Dress the dress detail, placing it over the left shoulder. Sew it around the body.
Item 5 :
Place the book on her left hand and sew it.
Item 6 :
Sew the right arm in round 11, taking 4 stitches in length. Add a small stitch to sew the arm on her face so it remains standing.
Item 7 :
Sew the torch in the third round of the arm.
Item 8 :
Embroider the eyes in round 24 leaving 5 stitches between them.
This Lady Liberty amigurumi pattern transforms an iconic symbol into a tiny, handmade friend youll be proud to display. It combines simple amigurumi shaping with charming small details like the crown, torch, and little book. Make it for patriotic gifts, home decor, or a fun collectible to celebrate holidays and history. 🧶🗽