🧢 Beautiful ✨ Detailed πŸ’ Adorable

Hammerhead Shark Friend Amigurumi Pattern

Hammerhead Shark Friend Amigurumi Pattern
4.1β˜… Rating
2-4 Hours Time Needed
2.4K Made This
βœ‚οΈ

Intermediate Level

Ideal for those with basic crochet experience, featuring slightly more advanced stitches and techniques to expand your skills.

⏱️

Bite-Sized Project

Finishes in 2-4 hoursβ€”perfect for an afternoon of creative relaxation.

πŸ₯

Charming Critter

Delightful animal designs with sweet details that capture the essence of your favorite woodland and farmyard friends.

About This Hammerhead Shark Friend Amigurumi Pattern

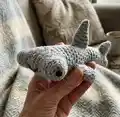
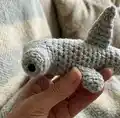
This pattern makes a cute, happy hammerhead shark amigurumi with a rounded head, small fins and a friendly smile. The design uses DK weight yarn and simple single crochet shaping worked both in rounds and short rows. You will learn how to shape the hammerhead head, join and sculpt the body, and crochet small fins to attach later. The finished shark is small, squeezable, and great as a gift or a little desk companion.

Hammerhead Shark Friend Amigurumi Pattern crochet pattern - detailed view of completed project

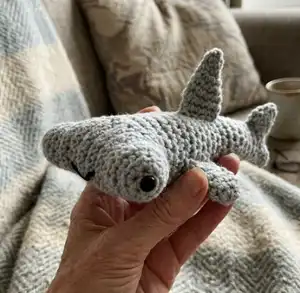
Written in US crochet terms with clear abbreviations and step-by-step rounds to follow. Photos are provided to guide assembly and placement of fins and eyes.

Why You'll Love This Hammerhead Shark Friend Amigurumi Pattern

I absolutely love this pattern because it turns a few basic stitches into a characterful little shark with so much personality. I enjoyed designing the simple hammerhead shape that is both playful and approachable. The small size makes it quick to finish, so you get a satisfying result in just a couple of hours. I also love that you can easily customise the fins and facial expression to make each shark unique. Sharing the finished pals and seeing other makers tag me always makes my day.

Hammerhead Shark Friend Amigurumi Pattern step 1 - construction progress Hammerhead Shark Friend Amigurumi Pattern step 2 - assembly progress Hammerhead Shark Friend Amigurumi Pattern step 3 - details and accessories Hammerhead Shark Friend Amigurumi Pattern step 4 - final assembly and finishing

Switch Things Up

I love how easily this pattern can be customised by simply changing yarn and hook size; try pastel greys or bold blues for different moods.

To make a mini keychain version use thinner yarn and a smaller hook (fingering weight with a 2.5-3.0mm hook) and sew on a small keyring before finishing.

If you want a chunkier, cuddlier shark, use bulky yarn with a 5mm or larger hook and increase stuffing for a plush look.

I often add embroidered details like tiny gills or a different mouth expression to change the personality of each shark.

Try using safety eyes of different sizes or embroider the eyes for a softer, baby-safe toy.

For extra realism add a contrasting belly color by changing yarn mid-body or crochet a small oval and sew it to the underside.

You can make ecological gifts by using leftover yarn scraps to create a school of little sharks in varied colors.

I sometimes add a tiny crocheted accessory like a miniature lifebuoy or bow tie to make a themed gift.

If you enjoy posing, add a short piece of wire inside the fins for slight posability but secure it well so it does not poke through the fabric.

When giving as gifts, consider varying eye placement or mouth style to create 'happy', 'sleepy' or 'mischievous' expressions for personality-packed pals.

Common Mistakes & How to Fix Them

βœ— Skipping the stitch counts in brackets can cause you to lose track of totals; count your stitches after each round and refer to the numbers in brackets to stay accurate. βœ— Missing the BLO rounds will change the head shaping and edges; make sure to work back loop only (BLO) rounds exactly where indicated to get the correct profile. βœ— Not stuffing as you go results in awkward shaping and lumps; start stuffing early and add small amounts gradually to maintain an even, smooth shape. βœ— Placing safety eyes incorrectly will affect facial placement and symmetry; insert safety eyes in the beginning/end spaces as instructed and check placement before securing backs. βœ— Using a hook too large for DK yarn will produce loose stitches and visible stuffing; size down your hook by 0.5–1.0mm if needed to keep stitches tight and neat.

Hammerhead Shark Friend Amigurumi Pattern

Create a sweet, pocket-sized hammerhead shark with this friendly amigurumi pattern. You will enjoy simple shaping and small fins that give personality to this little marine pal. The pattern is written in US terms with clear step-by-step rounds so you can follow along easily. Perfect for gifting or keeping as a cute handmade addition to your collection.

Intermediate 2-4 Hours

Materials Needed for Hammerhead Shark Friend Amigurumi Pattern

β€” Main Fabric

  • 01
    Grey yarn - DK weight cotton yarn recommended (main color), approximately 50-75g
  • 02
    Alternative: chunky yarn for a squishier, larger shark (adjust hook accordingly)
  • 03
    Note: DK yarn used with a 4mm hook in sample, a 3mm hook will give a smaller item and a 5mm hook will give a larger item
  • 04
    Stuffing - polyester toy stuffing sufficient for small amigurumi
  • 05
    2 x safety eyes (size appropriate for small amigurumi, examples shown in pattern)

β€” Tools Required

  • 01
    Crochet hook size 4mm (recommended)
  • 02
    Alternative hook sizes mentioned: 3mm (for smaller result) and 5mm (for larger/chunky result)
  • 03
    2 x safety eyes
  • 04
    Scissors
  • 05
    Yarn needle for sewing and weaving ends
  • 06
    Stitch markers
  • 07
    Polyester stuffing
  • 08
    Small amount of craft glue (optional, to fix smile)
  • 09
    Pins for positioning fins (optional)

Progress Tracker

0% Complete

β€” Pattern notes :

Infos :

The number in brackets at the end of each round indicates the total number of stitches. You can use whatever method you like to start your amigurumi, I prefer to chain 2 and work into the first stitch but if you like a magic circle you go right ahead. I used cotton DK yarn and a 4mm hook for this shark, but I've also made them using chunky yarn for an extra squishy pal. You can use whatever yarn you have to hand, I'd suggest sizing down your hook 0.5mm - 1.0mm from the recommended size to ensure your stitches are tight. DK yarn and a 3mm hook will result in a smaller item and chunky yarn and a 5mm hook will obviously be larger. But remember, all sharks are beautiful. I sometimes use a little dollop of craft glue to keep the smile in place. Now, hammerheads have a surprising amount of fins. This guy is quite little so I think a lot of fins overwhelm him and personally, I think less is more. However, if you want him to be more anatomically correct, you go right ahead and make as many fins as you like.

β€” Supplies :

Info :

Grey yarn. 2 x safety eyes. Stuffing.

β€” Abbreviations :

Infos :

This pattern is written in US crochet terms. CH: Chain. DC: Double crochet. DEC: SC the next 2 ST together. FO: Fasten off. HDC: Half double crochet. INC: 2SC in the next ST. SC: Single crochet. SS: Slip stitch. ST: Stitch/es. TR: Treble crochet. *___*: Repeat instructions from * to * as many times as stated.

β€” Head :

Info :

Chain 2, 6sc into second chain from hook.

Round 1 :

*inc* x 6 (12)

Round 2 :

*BLO sc* (12)

Round 3-5 :

*sc* (12)

Info :

Begin working in rows

Info :

Ch1 & turn

Round 6-14 :

sc x 10, ch1, turn

Round 15 :

sc x 10, ch 2, do not turn, continue working in first st of row 15

Round 16 :

sc x 10 and in both ch spaces (12)

Round 17-18 :

*sc* (12)

Round 19 :

*BLO dec* x 6 (6)

Info :

FO.

Info :

Insert safety eyes in beginning/ end spaces.

β€” Body :

Info :

Join in fifth st from corner as shown in the photo.

Round 1 :

Sc in each row edge, corner and ch sp around (28)

Round 2 :

*sc*

Round 3 :

8sc, dec, 12sc, dec, 4sc (26)

Round 4 :

8sc, dec, 11sc, dec, 3sc (24)

Round 5 :

7sc, dec, 10sc, dec, 3sc (22)

Round 6 :

7sc, dec, 9sc, dec, 2sc (20)

Round 7 :

7sc, dec, 8sc, dec, 1sc (18)

Info :

Start stuffing as you go

Round 8 :

*sc* (18)

Round 9 :

6sc, dec, 8sc, dec (16)

Round 10 :

*sc* (16)

Round 11 :

6sc, dec, 6sc, dec (14)

Round 12-15 :

*sc* (14)

Round 16 :

Dec, 5sc, dec, 5sc (12)

Round 17-18 :

*sc* (12)

Round 19 :

Dec, 4sc, dec, 4sc (10)

Round 20 :

*sc* (10)

Info :

Stuff firmly

Round 21 :

Sc closed (5)

Info :

Ch1, turn

Info :

(Sc, hdc, dc, dc, tr, tr) in next st. Ch4, sc in next 2 stitches. (Sc, hdc, dc dc) in next st, ch 2, sc in last st.

β€” Big fin :

Info :

Make 1

Info :

Chain 2, 6 sc in second chain from hook.

Round 1-2 :

*sc* (6)

Round 3 :

*sc, inc* x 3 (9)

Round 4 :

*sc* (9)

Round 5 :

*2 x sc, inc* x 3 (12)

Round 6 :

*sc* (12)

Info :

Sc closed and fasten off.

β€” Small fin :

Info :

Make 2 - 5.

Info :

Chain 2, 6 sc in second chain from hook.

Round 1-2 :

*sc* (6)

Round 3 :

*sc, inc* x 3 (9)

Round 4-5 :

*sc* (9)

Info :

Sc closed and fasten off.

β€” Assembly :

Info :

Attach fins to the body using the photo as a guide.

Info :

Use black yarn to sew on a smile and you're done!

Info :

Feel free to sell your finished items but please credit me as the designer. Remember to tag me on social media @manatee_squares because I love to see these little guys pop up!

Info :

Please do not recreate this pattern in any way.

Assembly Instructions

  • Attach fins to the body using the photo as a guide and pin them into position before sewing to check placement.
  • Use black yarn to sew on the smile as shown in the photos; a small dollop of craft glue can be used to help keep the smile in place.
  • Insert safety eyes in the beginning/end spaces of the head before final closing and secure the safety backs.
  • Start stuffing the body early and stuff firmly but evenly as you work through the decreasing rounds to maintain the shape.
  • Weave in all ends neatly and credit the designer if you plan to sell finished items; tag @manatee_squares on social media if sharing photos.

Important Notes

  • πŸ’‘Use stitch markers to mark the beginning of rounds and to keep track of increases and decreases for accurate shaping.
  • πŸ’‘Start stuffing as you go and stuff firmly but not overfilled to maintain smooth shaping and correct profile.
  • πŸ’‘If you want a tighter fabric use a hook 0.5-1.0mm smaller than recommended to prevent stuffing showing through.
  • πŸ’‘Place safety eyes before closing the head and check symmetry by comparing both sides before securing the backs.
  • πŸ’‘Use photos as a placement guide for fins and pin parts in place prior to sewing for best results.

This little hammerhead pal is designed to bring a smile and a splash of handmade charm to your day. It's quick to make, fun to personalise, and perfect for gifting or keeping on your shelf. Make a school of them in different greys or go bright and playful for a colourful twist! 🧢🦈

You ask,

we answer.

FAQs

What size will the finished piece be?

The finished amigurumi measures approximately 12-15 cm long when using DK yarn and a 4mm hook; size will vary with yarn weight and hook size.

Can I use different yarn weights for this pattern?

Yes, you can use different yarn weights but it will change the final size; using chunky yarn with a larger hook will create a bigger, squishier shark while using a smaller hook and DK or fingering yarn will give a smaller result.

Do I need prior crochet experience for this pattern?

This pattern is rated intermediate, so basic crochet skills like single crochet, increases, decreases and working in BLO are recommended for best results.

How long does this project typically take to complete?

Most crocheters finish this project in about 2-4 hours, though time may vary depending on experience and how many fins you choose to make.

Where should I place the safety eyes?

Insert safety eyes in the beginning/end spaces of the head as instructed; check the photos and spacing before securing the backs for symmetry.