About This Frog Prince Amigurumi Pattern
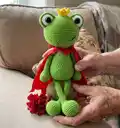
Create a tall, whimsical Frog Prince amigurumi with big expressive eyes and a tiny crown. This pattern includes complete instructions for head, body, eyes, eyelids, arms, legs and crown. It is written in rounds with exact stitch counts to help you shape each piece accurately. Ideal for crocheters who enjoy assembling and detailing amigurumi pieces.

Includes a full materials list, abbreviations and helpful notes for working in continuous spiral. Step-by-step assembly instructions explain eye placement and how to sew all parts together for a polished finish.
Why You'll Love This Frog Prince Amigurumi Pattern
I absolutely love this pattern because it captures so much personality with very simple shapes. I enjoy how the large eyes and tiny crown transform basic rounds into a regal little character. I put care into clear stitch counts so you can easily follow every round without guessing. I also love that you can personalize the frog with different colors or a little cape, making each finished piece unique. Working this pattern always feels rewarding — the frog comes together quickly and looks charming on display.
Switch Things Up
I love experimenting with color to change the mood of this Frog Prince; try soft pastels for a nursery-friendly version or jewel tones for a regal look.
I often make a tiny crown using metallic yarn or embroidery thread to add sparkle and character to the frog's head.
Want a smaller or larger frog? Change yarn weight and hook size — bulky yarn will create a chunky cuddly frog while sport weight makes a delicate miniature.
I sometimes replace safety eyes with embroidered eyes for baby-safe toys; you can embroider pupils and highlights with black and white thread.
I recommend adding posable wire into the arms or legs if you want a frog that can hold props or sit in different poses.
Swap the cape material for felt or a printed cotton scrap to give your frog a unique wardrobe or seasonal theme.
Try decorative stitches on the body such as surface slip stitches or small spots to create a patterned frog skin.
I like to embroider a small smile or dimples with black embroidery thread for personality instead of a yarn mouth.
If you make multiple frogs, vary eye sizes and crown shapes to give each one a distinct personality and charm.
I also enjoy making coordinating tiny accessories like a felt lily pad or a miniature scarf to make the finished frog an irresistible gift.
For gifting, attach a small loop of yarn to the crown so the frog can hang as an ornament, or sew a pocket to the back to tuck in a tiny note.
Common Mistakes & How to Fix Them
✗ Skipping stitch markers while working in continuous spiral leads to lost beginning-of-round placement; place a stitch marker at the first stitch of each round and move it up as you work to avoid counting errors.
✗ Stuffing too late or unevenly can distort shaping and create lumps; start stuffing early in shaping sections and add stuffing gradually for smooth curves.
✗ Forgetting to leave long tails on parts meant for sewing makes attachment difficult; always leave a long tail when you fasten off so you can securely sew pieces together.
✗ Ignoring safety eye placement instructions can result in misaligned eyes; place and pin the eyes between the specified rounds and check symmetry before securing or sewing.
✗ Working with inconsistent tension will change final size and proportions; maintain even tension throughout and check stitch gauge with a few rounds if unsure.