🧢 Beautiful ✨ Detailed πŸ’ Adorable

Fox Booties Pattern

Fox Booties Pattern
4.3β˜… Rating
5-7 Hours Time Needed
1.6K Made This
βœ‚οΈ

Intermediate Level

Ideal for those with basic crochet experience, featuring slightly more advanced stitches and techniques to expand your skills.

⏱️

Weekend Treat

Takes 5-7 hours, making it an enjoyable project to finish over a couple of days.

🧣

Snug Essential

Everyday comfort with practical charm, designed for both functionality and style through changing seasons.

About This Fox Booties Pattern

This pattern creates a pair of baby fox booties with embroidered sleepy eyes and tiny ears for a charming finish. It is written with step-by-step rounds and clear photos to guide you through sole, sidepiece, toe, upper, ears and eyes. The pattern includes three sizes for 0-3, 3-6 and 6-9 months and uses mercerized cotton for a neat result.

Fox Booties Pattern crochet pattern - detailed view of completed project

The instructions include exact stitch counts per round and helpful assembly photos to make finishing easy. Perfect as a handmade gift or a cute addition to a baby outfit.

Why You'll Love This Fox Booties Pattern

I absolutely love this pattern because it combines small, manageable sections with delightful fox details that really pop. I enjoy the clean look achieved with mercerized cotton yarn and the tiny embroidered eyes and ears that give the booties personality. I appreciate that the pattern includes three sizes so you can make the perfect fit for a growing baby. I also love that the step-by-step photos make assembly and finishing straightforward and satisfying.

Fox Booties Pattern step 1 - construction progress Fox Booties Pattern step 2 - assembly progress Fox Booties Pattern step 3 - details and accessories Fox Booties Pattern step 4 - final assembly and finishing

Switch Things Up

I love customizing this pattern by changing colors to create different animals: try grey and white for a wolf or cream and pink for a bunny.

I often experiment with yarn weight and hook size to make mini keychain versions or larger cozy slippers; changing yarn will alter the finished size.

I add felt or tiny safety buttons for accents, but for baby-safe versions I prefer embroidered details instead of small plastic parts.

Swap the macrame cord shoelaces for satin ribbon for a dressier look or use braided yarn ties for a rustic feel.

Try a two-tone sole by working the bottom in white and the rest in the main color for contrast and a fun design detail.

I sometimes add a small pompom or tassel at the back heel for playful flair that older babies will enjoy.

For a sturdier sole, you can slipstitch an extra round in tighter tension or use a slightly smaller hook just for the bottom round.

If you want a higher sidepiece, repeat round 3 of the sidepiece 1-2 extra times as suggested to accommodate chubbier or high-arched feet.

I recommend trying different embroidery styles for the sleeping eyes to change the expression from sleepy to cheerful with just a few stitches.

When gifting, I like to personalize by embroidering the baby’s initial on the sole or inside the cuff with a contrasting thread.

Common Mistakes & How to Fix Them

βœ— Not checking your gauge before starting may result in booties that are too large or too small; make a gauge swatch and adjust hook size to match the specified gauge. βœ— Skipping stitch counts when working the sole rounds leads to uneven shaping and fit; count stitches at the end of every round and check against the numbers shown. βœ— Inserting the sidepiece hook incorrectly under posts instead of stitches will distort the edge; follow the instruction to insert under the post of dc from the previous round for a neat join. βœ— Overstuffing or adding tension on the upper rows can cause the bootie to pucker; maintain even tension and do not pull yarn too tight when working upper rounds and embroidery. βœ— Attaching eyes or ears without pinning can result in asymmetry; pin pieces in place and compare both sides before sewing securely.

Fox Booties Pattern

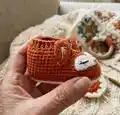
Make adorable fox baby booties with this cozy, detailed crochet pattern. You will love the charming fox face, easy-to-follow photos, and clear sizing for 0-9 months. This pattern uses mercerized cotton for a soft, durable finish perfect for baby feet. Follow step-by-step rounds and assembly instructions to create a professional-looking pair of booties.

Intermediate 5-7 Hours

Materials Needed for Fox Booties Pattern

β€” Main Fabric

  • 01
    Vita Lily 100% mercerized cotton, 1.75oz (50g)/137 yds (125m)
  • 02
    Main color (orange) – 1 hank
  • 03
    Contrasting color (white) – ~40 yds (30m)
  • 04
    Suggested substitute yarn: Scheepjes Catona
  • 05
    Suggested substitute yarn: Schachenmayr Catania
  • 06
    Suggested substitute yarn: Patons Grace
  • 07
    Shoelaces: macrame cord 100% polyester 3-4mm, 55 cm (for laces)

β€” Tools Required

  • 01
    Crochet hook C/2 or B/1 (2.5mm or 2mm) OR size to obtain gauge
  • 02
    Scissors
  • 03
    Tapestry needle or smaller crochet hook
  • 04
    Shoelaces 55 cm (macrame cord 100% polyester 3-4mm)
  • 05
    Yarn needle for sewing and embroidery

Progress Tracker

0% Complete

β€” General Info :

Infos :

! Number of stitches is provided below according to the size as follows: 0-3months / 3-6 months / 6-9 months ch 19 / 22 / 25. 0-3 months - foot length approx 3.5”(9 cm). 3-6 months - foot length approx 3.9”(10 cm). 6-9 months - foot length approx 4.3”(11 cm). ! Measure the baby’s foot for better fit.

β€” Sole :

Round 1 :

Rnd 1: With CC ch 19/22/25. 2dc in the 4th st from the hook, dc in next 14/17/20 sts, 6dc in the last st, cont to work along the opposite side of the chain, dc in next 14/17/20 sts, 3dc in the last st (pic.3). Finish with sl st in ch (pic.4). (40/46/52 sts).

Round 2 :

Rnd 2: ch1 (do not count as st), 2sc in the same st, sc in next st (pic.5), 2sc in next st, sc in next 5 sts, hdc in next 2 sts, dc in next 7/10/13 sts, 2dc in each of next 6 st, dc in next 7/10/13 sts, hdc in next 2 sts, sc in next 5 sts, 2sc in next st, sc in next st, 2 sc in the last st. Finish with sl st in 1st sc. (pic.6) (50/56/62 sts).

Round 3 :

Rnd 3: ch3 (counts as 1 dc), dc in the same st, [dc in next st, 2dc in next st] 2 times], dc in next 14/17/20 sts, [2dc in next st, dc in next st ] 6 times], dc in next 14/17/20 sts, 2dc in next st, [dc in next st, 2dc in next st] 2 times]. Finish with sl st in ch. (pic.7). (62/68/74 sts). Fasten off and cut yarn. The sole is ready.

β€” Sidepiece :

Round 1 :

Rnd 1: With MC cont to work starting from BOR with RS facing you, sc, inserting the hook not in the st but under the post of dc of the previous rnd of the sole. RS is inside the bootie. Work as follows: ch1 (counts as sc), sc in next 61/67/73 post of dc. Finish with sl st in ch. (62/68/74 sts)

Round 2 :

Rnd 2: ch2 (do not counts as st), dc in next 62/68/74 sts. Finish with sl st in 1st dc. (62/68/74 sts)

Round 3-4 :

Rnds 3-4: ch1 (do not counts as st), sc in every sts. Finish with sl st in 1st sc. (62/68/74 sts). Fasten off and cut yarn. The sidepiece is ready. *If the baby's foot is roly poly or has a high arches, I recommend repeat round 3 1-2 more times to make higher sidepiece.

β€” Toe :

Info :

Toe worked back and forth in rows, shaping with decreases.

Row 1(RS) :

Row 1(RS): Join yarn at 16th/17th/18th st from the BOR, ch2, dc in next st, [dc2tog 15/17/19 times].

Row 2(WS) :

Row 2(WS): ch2, turn, dc in next st, [dc2tog 7/8/9 times].

Row 3(RS) :

Row 3(RS): ch 2, turn, dc7tog/ dc8tog/ dc9tog. Do not cut yarn. Toe is ready.

β€” The upper part :

Round 1 :

Rnd 1: Continue to work with wrong rounds. Ch 2 (counts as 1 dc), turn, dc 5 in horizontal sts of the toe (pic. 20). Work DC's along the whole length until we reach the opposite side toe, dc 6 in horizontal sts of the toe (pic. 22). Finish with sl st post ch. (42/44/48 sts).

Round 2-4 :

Rnds 2-4: Work all next rnds alternating bpdc and fpdc. Ch2 (counts as 1 dc), *bpdc in next st, fpdc in next st; rep from *, round ending with bpdc. (42/44/48 sts). Finish with sl st post ch. Fasten off, cut yarn, weave in all tails. Optionally, you can make another of the same round for size 11cm.

β€” Ears (Make 4) :

Info :

Ears are worked in a continuous spiral with main color. Do not join in the rnd, just work sc in the next st. Place marker or use contrasting color yarn to mark BOR.

Round 1 :

Rnd 1 - 6 sc in magic ring (6)

Round 2 :

Rnd 2 - [inc, sc 1] * 3 (9)

Round 3 :

Rnd 3 - [inc, sc 2] * 3 (12)

Round 4 :

Rnd 4 - [inc, sc 5] * 2 (14)

Round 5 :

Rnd 5 - [inc, sc 6] * 2 (16)

Info :

Fold the ear in half and sc 7 sts along the edge, by connecting opposite sts. Fasten off. Leave a long tail for sewing. Make embroidery CC yarn as shown in the pic.29. Pic. 30-31 shows how to imperceptibly weave the ends.

β€” Eyes (Make 4) :

Info :

With contrasting color working in rows.

Row 1 :

Row 1 - 3 sc in magic ring, ch 1, turn (3)

Row 2 :

Row 2 - [inc] * 3, ch 1, turn (6)

Row 3 :

Row 3 - [inc, sc 1] * 3, ch 1, turn (9)

Row 4 :

Row 4 - [inc, sc 2] * 3 (12)

Info :

Fasten off. Leave a long tail for sewing. Make embroidery of sleeping eyes according to the scheme (pic.34-38). The eyes are ready.

β€” Assembly :

Info :

Sew the eyes to the booties as shown in the pic. 39. Now embroider the nose in brown or black. (pic. 40-41). Sew the ears to the booties (pic. 42-43)

Info :

Using a crochet hook, insert the shoelaces into the last rnd, weaving the shoelaces around the upper part.

Assembly Instructions

  • Sew the eyes to the booties as shown in the picture and alignment guide, centering each eye over the toe area before securing with small whipstitches.
  • Embroider the nose between the eyes using brown or black yarn, following the photos for position and size, and secure ends inside the bootie.
  • Sew the ears to the upper front of each bootie (refer to pics 42-43), spacing them evenly and sewing through the long tail left for attachment.
  • Insert shoelaces using a crochet hook through the last round, weaving the cord around the upper part so the laces run evenly and can be tied.
  • Weave in all tails and cut excess yarn, making sure ends are hidden inside the bootie to avoid irritating baby skin.

Important Notes

  • πŸ’‘Take time to check your gauge: 26 dc x 13 rows = 4”(10cm) to ensure correct sizing for the three sizes included.
  • πŸ’‘Measure the baby’s foot before making the booties to choose the correct starting chain (19 / 22 / 25) for 0-3 / 3-6 / 6-9 months.
  • πŸ’‘Place a marker to indicate the BOR when working ears in a continuous spiral to avoid losing your starting point.
  • πŸ’‘Fasten off and weave in ends after finishing major sections (sole, sidepiece, upper) to keep work tidy and manageable.

These fox booties are a delightful handmade gift for newborns and infants, combining sweet details and practical design. The pattern includes step-by-step rounds, clear photos, and three sizes to fit growing babies. Enjoy making a cozy, stylish pair that will be treasured. 🦊🧢

You ask,

we answer.

FAQs

What size will the finished piece be?

The pattern includes three sizes: 0-3 months (approx 3.5"/9 cm), 3-6 months (approx 3.9"/10 cm), and 6-9 months (approx 4.3"/11 cm) using the recommended yarn and hook.

Can I use different yarn weights for this pattern?

Yes, you can use different yarn weights, but this will affect the final size; adjust your hook size and check gauge to achieve the intended measurements.

Do I need prior crochet experience for this pattern?

This pattern is rated intermediate, so basic knowledge of single crochet, double crochet, increases, decreases, and working in rounds is recommended.

How long does this project typically take to complete?

Most crocheters complete a pair of booties in about 5-7 hours, depending on experience, size chosen, and time taken for embroidery and assembly.