🧶 Beautiful ✨ Detailed 💝 Adorable

Fried Egg Amigurumi Pattern

Fried Egg Amigurumi Pattern
4.3★ Rating
1-2 Hours Time Needed
2.3K Made This
✂️

Beginner Friendly Level

Perfect for those just starting their crochet journey, with clear instructions and simple techniques

⏱️

Quick Make

Complete in under 2 hours—lightning fast fun for instant gratification and quick gifts.

🎁

Tiny Treasure

Small, sweet, and gift-worthy creations that fit perfectly in the palm of your hand with detailed charm.

About This Fried Egg Amigurumi Pattern

This pattern creates a small, realistic fried egg made from two crocheted parts: the egg white and a slightly stuffed yolk. Both pieces are worked from a magic ring in a spiral so there are no visible joins. It is written in US crochet terms and uses basic stitches that are perfect for beginners.
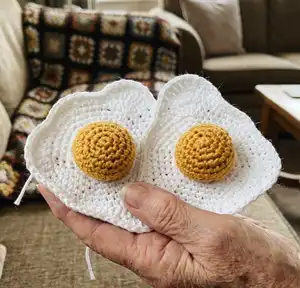
Fried Egg Amigurumi Pattern crochet pattern - detailed view of completed project

The finished piece measures approximately 4 inches and takes around 1.5 hours to make. It makes a cute decor item, play food, or a tiny gift.

Why You'll Love This Fried Egg Amigurumi Pattern

I absolutely love this pattern because it turns simple stitches into a playful, instantly recognizable piece of crochet art. I enjoy how quickly it works up — you can finish one in a short evening and gift it the next day. The two-part construction with a lightly stuffed yolk adds charming dimensionality that makes the piece feel thoughtfully handmade. I also love that it's a great way to practice magic ring technique and shaping while using small amounts of yarn.

Fried Egg Amigurumi Pattern step 1 - construction progress Fried Egg Amigurumi Pattern step 2 - assembly progress Fried Egg Amigurumi Pattern step 3 - details and accessories Fried Egg Amigurumi Pattern step 4 - final assembly and finishing

Switch Things Up

I love how easy it is to customize this fried egg by changing yarn colors and textures to create different looks.

Try a cream or off-white for the egg white for a softer, more realistic appearance.

Use a pale yellow or gold yarn for the yolk to achieve a richer sunny color that stands out.

Make a mini version using finer yarn and a 2.5 mm hook to create tiny charms or keychains.

Use bulky cotton and a larger hook for a chunky, decorative piece that works as a quirky coaster.

I often add sewn-on details like small embroidered lines on the white to mimic browned edges for a playful touch.

Attach a loop before finishing to turn the egg into an ornament or bag charm.

Try different stuffing levels in the yolk to change how pronounced and puffy it looks.

Combine several fried eggs in a set with other breakfast amigurumi (bacon, toast) for a full play food collection.

I also sometimes add a little felt or embroidered smile to make a kawaii breakfast friend—it's all about having fun and experimenting.

Common Mistakes & How to Fix Them

✗ Skipping the magic ring and starting with chains can create a visible hole in the center; always begin with a magic ring to get a neat, closed center. ✗ Forgetting to work in a spiral (joining rounds with a slip stitch) will create visible seams and disrupt the round counts; follow the pattern and crochet continuously without slip stitching between rounds. ✗ Overstuffing the yolk leads to a lumpy, unnatural shape; stuff gradually with small amounts of filling and shape as you go for a rounded look. ✗ Not counting stitches during increase rounds can cause uneven shaping and an incorrect final size; count your stitches at the end of each round to verify the stitch count. ✗ Using inconsistent tension between the egg white and yolk results in mismatched sizes and fit; try to maintain similar yarn tension and hook size for both parts.
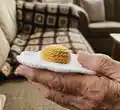
Fried Egg Amigurumi Pattern

Create a charming crocheted fried egg that is perfect for playful kitchen decor, keychains, or small gifts. This pattern walks you through making two pieces—the egg white and a stuffed yolk—and sewing them together for a realistic look. You will enjoy working in a continuous spiral with clear round-by-round instructions written in US terms. Great for using up cotton scraps and practicing shaping techniques.

Beginner Friendly 1-2 Hours

Materials Needed for Fried Egg Amigurumi Pattern

— Main Fabric

  • 01
    DMC Natura Just Cotton - White (Color 1 Ibiza) - small amount (approx. 15-25g)
  • 02
    DMC Natura Just Cotton - Yellow (Color 16 Tournesol) - small amount (approx. 10-15g)

— Tools Required

  • 01
    Crochet hook size 3 mm
  • 02
    Toy stuffing (polyester fiberfill)
  • 03
    2 stitch markers
  • 04
    Scissors
  • 05
    Yarn needle for sewing and weaving in ends

Progress Tracker

0% Complete

Info :

Note: This cute fried egg is made of two parts, which are sewn together. The yolk is additionally stuffed with some toy filling, for more realistic look. Both pieces require starting with a magic ring and crocheting in a spiral (without joining the separate rounds with a slip stitch). The finished piece measures approximately 4 inches and it takes about 1.5 hours to make. The pattern is written in US terms. Gauge: 2" = 12 sts x 13 rows in sc

— Egg white :

Round 1 :

6 sc in MR (6)

Round 2 :

inc x 6 (12)

Round 3 :

(sc, inc) x 6 (18)

Round 4 :

(2sc, inc) x 6 (24)

Round 5 :

(3sc, inc) x 6 (30)

Round 6 :

(4sc, inc) x 6 (36)

Round 7 :

(5sc, inc) x 6 (42)

Round 8 :

(6sc, inc) x 6 (48)

Round 9 :

4sc, 2hdc, 3dc inc, hdc, 3sc, 3hdc, 4sc, hdc, dc, dc inc, dc, hdc, 11 sc, hdc, dc inc, dc, dc inc, hdc, 7sc (54)

Round 10 :

3sc, 3hdc, dc, 3dc inc, dc, hdc, 28sc, hdc, dc, 3dc inc, dc, 3hdc, 5sc (60)

Round 11 :

5 sl st, 11 sc, 3 sl st, 5 sc, 2 sl st, 4 sc, inc, 3 sc, 3 sl st, 8 sc, hdc, dc, 3dc inc, dc, hdc, 3sc, 5 sl st (64)

Info :

Fo and weave in the ends.

— Yolk :

Round 1 :

6 sc in MR (6)

Round 2 :

inc x 6 (12)

Round 3 :

(sc, inc) x 6 (18)

Round 4 :

(2sc, inc) x 6 (24)

Round 5-7 :

sc around (24)

Round 8 :

sl st around (24)

Info :

Fo and weave in the ends.

— Assembly :

Info :

Choose the right spot for the yolk and sew it to the egg white. Ideally do it with your white yarn, using some hidden seam. Stuff yolk just before finishing the seam to achieve a rounded shape. Well done! You have just made your perfect fried egg :)

Assembly Instructions

  • Choose the right spot for the yolk on the egg white and position it centrally before sewing.
  • Sew the yolk to the egg white using white yarn and a hidden seam for a neat finish.
  • Stuff the yolk with toy filling just before closing the seam so it keeps a round, realistic shape.
  • Weave in all ends securely and trim excess yarn so the join is tidy and flat.
  • Pin the yolk in place with stitch markers if needed to ensure correct placement before sewing.

Important Notes

  • 💡Pattern is written in US terms; if you use UK terminology, convert stitches before starting.
  • 💡Work in a continuous spiral without joining rounds to avoid visible seams on both pieces.
  • 💡Use stitch markers to mark the start of rounds or key placement points for the yolk to ensure symmetry.

This adorable fried egg pattern makes a tiny, delightful piece that brings a smile to any handmade collection. It's quick to make and perfect for gifts, play food, or kitchen decor. Try a set in different colors for a sunny breakfast display! 🧶🍳

You ask,

we answer.

FAQs

What size will the finished piece be?

The finished fried egg measures approximately 4 inches across when using the recommended DMC Natura Just Cotton and a 3 mm hook.

Can I use different yarn weights for this pattern?

Yes, you can use different yarn weights but your finished size will change; adjust the hook size accordingly and expect a softer or firmer result depending on yarn and stuffing.

Do I need prior crochet experience for this pattern?

This pattern is beginner friendly and uses basic stitches like single crochet, half double crochet and double crochet; familiarity with the magic ring and working in the round is helpful.

How long does this project typically take to complete?

Most crocheters can complete this quick make in under 2 hours, though time may vary depending on experience and finishing details.