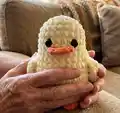
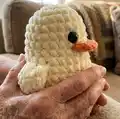
About This Duck No Sew Amigurumi Pattern
This pattern creates a small, no-sew duck amigurumi using super bulky (Category 6) yarn for a soft, plush finish. You will crochet the body from the base up into the head, add tiny legs, a simple beak (speculum) and optional wings. Techniques are simple increases, decreases and short crochet rows—ideal for quick makes.
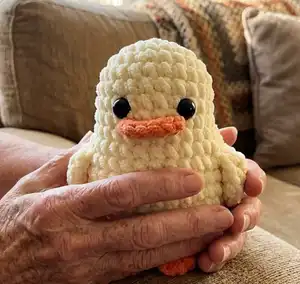
Complete step-by-step rounds are provided for yellow and mallard colorways plus a chicken/rooster variant. Helpful photos and placement notes guide assembly and finishing.
Why You'll Love This Duck No Sew Amigurumi Pattern
I absolutely love this pattern because it turns a few basic stitches into a charming little duck that feels cozy and squishy. I enjoyed designing it so the whole body is worked from the base up — no sewing pieces together — which saves time and makes assembly simple. The pattern is flexible so I can swap colors and make different bird characters in minutes. Seeing the finished tiny duck in my hands always makes me smile, and I hope you feel the same joy when you make one.
Switch Things Up
I love how easy it is to change the character by switching colors; for a mallard change head to green and body to brown as shown.
You can make a tiny keychain version by using a lighter weight yarn and a smaller hook to scale the pattern down.
I often add embroidered eyelashes or freckles for extra personality — simple surface embroidery goes a long way.
Try using fuzzy or boucle yarn for a fluffy chick effect; the texture changes the whole look.
If you want posable limbs, I sometimes add thin florist wire inside the legs before stuffing for stability and slight movement.
I swap the beak shape by changing the speculum rows to create a longer or shorter bill depending on the bird type.
For a festive touch, add a tiny crocheted hat or scarf in contrasting yarn — quick accessories make delightful gifts.
Mix stitch textures for interest: try working wings in BLO or FLO for a ridged appearance that mimics feathers.
I recommend trying safety eyes of different sizes to alter expression — larger eyes give a cuter, more toy-like look.
Finally, experiment with placement: moving the eyes slightly closer or further apart changes the personality — try on scrap yarn before final placement.
Don’t be afraid to combine elements from the rooster, mallard, and chick versions to invent your own bird characters — I do this often to build a little flock!
Common Mistakes & How to Fix Them
✗ Skipping stitch markers around the start of rounds can make counting difficult; place a marker at the beginning of each round and move it as you work.
✗ Forgetting to stuff before closing the head leads to a misshapen result; stuff gradually during shaping, adding small amounts before decreases.
✗ Pulling your yarn too tightly on increases or decreases can distort the shape; keep an even, moderate tension for consistent stitch size and neat shaping.
✗ Not attaching safety eyes before closing the head can be tricky later; follow the instruction for eye placement (rows indicated) and attach them while the opening is wide enough.