🧢 Beautiful ✨ Detailed πŸ’ Adorable

Biscuits Amigurumi Pattern

Biscuits Amigurumi Pattern
4.1β˜… Rating
2-3 Hours Time Needed
1.2K Made This
βœ‚οΈ

Beginner Friendly Level

Perfect for those just starting their crochet journey, with clear instructions and simple techniques

⏱️

Bite-Sized Project

Finishes in 2-4 hoursβ€”perfect for an afternoon of creative relaxation.

🎁

Tiny Treasure

Small, sweet, and gift-worthy creations that fit perfectly in the palm of your hand with detailed charm.

About This Biscuits Amigurumi Pattern

This pattern teaches you how to crochet three tiny biscuit styles: Choc Chip, Jammie Dodger and Oreo. Each biscuit is made from simple rounds using DK yarn and a 4mm hook, making them quick and satisfying to complete. The designs include decorative details like stitched choc chips and a heart-shaped jam centre.

Biscuits Amigurumi Pattern crochet pattern - detailed view of completed project

Perfect for gift sets, play food, or small decorations, these biscuits are compact and fun to make. The pattern uses standard UK terminology and includes full round-by-round instructions for each biscuit.

Why You'll Love This Biscuits Amigurumi Pattern

I absolutely love this pattern because it turns simple crochet rounds into irresistible little treats you can hold in your hand. I enjoy how quickly each biscuit comes together β€” they are perfect for using up small scraps of DK yarn. I love adding tiny details like the jam heart or stitched choc chips because they give each biscuit personality and charm. This set is playful, portable, and makes a lovely handmade gift for friends and family.

Biscuits Amigurumi Pattern step 1 - construction progress Biscuits Amigurumi Pattern step 2 - assembly progress Biscuits Amigurumi Pattern step 3 - details and accessories Biscuits Amigurumi Pattern step 4 - final assembly and finishing

Switch Things Up

I love customizing these biscuits by changing yarn colors to suit seasons or gifts; swap the jam color or cookie shade for fun variations.

You can make minis for keyrings by using a finer yarn and smaller hook; try fingering weight yarn to create tiny charms.

For a chunkier look, use bulky yarn and a larger hook and you will get a soft, squishy biscuit perfect for display.

I sometimes embroider additional details like sprinkles or initials on the top for a personalized touch.

You can add a small loop before finishing to turn any biscuit into an ornament or gift tag.

I recommend using felt or embroidered details instead of yarn for delicate features if you prefer a neater look.

If you want a sandwich-style biscuit, increase the centre thickness by making an extra centre disc and sew between the layers.

I often mix and match yarn weights to create a 'flat' biscuit and a thicker filling for contrast and texture.

Try adding a tiny amount of stuffing between layers for a slightly puffy biscuit β€” just enough to keep the shape without bulging.

I encourage experimenting with placement of choc chips and the heart centre; moving eyes or decorations a few stitches changes the whole personality of the biscuit.

Common Mistakes & How to Fix Them

βœ— Not keeping tension consistent across top and base pieces causes mismatched sizes; check both pieces as you go and adjust hook or tension to match sizes. βœ— Sewing too close to the edge when joining layers can squash the centre detail; leave a small margin and sew slightly in from the edge to preserve shape. βœ— Skipping the long cast-on tail for the Jammie Dodger top will make securing the heart centre difficult; leave the tail and use it to stitch the heart shape in firmly. βœ— Placing all choc chips in the centre of the cookie looks unbalanced; stitch some chips into round 7 so the decoration is spread across the surface.

Biscuits Amigurumi Pattern

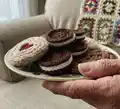
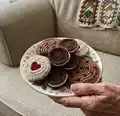
Make a charming set of crochet biscuits including a Choc Chip Cookie, a Jammie Dodger, and an Oreo Cookie. This pattern is perfect for small gift-making and playful decor, using DK weight yarn and simple rounds. You will enjoy quick rounds and easy assembly to create a delightful plate of handmade biscuits. Clear instructions and minimal tools make this a relaxing, creative project.

Beginner Friendly 2-3 Hours

Materials Needed for Biscuits Amigurumi Pattern

β€” Main Fabric

  • 01
    Paintbox Yarns Simply DK (100% Acrylic; 276m/302yds per 100g ball)
  • 02
    A: Soft Fudge - 10g (main for Choc Chip)
  • 03
    B: Coffee Bean - 10g (choc chips and Oreo top/base)
  • 04
    C: Vanilla Cream - 10g (Jammie Dodger top/base)
  • 05
    D: Red Wine - 5g (Jammie Dodger centre heart)
  • 06
    E: Champagne White - 5g (Oreo centre cream)

β€” Tools Required

  • 01
    Crochet hook size 4mm (G/6)
  • 02
    Tapestry needle for sewing in ends
  • 03
    Scissors

Progress Tracker

0% Complete

β€” Introduction :

Infos :

YOU WILL NEED Paintbox Yarns Simply DK (100% Acrylic; 276m/302yds per 100g ball) A: Soft Fudge, 10g B: Coffee Bean, 10g C: Vanilla Cream, 10g D: Red Wine, 5g E: Champagne White, 5g Crochet hook size 4mm (G/6) Tapestry needle for sewing in ends Scissors

Info :

TENSION Specific tension is not too important for this pattern, as long as as it is consistent throughout so that your top and base pieces for the biscuits are the same size. Please be aware that if you use different yarns you may need more than what is specified for the Paintbox yarns.

Info :

SIZE INFORMATION Choc Chip Cookie 9cm diameter; Jammie Dodger 6cm diameter; Oreo Cookie 5cm diameter.

Info :

ABBREVIATIONS & STITCHES This pattern is written and charted using standard UK crochet terminology. mc – magic circle ch – chain ss – slip stitch st – stitch dc – double crochet

β€” Choc Chip Cookie :

Info :

Top and base (make two):

Round 1 :

with A dc7 into magic circle, join with ss to 1st dc (7).

Round 2 :

ch1, 2dc into same st, 2dc into each st around, join with ss to 1st dc (14).

Round 3 :

ch1, dc into same st, 2dc in next st, *dc, 2dc in next st* repeat from * to * 6 times, join with ss to 1st dc (21).

Round 4 :

ch1, dc into same st, dc, 2dc in next st, *dc2, 2dc in next st* repeat from * to * 6 times, join with ss to 1st dc (28).

Round 5 :

ch1, dc into same st, dc2, 2dc in next st, *dc3, 2dc in next st* repeat from * to * 6 times, join with ss to 1st dc (35).

Round 6 :

ch1, dc into same st, dc3, 2dc in next st, *dc4, 2dc in next st* repeat from * to * 6 times, join with ss to 1st dc (42).

Round 7 :

ch1, dc into same st, dc4, 2dc in next st, *dc5, 2dc in next st* repeat from * to * 6 times, join with ss to 1st dc (49). Fasten off and sew in ends.

Add choc chips :

On right side of top piece, use B to stitch your choc chips randomly over the top. Make sure you put a couple in round 7 so that they are not concentrated in the centre of your cookie!

Join together :

With wrong sides together join A through both sides and ch1, dc the two pieces together making sure you hook through both sides as you go around, join with ss to 1st dc, fasten off and sew in ends.

β€” Jammie Dodger :

Info :

Base:

Round 1 :

with C dc7 into magic circle, join with ss to 1st dc (7).

Round 2 :

ch1, 2dc into same st, 2dc into each st around, join with ss to 1st dc (14).

Round 3 :

ch1, dc into same st, 2dc in next st, *dc, 2dc in next st* repeat from * to * 6 times, join with ss to 1st dc (21).

Round 4 :

ch1, dc into same st, dc, 2dc in next st, *dc2, 2dc in next st* repeat from * to * 6 times, join with ss to 1st dc (28).

Round 5 :

ch1, dc into same st, dc2, 2dc in next st, *dc3, 2dc in next st* repeat from * to * 6 times, join with ss to 1st dc (35). Fasten off and sew in ends.

Info :

Centre:

Round 1 :

with D dc7 into magic circle, join with ss to 1st dc (7).

Round 2 :

ch1, 2dc into same st, 2dc into each st around, join with ss to 1st dc (14).

Round 3 :

ch1, dc into same st, 2dc in next st, *dc, 2dc in next st* repeat from * to * 6 times, join with ss to 1st dc (21).

Round 4 :

ch1, dc into same st, dc, 2dc in next st, *dc2, 2dc in next st* repeat from * to * 6 times, join with ss to 1st dc (28). Fasten off and sew in ends.

Info :

Top:

Round 1 :

with C ch14, join ends with ss, ch1 and dc21 into the circle, join with ss to 1st dc (21).

Info :

Top tip: leave a long cast on tail so that you can use it later to secure the centre heart shape in place when sewing together.

Round 2 :

ch1, dc into same st, dc, 2dc in next st, *dc2, 2dc in next st* repeat from * to * 6 times, join with ss to 1st dc (28).

Round 3 :

ch1, dc into same st, dc2, 2dc in next st, *dc3, 2dc in next st* repeat from * to * 6 times, join with ss to 1st dc (35). Fasten off and sew in end.

Join together :

Using the long cast on tail from your top piece, join the top and centre together by stitching around the central hole, shaping it into a heart as you sew around. Add a couple of stitches into the centre, to make the v-shape at the top of the heart. With wrong sides together, using A, sew through top and base to join around the edge.

β€” Oreo Cookie :

Info :

Top and base (make two):

Round 1 :

with B dc7 into magic circle, join with ss to 1st dc (7).

Round 2 :

ch1, 2dc into same st, 2dc into each st around, join with ss to 1st dc (14).

Round 3 :

ch1, dc into same st, 2dc in next st, *dc, 2dc in next st* repeat from * to * 6 times, join with ss to 1st dc (21).

Round 4 :

ch1, dc into same st, dc, 2dc in next st, *dc2, 2dc in next st* repeat from * to * 6 times, join with ss to 1st dc (28). Fasten off and sew in ends.

Info :

Centre:

Round 1 :

with E dc7 into magic circle, join with ss to 1st dc (7).

Round 2 :

ch1, 2dc into same st, 2dc into each st around, join with ss to 1st dc (14).

Round 3 :

ch1, dc into same st, 2dc in next st, *dc, 2dc in next st* repeat from * to * 6 times, join with ss to 1st dc (21).

Round 4 :

ch1, dc into same st, dc, 2dc in next st, *dc2, 2dc in next st* repeat from * to * 6 times, join with ss to 1st dc (28). Fasten off and sew in ends.

Join together :

Stack pieces with base upside down, centre and top right side up. Using B sew the layers together, being careful not to sew too close to the edge or you'll squash the cream centre of your biscuit!

Assembly Instructions

  • Choc Chip: On the right side of the top piece, stitch choc chips randomly using B yarn, placing a couple in round 7 to spread decoration, then with wrong sides together join top and base using A by ch1, dc through both layers around the edge, join with ss to 1st dc and fasten off.
  • Jammie Dodger: Using the long cast-on tail from the top piece, stitch the top to the centre by shaping the central hole into a heart and adding a couple of stitches at the centre to make the V shape; then with wrong sides together sew top, centre and base together using A around the outer edge.
  • Oreo: Stack the base upside down, centre and top right side up, then using B yarn sew the layers together around the edge, taking care not to sew too close to the edge so the cream centre retains its shape.
  • Sew in ends carefully after joining each biscuit and weave tails into the edge to hide them and secure joins.
  • For each biscuit ensure top and base pieces are the same size before joining by matching rounds and stitch counts, adjusting tension or refitting if required.

Important Notes

  • πŸ’‘Use consistent tension throughout so top and base pieces match in size for neat joins.
  • πŸ’‘Leave a long tail on the Jammie Dodger top to use for securing the heart centre when sewing the layers together.
  • πŸ’‘Fasten off and sew in ends for each piece as directed to keep edges tidy and secure.
  • πŸ’‘Be careful not to sew too close to the edge when joining layered biscuits or you may squash the centre design.

These tiny crochet biscuits are a sweet way to brighten someone's day and use up DK yarn scraps. Handmade biscuits make adorable gifts, decorations, or play food for little ones. Youll love the quick rounds and satisfying finishing touches like the jam heart and choc chips. πŸͺ🧢

You ask,

we answer.

FAQs

What size will the finished piece be?

Choc Chip Cookie measures approximately 9cm diameter; Jammie Dodger 6cm diameter; Oreo Cookie 5cm diameter using the recommended DK yarn and 4mm hook.

Can I use different yarn weights for this pattern?

Yes, you can use different yarn weights, but this will change the final size; adjust your hook size accordingly and be aware you may need more yarn than specified.

Do I need prior crochet experience for this pattern?

This pattern is beginner friendly and uses basic rounds and double crochet stitches; familiarity with working in the round and common stitches will help.

How long does this project typically take to complete?

Each biscuit is quick to make; most crocheters can make a few biscuits in 2-3 hours total depending on speed and how many you make.