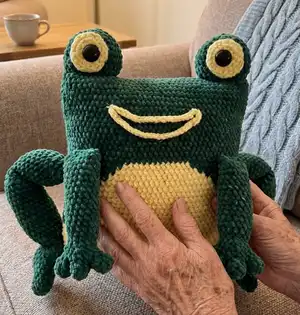
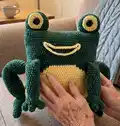
Make an adorable frog pillow that doubles as a cuddly toy and a cheerful decor piece. This pattern guides you through a color-change body, plush eyes, a stitched mouth, and poseable legs so you can create a charming handmade companion. You will enjoy clear step-by-step rounds, helpful photos, and assembly tips to finish a professional-looking pillow. Perfect for gifting or brightening a nursery, bedroom, or living room.
Progress Tracker
0% Complete
— Body :
Info :
Work in continuous rows. Use green color.
Info :
Attention! From this moment we will alternate colors.
Round 2 :
green: Connect the chain by working the first sc into the first chain, being careful not to twist the chain (this is the first stitch of the second round), 43 sc, yellow: 46 sc {90}
Round 3 :
green: 44 sc, yellow: 46 sc {90}
Round 4 :
green: 44 sc, yellow: 46 sc {90}
Round 5 :
green: 45 sc, yellow: 44 sc, green: 1 sc {90}
Round 6 :
green: 46 sc, yellow: 43 sc, green: 1 sc {90}
Round 7 :
green: 47 sc, yellow: 41 sc, green: 2 sc {90}
Round 8 :
green: 48 sc, yellow: 40 sc, green: 2 sc {90}
Round 9 :
green: 49 sc, yellow: 38 sc, green: 3 sc {90}
Round 10 :
green: 50 sc, yellow: 37 sc, green: 3 sc {90}
Round 11 :
green: 51 sc, yellow: 35 sc, green: 4 sc {90}
Round 12 :
green: 52 sc, yellow: 34 sc, green: 4 sc {90}
Round 13 :
green: 53 sc, yellow: 32 sc, green: 5 sc {90}
Round 14 :
green: 54 sc, yellow: 31 sc, green: 5 sc {90}
Round 15 :
green: 55 sc, yellow: 29 sc, green: 6 sc {90}
Round 16 :
green: 56 sc, yellow: 28 sc, green: 6 sc {90}
Round 17 :
green: 57 sc, yellow: 26 sc, green: 7 sc {90}
Round 18 :
green: 58 sc, yellow: 25 sc, green: 7 sc {90}
Round 19 :
green: 59 sc, yellow: 23 sc, green: 8 sc {90}
Round 20 :
green: 60 sc, yellow: 22 sc, green: 8 sc {90}
Round 21 :
green: 62 sc, yellow: 19 sc, green: 9 sc {90}
Round 22 :
green: 64 sc, yellow: 16 sc, green: 10 sc {90}
Round 23 :
green: 66 sc, yellow: 13 sc, green: 11 sc {90}
Rounds 24 - 41 :
green: 90 sc {90}
Round 42 :
We need to make a few shift stitches to bring the yarn to the corner of the pillow. I had to make 9 sc. Depending on your tension you may have to make more or less.
Info :
Weave all the ends. Cut the yarn leaving a long tail for sewing the top edge of the pillow. Stuff the pillow tightly, especially in the corners. Sew the bottom edge of the pillow, keep stuffing as you go. Secure the yarn and weave the end inside the pillow.
— Eyes :
Info :
(2 details made of two parts each)
Part one 1. (Make 2) :
Use green color. Round 1: 6 sc in magic ring {6}
Round 3 :
(1 sc, inc) *6 {18}
Round 4 :
(2 sc, inc) *6 {24}
Round 5 :
(3 sc, inc) *6 {30}
Rounds 6 - 10 :
30 sc {30}
Round 11 :
(3 sc, dec) *6 {24}
Info :
Cut the yarn leaving a long tail for sewing.
Part 2. (Make 2) :
Use yellow yarn. Round 1: 6 sc in magic ring {6}
Round 3 :
(1 sc, inc) *6 {18}
Round 4 :
(2 sc, inc) *6, 1 sl st {24}
Info :
Cut the yarn leaving a long tail for sewing. Sew on part 1 to the top corners of the pillow, stuffing the detail as you sew. Next, sew on part 2 to part 1. Then, sew on shank buttons to the yellow part. Secure the thread, hide inside the eyes, and cut off the excess.
— Mouth :
Info :
Make two separate chains using yellow yarn: Chain 21 and Chain 25.
Info :
Leave long tails for sewing. Sew on the mouth, secure that yarn and weave in the ends.
— Arms (2 details) :
Info :
Make 3 separate details for fingers. Tighten the yarn of the first 2 fingers and leave a little tail for sewing the hole between fingers. Do not cut the yarn of the 3rd finger but continue to crochet.
Fingers (Make 3) - Round 1 :
6 sc in magic ring {6}
Round 4 :
3rd finger: 2 sc, 2nd finger: 3 sc, 1st finger: 6 sc, now crochet on other side of fingers, 2nd finger: 4 sc, 3rd finger: 4 sc {19}
Round 6 :
3 sc, dec, 7 sc, dec, 5 sc {17}
Round 7 :
3 sc, dec, 6 sc, dec, 4 sc {15}
Round 8 :
2 sc, dec, 6 sc, dec, 3 sc {13}
Round 9 :
6 sc, inc, 5 sc, inc {15}
Round 10 :
7 sc, inc, 6 sc, inc {17}
Info :
Loosely stuff the detail and continue to crochet.
Rounds 12 - 23 :
17 sc {17}
Info :
Loosely stuff again and fold the detail to close the edge by crocheting 8 sc inserting the hook through both layers. Leave a long tail for sewing.
— Legs (Make 2) :
Info :
Make 3 separate details for fingers (toes). Tighten the yarn of the first 2 fingers and leave a little tail for sewing the hole between fingers. Do not cut the yarn of the 3rd finger but continue to crochet.
Fingers (Make 3) - Round 1 :
6 sc in magic ring {6}
Round 3 :
(1 sc, inc) *6 {18}
Round 4 :
(1 sc, dec) *6 {12}
Round 5 :
3rd finger: 5 sc, 2nd finger: 6 sc, 1st finger: 12 sc, now crochet on other side of fingers, 2nd finger: 7 sc, 3rd finger: 7 sc {37}
Round 7 :
8 sc, dec, 8 sc, dec, 7 sc, dec, 6 sc, dec {33}
Round 8 :
8 sc, dec, 6 sc, dec, 6 sc, dec, 7 sc {30}
Round 9 :
dec, 5 sc, dec, 5 sc, dec, 6 sc, dec, 6 sc {26}
Round 10 :
5 sc, dec, 5 sc, dec, 5 sc, dec, 3 sc, dec {22}
Round 11 :
5 sc, dec, 4 sc, dec, 3 sc, dec, 4 sc {19}
Round 12 :
dec, 3 sc, dec, 3 sc, dec, 3 sc, dec, 2 sc {15}
Round 14 :
(3 sc, inc) *3, 3 sc {18}
Round 15 :
(2 sc, inc) *6 {24}
Rounds 17 - 30 :
24 sc {24}
Round 31 :
(2 sc, dec) *6 {18}
Round 32 :
(1 sc, dec) *6 {12}
Round 33 :
(1 sc, inc) *6 {18}
Round 34 :
(2 sc, inc) *6 {24}
Rounds 35 - 42 :
24 sc {24}
Info :
Loosely stuff again and fold detail to close the edge by crocheting 12 sc inserting the hook through both layers. Leave a long tail for sewing.
— Assembly :
Info :
Sew on the hands to round 24 (count the rounds from the bottom of the pillow).
Info :
Sew on the legs. Option 1: Sew on the legs on the bottom corners. Option 2: Sew on the legs to the sides of round 18 (count the rounds from the bottom of the pillow). Fold the legs as shown in the photos. Sew the bottom part of the leg to the corner of the pillow. Tighten the thread and weave the ends.
This Frog Pillow pattern turns plush yarn into a playful, huggable friend you will love to make and display. It makes a delightful gift for kids, friends, or to brighten your own living space with handmade charm. Try different color combinations to make each frog unique and full of personality. 🐸🧶