🧶 Beautiful ✨ Detailed 💝 Adorable

Freestyle Beanie Pattern

Freestyle Beanie Pattern
4.4★ Rating
2-4 Hours Time Needed
1.5K Made This
✂️

Beginner Friendly Level

Perfect for those just starting their crochet journey, with clear instructions and simple techniques

⏱️

Bite-Sized Project

Finishes in 2-4 hours—perfect for an afternoon of creative relaxation.

👕

Casual Chic

Relaxed style with a modern twist, perfect for everyday wear while maintaining that handcrafted uniqueness.

About This Freestyle Beanie Pattern

This Freestyle Beanie pattern teaches you a simple rectangle-to-hat method using HDC worked in the back loop to create a stretchy rib-like texture. You will learn how to size the rectangle for different head circumferences, shape the crown with decreases worked into the ridges, and finish with a seamless whip stitch and tidy top closure. The pattern is intentionally flexible so you can use any yarn weight and easily personalize with pom-poms, flowers, embroidery, studs, or buttons.
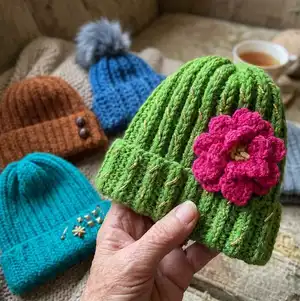
Freestyle Beanie Pattern crochet pattern - detailed view of completed project

Clear tips and example yarns are included so you can recreate the samples shown. The instructions explain turning chains, back loop detail, shaping across the top edge, and tidy finishing techniques.

Why You'll Love This Freestyle Beanie Pattern

I absolutely love this pattern because it gives you complete freedom to make a hat that fits your style and yarn stash. I created it to be flexible—use any yarn weight, change the brim height, and add as many embellishments as you like. The method is simple yet produces a polished, professional-looking beanie that wears beautifully. I find the back-loop HDC rows create a cozy, stretchy fabric that is both warm and comfortable to wear. Making a freestyling beanie like this is one of my favorite quick projects when I want a satisfying, useful finish.

Freestyle Beanie Pattern step 1 - construction progress Freestyle Beanie Pattern step 2 - assembly progress Freestyle Beanie Pattern step 3 - details and accessories Freestyle Beanie Pattern step 4 - final assembly and finishing

Switch Things Up

I love how many ways you can remix this pattern: change yarn weight, hook size, or add texture for completely different looks.

Try bulky yarn and a big hook for a chunky winter hat, or use a finer yarn and smaller hook to create a sleek, slouchy adult hat.

Swap HDC for SC on the foundation row if you prefer a flatter start; the first row will blend differently when seamed.

Make the rectangle shorter for a beanie with no fold, or add extra rows if you want a deep slouch or a tall cuff to fold.

Add a faux fur pom for a classic winter look, or a crocheted flower for a playful, feminine style.

Stitch long whip stitches in a contrasting color along the ridges to mimic cactus spines or add subtle surface texture.

Attach leather buttons through both layers near the brim for a librarian-chic vibe, and use a small fabric patch behind them to hide prongs or studs.

Experiment with stripes by changing colors every few rows; this gives you lots of personality without changing technique.

I sometimes insert a couple of safety pins or decorative studs into the folded brim to hold a folded edge in place and to add a tiny weight for a neat drape.

If you want a mini version for a keychain or doll, use thin yarn and a tiny hook and scale down the chains and rows proportionally.

Common Mistakes & How to Fix Them

✗ Starting with a chain that is too short for your desired hat height; measure and chain slightly longer than the target height (add about 1"/2.5cm) and add the extra turning chain stitch as instructed. ✗ Working into the wrong chain or stitch on your foundation row; always begin with the second chain from the hook and work into the bottom of the chain so your foundation row sits correctly. ✗ Not working in the back loop only (BLO) when instructed; this will ruin the rib texture so be sure to insert your hook into the back loop for each HDC row. ✗ Failing to measure or pin the long side to check circumference; measure across the rectangle or pin short ends together to test the fit before seaming. ✗ Skipping the step to make the long side slightly smaller than head circumference; the long side should be 1-3" [2.5-7.5cm] smaller so the hat stretches to fit snugly. ✗ Seaming carelessly leaving an obvious seam; insert your needle under the top loop of the last row worked and under both loops of the foundation edge to make a nearly invisible seam.
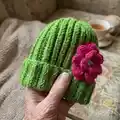
Freestyle Beanie Pattern

Make a customizable ribbed beanie that works with any yarn weight and your favorite hook. This versatile pattern shows how to create a rectangular ribbed piece using back-loop half double crochets, shape the crown with simple single crochet decreases, and finish with a folded brim, pom-pom, flower, or studs. You can easily adapt length, width, and embellishments to make hats for babies through adults using the same basic technique. Perfect for gifting, markets, or your own cozy winter wear.

Beginner Friendly 2-4 Hours

Materials Needed for Freestyle Beanie Pattern

— Main Fabric

  • 01
    Worsted weight yarn (#4): approximately 290 yds (example: Kelbourne Woolens Germantown, 100% North American Wool; 220 yds [201m]/3.5 oz [100 g]; Medium Gray Heather #030 used in sample)
  • 02
    Bulky weight yarn (#5): approximately 225 yds (example: We Crochet Brava Bulky, 100% Acrylic; 136 yds/3.5 oz [100 g]; Peapod #633894 used)
  • 03
    Super Bulky weight yarn (#6): approximately 190 yds (example: Buttercream Luxe Craft Alpaca Solid, 80% Acrylic/20% Alpaca; 130 yds [119m]/6 oz [170 g]; Light Blue #BCMA-421 used)
  • 04
    Scraps/fingering weight for embroidery: West Yorkshire Spinners Signature 4-ply fingering weight (#1), 75% Wool/25% Nylon; 437 yds [400m] (Milk Bottle #230 and Butterscotch #240 used for cactus spines and flower center)
  • 05
    WeCrochet Wool of the Andes (worsted #4) example for studs sample: 110 yds [100m]/1.75 oz [50 g]; Amber Heather #23893
  • 06
    Happy Sheep Woolpower (heavy worsted) example for turquoise sample: 174 yds [160m]/3.5 oz [100 g]; Turquoise #19

— Tools Required

  • 01
    Crochet hook size G/6 (4.0 mm) recommended for worsted weight (#4)
  • 02
    Crochet hook size I/9 (5.5 mm) recommended for bulky weight (#5)
  • 03
    Crochet hook size K (6.5 mm) or L (8.0 mm) recommended for super bulky weight (#6)
  • 04
    Measuring tape or ruler
  • 05
    Yarn needle for weaving and seaming
  • 06
    Sewing needle and thread for attaching buttons
  • 07
    Scissors
  • 08
    Pins for fitting and assembly (optional)
  • 09
    Pom-pom or faux fur pom (optional)
  • 10
    3/4" faux leather buttons (optional) or other buttons
  • 11
    Studs and safety pins (optional) for decoration

Progress Tracker

0% Complete

— Notes :

Info :

Making a beanie without a pattern is super simple! It can be very freeing to create something without having to follow someone else's directions to the T. Basic beanies make excellent gifts and have so much potential for personalization! Be sure to watch the live event for a full tutorial!

Info :

For this project, you can make a beanie in whichever yarn weight you like. Choose a hook that will give you a fairly firm gauge so that you do not have large holes between your stitches. Just to give you a frame of reference, I often use a worsted weight yarn (this is a #4) with a G/6 (4.0mm) hook, or a bulky yarn (#5) with an I/9 (5.5mm) hook or a super bulky weight (#6) with a K (6.5mm) or L (8.0mm) hook.

Info :

Yarn usage is dependent on the thickness and type of yarn that you choose as well as the size of the beanie, how far the bottom of the hat is folded up, and gauge. Just for a ballpark idea of how much yarn is needed, I've listed my averages here for different yarn weights for a medium adult sized hat. You will need extra for a larger hat, less for a smaller hat, etc.

Info :

Worsted weight (#4): approximately 290 yds. Bulky weight (#5): approximately 225 yds. Super Bulky weight (#6): 190 yds.

Info :

Next, determine how tall you would like your hat to be. You can use a beanie that you already own and measure it from the top to bottom, or you can use your head to determine this measurement. To use your head, use a measuring tape to measure where the bottom edge of the hat should be and measure up to where you imagine the center top of the hat should be. If you plan the hat to have a folded brim like the sample shown, you will need to add the height of the brim to the projected height of the hat. For instance, I wanted my rust colored hat to measure about 8" [20.5cm] tall and I wanted the brim to measure about 3" [7.5cm] up from the folded edge. So the total height of my hat should be 11" [28cm]. (The rust colored sample was made to fit a child, with a bit of extra height to the hat).

— Foundation and Body :

Round 1 :

Make a beginning chain that is just slightly longer than the desired beanie height by about 1" [2.5cm], then add 1 more stitch (this will count as a turning chain). In the worsted weight, rust colored sample I started with 49 chains.

Round 2 :

Beginning with the second chain from hook and working into the bottom of the chain, make a HDC (see note below) in each st across, until the piece is as long as your targeted height measurement. If there are extra chains leftover, these can be unraveled. As you continue making rows, continue to monitor the width of your rows (this is the height of the finished hat). Sometimes our gauge fluctuates a bit at the start of our project so it is important to double check after a few rows to make sure it is on target.

Info :

Note: Alternatively, you can begin with a SC row instead of a HDC row. I like to do this because then the first row + the foundation chain add up to be about the same height as 1 row of HDC. This means that this first row will blend in a bit better when we seam the hat together at the end.

Round 3 :

Next, *make a ch-2 for a turning chain (this will not count as a stitch - you will never work into these turning chains), turn your work and make 1 HDC in the back loop of each stitch across. Repeat from * until your hat is the desired circumference (you will need to measure across the long sides of the rectangle, or you can pin the short ends to each other and try it on). The long side of the rectangle should measure 1-3" [2.5-7.5cm] smaller than the head circumference so that it has to stretch a bit to fit. Make sure you work an even amount of rows; the working loop should be opposite where the beginning yarn tail is when you are finished. In my rust colored sample I worked 50 rows.

— Top Edge Shaping (Decrease along Row-Ends) :

Info :

Rotate the piece in order to work along the top edge of hat, into the row-ends. Make SC decreases (SC2tog) as shown, across the top edge to help shape the top edge. To make the decreases across the top edge, **insert hook into the next ridge (see photo) YO, and pull up loop, insert hook into following ridge, YO and pull up loop... YO and pull through all 3 loops on hook.

Round 4 :

Repeat from ** across until all ridges have been worked. If one ridge remains at the end, work one SC into the last ridge.

— Finishing :

Info :

Fasten off leaving a long tail for sewing. Using yarn needle, weave yarn tail through each of the SC that were worked along top edge of hat and pull tight to close the top of the hat.

Info :

Continue to use the yarn tail to whip stitch the seam in hat. To make your seam blend in really well, insert needle under just the top loop of the last row worked, but under both loops of the foundation edge as shown.

Info :

Weave in ends. Block.

— Flower & Embroidery (Optional) :

Info :

I made a flower following a 3-D Flower pattern, except I started with a foundation chain of 19 instead of 9. I also added a little [ch-2, sl st in first ch] picot between the center 2 DC in each petal in the last row. This gave each of the petals a bit of a point. The yarn tails were used to stitch the coiled-up piece to itself (securing the base in a spiral), and then to the beanie.

Round 5 :

I held the same two sock yarns together to create the center of the flower using a small hook for a tight gauge. Center of flower was worked as follows: *chain 5, beginning with the 2nd chain from hook and working into the bottom of the chain, I made 1 sl st into each of the next 4 chains. I repeated from * 8 more times. My piece looked kind of like eyelashes at this point. I coiled up the bottom (the end where all of the wisps were connected), and then I stitched this to the center of the flower.

Info :

For the cactus spine embroidery I used 2 strands of a sock-weight yarn held together (one in off-white, and one in yellow) and a yarn needle to make some long whip-stitches along each of the ridges. I made sure that I added the spines on the WS of the hat near the bottom so that when it was turned upward, the stitches would be on the outside.

— Embellishment & Hardware Notes :

Info :

Leather buttons have the power to elevate a basic beanie to librarian-chic in mere minutes. I used a needle and thread to stitch two 3/4" faux leather buttons through both layers of the beanie. For studs and pins, Amazon sells pyramid studs; I added a small rectangle of black knit fabric to the bottom of the beanie to hide the backing and pierced the studs through both layers and fastened them in place by bending the prongs inward. After attaching an enamel pin, I used a couple of safety pins (through all layers) to hold the brim in place. If you don't like the look of safety pins, use a small amount of matching yarn to tack the folded edge in place instead.

Assembly Instructions

  • Close the top: weave the long tail through each of the single crochets along the top edge created by the decreases, pull tight to close the crown snugly and secure with a knot.
  • Seam the sides: using the long tail, whip stitch the short edges together to form a hat tube; insert the needle under the top loop of the last worked row and under both loops of the foundation edge to make the seam blend.
  • Fold the brim: fold up the bottom edge to create the desired brim height and tack the fold in a few places with matching yarn or secure with decorative studs/pins as desired.
  • Attach embellishments: stitch on flowers, buttons, or sew a faux-fur pom-pom to the crown using a sewing needle/thread or yarn needle; use the yarn tails from the flower to secure the coiled flower base to the hat.
  • Finish and secure: weave in all remaining ends neatly on the WS and then block the hat lightly to even out stitches (steam or wet-block according to yarn fiber).

Important Notes

  • 💡Use a measuring tape to check the long side of your rectangle to ensure it is 1-3" smaller than the head circumference for a snug fit.
  • 💡Work the HDC rows in the back loop only to create the ribbed texture; double-check that you are inserting your hook into the back loop each row.
  • 💡Pin and try the rectangle by overlapping the short ends before seaming to confirm fit and to ensure the working loop and beginning tail are positioned correctly.
  • 💡When seaming, insert your needle under the top loop of the last row and under both loops of the foundation edge to make the seam nearly invisible.

This Freestyle Beanie is a small project with big style possibilities—mix yarn weights, add a pom, pins, or a 3-D flower to make it yours. It sews up quickly and looks polished whether you keep it classic or go bold. Grab some yarn, pick a hook, and make a hat you and your friends will love! 🧶✨

You ask,

we answer.

FAQs

What size will the finished piece be?

The finished beanie size depends on your yarn weight and how many chains/rows you make; as a guide, aim for the long side of the rectangle to measure 1-3" [2.5-7.5cm] smaller than the head circumference so it stretches to fit.

Can I use different yarn weights for this pattern?

Yes, you can use different yarn weights; choose an appropriate hook size for the yarn and check your rectangle measurements—worsted, bulky, and super bulky examples are shown in the pattern.

Do I need prior crochet experience for this pattern?

This pattern is beginner friendly—basic stitches like chain, HDC, and SC are used, but you should be comfortable working rows and following simple shaping instructions.

How long does this project typically take to complete?

Most crafters finish a beanie like this in 2-4 hours, though time will vary depending on yarn weight, size, and the amount of embellishment you add.