🧶 Beautiful ✨ Detailed 💝 Adorable

Free Crochet Hat Pattern

Free Crochet Hat Pattern
4.6★ Rating
2-3 Hours Time Needed
1.9K Made This
✂️

Beginner Friendly Level

Perfect for those just starting their crochet journey, with clear instructions and simple techniques

⏱️

Bite-Sized Project

Finishes in 2-4 hours—perfect for an afternoon of creative relaxation.

🧣

Snug Essential

Everyday comfort with practical charm, designed for both functionality and style through changing seasons.

About This Free Crochet Hat Pattern

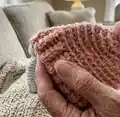
This pattern creates a classic ribbed beanie with a small pom pom on top, crocheted from the bottom up. The ribbing is worked flat in back-loop single crochet then joined to work in the round for the crown. It is sized to fit the Snowman Friends pattern but can be adapted for other projects. You will use two hook sizes for the ribbing and crown for a neat, stretchy finish.

Free Crochet Hat Pattern crochet pattern - detailed view of completed project

Worked in worsted weight yarn, the hat uses simple single crochet stitches and back-loop-only ribs. The crown is shaped with decreases worked in the back loop to match the ribbing texture.

Why You'll Love This Free Crochet Hat Pattern

I absolutely love this pattern because it combines simple stitches with a polished, professional look. I enjoy how the back-loop ribbing creates a stretchy, snug brim that holds its shape without being tight. The construction is straightforward, so I can make several quickly as gifts and customize the colors. Working the crown in BLO keeps the texture consistent and gives a lovely finished edge for the pom pom.

Free Crochet Hat Pattern step 1 - construction progress Free Crochet Hat Pattern step 2 - assembly progress Free Crochet Hat Pattern step 3 - details and accessories Free Crochet Hat Pattern step 4 - final assembly and finishing

Switch Things Up

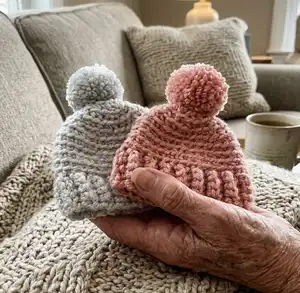
I love customizing this hat by changing yarn colors; try stripes or a two-tone brim for a fresh look.

I often make a matching set by using the same yarn for a cowl or mittens so everything coordinates perfectly.

To make the hat larger or smaller, I change the yarn weight and use a correspondingly larger or smaller hook, which gives predictable size changes.

For a chunkier, cozy version I use bulky yarn and a larger hook, and for tiny keychain or doll hats I use fingering yarn and a small hook.

I like to swap the pom pom for a faux fur pom for a dressier version or knit a tassel for a playful alternative.

Try working the ribbing for fewer or more rows; shortening the ribbing makes a slouchier hat while lengthening gives a cuffed beanie look.

I sometimes embroider initials or small motifs on the brim after finishing to personalize the hat as a gift.

Another idea is to add earflaps and braided ties for a cozy winter hat — simply pick up stitches at sides and work downwards.

For extra warmth I line the hat with a fleece band or a second crocheted lining for winter wearability.

I also experiment with different stitch textures for the crown — switching BLO decreases for regular decreases changes the final look subtly and tastefully.

Common Mistakes & How to Fix Them

✗ Skipping the turning chain as a reference can throw off your counts; always follow the pattern and remember that the turning chain does not count as a stitch. ✗ Joining the ribbing incorrectly will twist the brim and distort the hat; fold the ribbing in half and slip stitch row 1 to row 30 matching edges before turning inside out. ✗ Using a hook that is too large for the ribbing results in a floppy brim; use the recommended 3.25 mm hook for a firm rib and 3.75 mm for the crown as specified. ✗ Fastening off too early makes it hard to close the crown neatly; leave a long tail when fastening off round 9 and weave the tail through the front loops to pull tight and close. ✗ Not maintaining BLO placement during rounds will change the texture and stitch counts; be consistent and work the specified BLO stitches for rounds 2-8 to keep stitch numbers correct.

Free Crochet Hat Pattern

Make a cozy ribbed crochet hat with an adorable pom pom — a quick, satisfying project you can finish in an afternoon. This pattern uses worsted weight yarn and two hook sizes to create a stretchy ribbed brim and a neat crown. Clear step-by-step rows and rounds make it easy to follow, and the finished hat fits the Snowman Friends sizing or can be adapted for other projects. Perfect for gifting or adding handmade warmth to your wardrobe.

Beginner Friendly 2-3 Hours

Materials Needed for Free Crochet Hat Pattern

— Main Fabric

  • 01
    Worsted weight yarn (#4), approximately 50 yards (50 yds approximately) per hat
  • 02
    Paintbox Yarns Simply Aran in Stormy Grey (used for pictured hat)
  • 03
    Paintbox Yarns Simply Aran in Blush Pink (used for pictured hat)

— Tools Required

  • 01
    Crochet hook 3.25 mm (crochet hook)
  • 02
    Crochet hook 3.75 mm (crochet hook)
  • 03
    Tapestry needle
  • 04
    Scissors
  • 05
    Pom Pom maker (optional)

Progress Tracker

0% Complete

— Ribbing :

Info :

Using the 3.25 mm hook, ch 5

Row 1 :

sc in the second ch from the hook and in each ch across, Ch 1 and turn [4sc]

Row 2 :

sc BLO in each st across. Ch 1 and turn [4sc]

Row 3-30 :

Repeat row 2

Info :

Do not fasten off. Fold in half, sl st row 1 and row 30 together to join the ribbing. Turn inside out, so the seam is on the inside and the working loop is on the top. The pattern will now be worked in the round.

— Top of the Hat :

Info :

Using the 3.75 mm hook

Round 1 :

ch 1, work 30 sc evenly around the ribbing, sl st to the first sc [30 sc]

Round 2-5 :

ch 1, sc BLO in each st around, sl st to the first sc [30]

Round 6 :

ch 1, (sc BLO in next 3 sts, sc2tog BLO) around, sl st to the first st [24]

Round 7 :

ch 1, (sc BLO in next 2 sts, sc2tog BLO) around, sl st to the first st [18]

Round 8 :

ch 1, (sc BLO in next st, sc2tog BLO) around, sl st to the first st [12]

Round 9 :

ch1,(sc2tog BLO) around [6]

Info :

Fasten off yarn leaving a tail. Thread tail end of yarn onto a tapestry needle, insert the needle through the front loop of the remaining sts and pull tight to close.

Info :

Make a small Pom Pom and attach to the top of the hat.

Assembly Instructions

  • Fold the ribbing in half and slip stitch Row 1 to Row 30 together to join the ribbing, ensuring the seam is neat and on the inside.
  • After joining the ribbing, turn the piece inside out so the working loop is on the top before beginning the crown rounds.
  • When the crown is complete, fasten off leaving a long tail; thread the tail onto a tapestry needle and weave through the front loops of the remaining stitches, then pull tight to close the top securely.
  • Make a small pom pom using a pom pom maker or by hand and sew it to the very top of the hat, securing with several stitches to ensure it is firmly attached.

Important Notes

  • 💡The hat is crocheted from the bottom up and the ribbing is worked flat before joining to work in the round.
  • 💡The turning chain does not count as a stitch — always follow the pattern stitch counts shown in brackets.
  • 💡This hat pattern is sized to fit the Snowman Friends pattern; size adjustments require changing yarn weight and hook size accordingly.
  • 💡When joining the ribbing, turn the work inside out so the seam sits on the inside and the working loop is on top for an even start to the crown.

This ribbed hat pattern is a quick, satisfying make for cozy winter days. The back-loop ribbing creates a snug, stretchy brim and a neat textured crown. Add a pom pom for a playful finish and gift-ready charm. 🧶✨

You ask,

we answer.

FAQs

What size will the finished hat be?

The finished hat is sized to fit the Snowman Friends pattern; size will vary with yarn and hook choice but is standard adult/child sizing for use with that pattern.

Can I use a different yarn weight or hook size?

Yes — switching yarn weight or hook size will change the finished dimensions; use a larger hook and thicker yarn for a bigger, chunkier hat and a smaller hook for a firmer, smaller hat.

Are there any special techniques needed to make this hat?

No special techniques are required beyond basic single crochet and working in the back loop only (BLO); the pattern is beginner friendly with clear row and round instructions.

How do I attach the pom pom securely?

Make a pom pom with a pom pom maker or by wrapping yarn, then thread yarn through the pom and the hat top several times and knot securely; weave ends through to hide them.