🧢 Beautiful ✨ Detailed πŸ’ Adorable

Bunny baby rattle Amigurumi Pattern

Bunny baby rattle Amigurumi Pattern
4.4β˜… Rating
2-4 Hours Time Needed
1.8K Made This
βœ‚οΈ

Intermediate Level

Ideal for those with basic crochet experience, featuring slightly more advanced stitches and techniques to expand your skills.

⏱️

Bite-Sized Project

Finishes in 2-4 hoursβ€”perfect for an afternoon of creative relaxation.

🧸

Cute Companion

An adorable friend to cherish, handcrafted with love to bring comfort and joy for years to come.

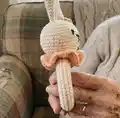
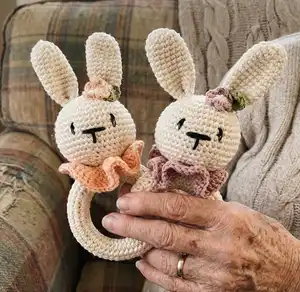
About This Bunny baby rattle Amigurumi Pattern

This pattern creates a small bunny baby rattle attached to a 6 cm wooden teether ring, crocheted in sport/baby weight yarn. Youll work in spirals for the head and ears, and in rows to wrap the wooden ring and make the collar and flower. Clear step-by-step instructions, photos and QR-linked video support help you through shaping and assembly.

Bunny baby rattle Amigurumi Pattern crochet pattern - detailed view of completed project

Perfect for gifting or selling finished items, the rattle combines wooden and soft textures to soothe baby gums. Safety notes and stitching guidance ensure a secure final toy for little hands.

Why You'll Love This Bunny baby rattle Amigurumi Pattern

I absolutely love this pattern because it combines simple amigurumi techniques with a functional teether ring that babies adore. I enjoy how the wooden ring adds texture and interest, making the toy both tactile and beautiful. The pattern is satisfying to crochet quickly but still allows for small creative details like the collar and flower. Sewing the pieces together and finishing the face gives each rattle a charming personality, which I find very rewarding.

Bunny baby rattle Amigurumi Pattern step 1 - construction progress Bunny baby rattle Amigurumi Pattern step 2 - assembly progress Bunny baby rattle Amigurumi Pattern step 3 - details and accessories Bunny baby rattle Amigurumi Pattern step 4 - final assembly and finishing

Switch Things Up

I love experimenting with colors, so try pastel shades for a softer look or bright contrasts for a playful rattle.

You can change the yarn weight and hook to alter the size β€” bulky yarn will create a chunkier rattle, thin yarn makes a delicate mini version.

I often swap the wooden ring for a silicone teether ring for a chew-safe modern option β€” be sure the ring is baby-safe food grade.

Try embroidering different facial expressions by moving the eyes and nose placement to create sleepy, curious, or smiling bunnies.

I sometimes make the collar ruffle bigger by adding extra rows or by using a contrast color for a layered look.

If you like, add a small bell inside the rattle ball for extra sound, but ensure it is sewn securely and safe for babies.

Embellish the bunny with tiny crochet bows or a crocheted hat for seasonal variations like Easter or winter themes.

I recommend using safety-tested materials and checking all attachments; replace wooden ring with a larger diameter for older children variations.

For a set, make several bunnies in a color palette and attach tags for gifting β€” they make lovely baby shower presents.

I enjoy adding a bit of embroidery detail on the collar or inner ear for a personalized touch β€” simple backstitches work well.

Common Mistakes & How to Fix Them

βœ— Not using the recommended hook size can result in a too-loose fabric where stuffing and rattle can show through; use a 2.00 mm hook or adjust to achieve the gauge of 24 sts x 25 rows = 10 cm. βœ— Forgetting to stuff before inserting the rattle ball can make positioning difficult; stuff the head firmly, insert the rattle ball, then finish stuffing before closing the head. βœ— Sewing parts loosely will make the toy unsafe for babies; sew all pieces tightly, use multiple passes where needed, and secure knots to prevent parts from detaching. βœ— Skipping stitch counting during increases/decreases will create misshapen pieces; count stitches after each shaping round and mark the first stitch with a marker to maintain correct rounds.

Bunny baby rattle Amigurumi Pattern

Make a sweet Bunny Baby Rattle with a wooden teether ring β€” a perfect handmade gift for little ones. This pattern guides you step-by-step through crocheting the head, ears, body wrap, collar and decorative flower, plus safe assembly tips. Youll enjoy a compact project with charming results and clear photos to help you along.

Intermediate 2-4 Hours

Materials Needed for Bunny baby rattle Amigurumi Pattern

β€” Main Fabric

  • 01
    Yarn Art Jeans (color 05) approx. 90 yards
  • 02
    Yarn Art Jeans (any color for decoration) approx. 5 yards
  • 03
    Suggested yarn: Sport/Baby weight (Fine #2)
  • 04
    Accent yarns for collar and flower - small amounts (approx. 5 yards each color)

β€” Tools Required

  • 01
    Crochet hook size 2.00 mm
  • 02
    Wooden ring 6 cm / 2.5" diameter
  • 03
    Rattle ball 24 mm / 1"
  • 04
    Polyester fiberfill for stuffing
  • 05
    Sewing needle for assembly
  • 06
    Sewing pins for placement
  • 07
    Scissors
  • 08
    Stitch markers
  • 09
    Yarn needle for weaving ends

Progress Tracker

0% Complete

β€” Head :

Info :

Crochet by spiral.

Round 1 :

6 sc in Magic ring [fig 1] (6)

Round 2 :

6 inc (12)

Round 3 :

(1 sc, inc) * 6 (18)

Round 4 :

(2 sc, inc) * 6 (24)

Round 5 :

(3 sc, inc) * 6 (30)

Round 6 :

(4 sc, inc) *6 [fig 2] (36)

Round 7 :

(5 sc, inc) * 6 (42)

Round 8 :

(6 sc, inc) * 6 (48)

Round 9-15 :

48 sc [fig 3]

Round 16 :

(6 sc, dec) * 6 (42)

Round 17 :

(5 sc, dec) * 6 (36)

Round 18 :

(4 sc, dec) * 6 (30)

Round 19 :

(3 sc, dec) * 6 (24)

Info :

Stuff the head firmly and insert the rattle ball [fig 4]

Round 20 :

(2 sc, dec) * 6 (18)

Round 21 :

(1 sc, dec) * 6 (12)

Round 22 :

(sc) * 6 (6)

Info :

Cut the yarn with long tail [fig 5].

β€” Ears :

Info :

Crochet by spiral.

Round 1 :

6 sc in Magic ring (6)

Round 2 :

6 inc (12)

Round 3 :

(2 sc, inc) * 4 (16)

Rounds 4-11 :

16 sc

Round 12 :

(6 sc, dec) * 2 (14)

Round 13 :

14 sc

Round 14 :

(4 sc, dec) * 2 (12)

Round 15 :

12 sc

Round 16 :

(4 sc, dec) * 2 (10)

Info :

Cut the yarn with long tail approx. 15 cm /6" [fig 6]

Info :

Make the second ear.

β€” Body :

Info :

Working in rows. Start with foundation chain.

Info :

NOTE that you may need to increase or decrease the number of rows to match your wooden ring. It should `hug` wooden ring completely.

Item Name (P1) :

Chain 25.

Row 1-9 :

24 sc, ch 1 and turn [fig 7]

Info :

Cut the yarn leaving a long tail for sewing. Wrap the ring and sew along [fig 8]

β€” Collar :

Info :

Working in rows. Using brown yarn.

Item Name (P1) :

Chain 20

Row 1 :

ch 2, 1 dc in the 20th ch, *2 dc in the next st* till the end, turn [fig 9]

Row 2 :

ch 2, *2 dc in the next st* till the end.

Info :

Cut the yarn leaving a long tail for sewing [fig 10]

β€” Assembling :

Step 1 :

Attach the head to the middle of the body. And sew it, firmly as you can, so it doesn't move when shaking [fig 11]

Step 2 :

Fold the ears in half lengthwise so that a dimple forms at the base. Sew the ears between round 4 and 5. Use the sewing pins to place and fixate the ears. [fig 12]

Step 3 :

Place the collar between the body and head and sew the ends together into a ring. To prevent it from dangling, sew it to the head in several places [fig 13,14].

Step 4 :

Take black yarn and embroider the nose and eyes. Please, refer to the pictures! [fig 15]

Info :

Between the 11th and 12th rows embroider the horizontal line of the nose (the width of the nose is about 4 sc). From the middle down, embroider the nose with a vertical line in 2 rows. Embroider the eyes at a distance of 2 sc in the direction of the horizontal line of the nose. Make sure the muzzle is symmetrical ☺

β€” Flower :

Info :

Add some personality to your toy. Complete it with a bow or decorate it with a flower.

Item Name (P1) :

Chain 10 [fig 17].

Row 1 :

ch 1, 4 sc in one ch, sl-st, 4 hdc in one ch, sl-st, 4 dc in one ch, sl-st, change color of the yarn: (1 hdc, 2 dc, 2 trc, 2 dc, 1 hdc) in one ch, sl-st, (1 hdc, 2 dc, 2 tr, 2 dc, 1 hdc) in one ch.

Info :

Cut the yarn.

Info :

Roll up and give the shape of a flower [fig 18-19]. Sew tightly.

Assembly Instructions

  • Attach the head to the middle of the body and sew it firmly so it does not move when shaking; use strong stitches and check alignment with photos.
  • Fold each ear lengthwise to create a dimple at the base and sew the ears between rounds 4 and 5, using pins to position and fix them before stitching.
  • Wrap and sew the crocheted body strip around the wooden ring, leaving a long tail; secure by sewing along the seam so the ring is fully hugged.
  • Place the collar between the body and head, sew the ends together into a ring, and tack the collar to the head in several places to prevent dangling.
  • Embroider the nose and eyes with black yarn between the 11th and 12th rows, creating a horizontal nose line about 4 sc wide and a vertical nose line down 2 rows.

Important Notes

  • πŸ’‘Please sew all pieces tightly because a baby will play with it; use multiple secure stitches and hide knot ends.
  • πŸ’‘Do not leave toys unattended in the crib; remove the toy if any damage is visible and check attachments regularly.
  • πŸ’‘Maintain consistent tension to achieve the correct gauge of 24 stitches and 25 rows = 4" (10cm) in single crochet for proper fit on the wooden ring.

This adorable Bunny Baby Rattle is designed to delight both babies and makers with its soft yarn and wooden teether ring. It combines tactile textures and safe construction for soothing little hands and gums. Make one as a cherished gift or a special keepsake β€” happy crocheting! 🧢🍼

You ask,

we answer.

FAQs

What size will the finished piece be?

The finished rattle diameter is approximately 2 1/2" (6 cm) and the total height with the ring is about 5 1/2" (14 cm) when using the recommended materials.

Can I use different yarn weights for this pattern?

Yes, you can use different yarn weights but the final size will change; if you choose a thicker yarn use a larger hook and adjust row counts to fit the wooden ring.

Do I need prior crochet experience for this pattern?

This pattern is rated intermediate and assumes you know single crochet, increases and decreases, and basic assembly techniques.

How long does this project typically take to complete?

Most crocheters finish this project in 2-4 hours depending on experience and whether you make decorative details like the flower and collar.

Is this toy safe for babies?

Follow the safety notes: sew all pieces tightly, use a securely enclosed rattle ball and a solid wooden ring, and never leave the toy unattended with an infant.