🧢 Beautiful ✨ Detailed πŸ’ Adorable

Little frog Amigurumi Pattern

Little frog Amigurumi Pattern
4.8β˜… Rating
2-3 Hours Time Needed
2.0K Made This
βœ‚οΈ

Intermediate Level

Ideal for those with basic crochet experience, featuring slightly more advanced stitches and techniques to expand your skills.

⏱️

Bite-Sized Project

Finishes in 2-4 hoursβ€”perfect for an afternoon of creative relaxation.

🧸

Cute Companion

An adorable friend to cherish, handcrafted with love to bring comfort and joy for years to come.

About This Little frog Amigurumi Pattern

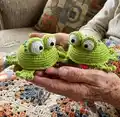
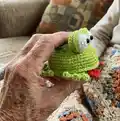
This pattern creates a small, stuffed Little Frog using cotton DK yarn and a 2.0 mm hook. It includes full round-by-round instructions for the belly, back, eyes, eyelids, paws and tongue, plus step-by-step assembly. The design uses simple shaping and small details like French knots to bring personality to your frog.

Little frog Amigurumi Pattern crochet pattern - detailed view of completed project

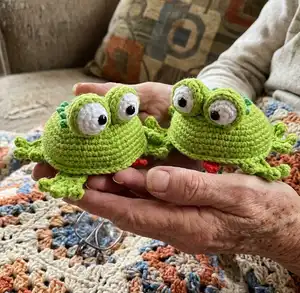
Pictures and exact round instructions are included to make assembly simple and accurate. Use the materials list to match gauge and achieve the pictured 7 cm frog.

Why You'll Love This Little frog Amigurumi Pattern

I absolutely love this pattern because it captures a lot of personality in such a small project. I enjoy how the simple rounds build up quickly into a delightful little frog that is so satisfying to finish. The step-by-step assembly and photos make it easy to place the eyes, paws and tongue for the cutest expression. I also love that you can personalize the frog with different colors or tiny embellishments to make each one unique.

Little frog Amigurumi Pattern step 1 - construction progress Little frog Amigurumi Pattern step 2 - assembly progress Little frog Amigurumi Pattern step 3 - details and accessories Little frog Amigurumi Pattern step 4 - final assembly and finishing

Switch Things Up

I love how simple it is to customize this frog by changing yarn colors β€” try pastel tones for a nursery-friendly look or neon shades for a playful twist.

To make the frog larger, I switch to thicker yarn and a larger hook; conversely use finer yarn and smaller hook to create tiny keychain frogs.

I often swap the safety eyes for embroidered eyes when making toys for small children to ensure maximum safety and softness.

Try adding tiny accessories like a crocheted bow, scarf, or hat to give each frog its own personality and make great gifts.

Instead of French knots, I sometimes sew on small green beads or seed beads to create sparkling bumps on the frog's back.

For a poseable version I add thin wire inside the legs so the frog can be bent into sitting or standing positions.

I like to experiment with different stuffing levels β€” slightly firmer gives a sturdier toy while softer stuffing creates a more squeezable feel.

Embroidering different mouth shapes or varying eye placement completely changes the frog's expression, so I try several placements before final sewing.

Use a contrasting color for the eyelids or belly trim for an eye-catching detail that really pops against the main body color.

If you want to sell finished frogs, consider offering small themed sets (like forest friends) using this basic pattern as the foundation.

Common Mistakes & How to Fix Them

βœ— Crocheting too loosely will create gaps where stuffing shows; use tighter tension or a smaller hook to eliminate holes. βœ— Not joining the belly and back securely can cause separation during play; insert the hook through loops of both pieces and work single crochet around the edge tightly. βœ— Forgetting to stuff gradually leads to lumps or overstuffed sections; add stuffing little by little while you crochet and shape as you go. βœ— Not leaving enough tail for sewing makes assembly fiddly; leave ample yarn tails for sewing and weaving in to secure pieces cleanly.

Little frog Amigurumi Pattern

Make a tiny, charming Little Frog amigurumi with this complete crochet pattern. You will find clear step-by-step rounds, materials, and assembly photos to guide you as you create a sweet pocket-sized frog. Perfect as a handmade gift or a cheerful addition to your amigurumi collection. Follow each round exactly for neat, professional results.

Intermediate 2-3 Hours

Materials Needed for Little frog Amigurumi Pattern

β€” Main Fabric

  • 01
    100% cotton DK yarn (PaintBox Yarns Cotton DK 125 m, 50 g) Lime Green (629) - main color approximately 50-75 g
  • 02
    Paper White (601) - approx 20-30 g for belly and eyes
  • 03
    Pillar Red (615) - small amount for tongue
  • 04
    Spearmint Green (626) - small amount for embroidery details

β€” Tools Required

  • 01
    Crochet hook size 2.0 mm (I used Clover)
  • 02
    Stuffing (hollow fiber)
  • 03
    Safety eyes or black beads 6 mm in diameter (2 pieces)
  • 04
    A needle with a big eye for sewing and embroidery
  • 05
    Sewing pins for positioning pieces during assembly
  • 06
    Scissors
  • 07
    Stitch markers (optional)

Progress Tracker

0% Complete

β€” Belly :

Info :

With white yarn. Use a hook 2.0 mm. The belly is crocheted in a spiral.

Row 1 :

6 sc in magic ring (6)

Row 2 :

2 sc in each sc (12)

Row 3 :

(1 sc, sc inc)*6 (18)

Row 4 :

(2 sc, sc inc)*6 (24)

Row 5 :

(3 sc, sc inc)*6 (30)

Row 6 :

(4 sc, sc inc)*6 (36)

Row 7 :

(5 sc, sc inc)*6 (42)

Row 8 :

(6 sc, sc inc)*6 (48)

Row 9 :

(7 sc, sc inc)*6 (54)

Row 10 :

(8 sc, sc inc)*6, sl.st (60)

Info :

Tie off the thread and cut it (pic. 1).

β€” Back :

Info :

With green yarn. Use a hook 2.0 mm. The back is crocheted in a spiral.

Row 1 :

6 sc in magic ring (6)

Row 2 :

2 sc in each sc (12)

Row 3 :

(1 sc, sc inc)*6 (18)

Row 4 :

(2 sc, sc inc)*6 (24)

Row 5 :

(3 sc, sc inc)*6 (30)

Row 6 :

(4 sc, sc inc)*6 (36)

Row 7 :

(5 sc, sc inc)*6 (42)

Row 8 :

(6 sc, sc inc)*6 (48)

Row 9 :

48 sc (48)

Row 10 :

(7 sc, sc inc)*6 (54)

Row 11 :

54 sc (54)

Row 12 :

(8 sc, sc inc)*6 (60)

Rows 13-14 :

2 rows - 60 sc (60) (pic. 2)

Info :

Don't cut the work thread.

Info :

Join the belly and the back together: put the wrong sides of the pieces to each other, insert the crochet hook through the loops of the both pieces (pic. 3) and crochet sc. Work sc around the edge (pic. 4). Stuff the body as you go round. (pic. 5). Finish with sl.st. Tie off the thread and hide it inside. (pic. 6, 7)

β€” Eyes. 2 pcs :

Info :

With white yarn. Use a hook 2.0 mm. The eyes is crocheted in a spiral.

Row 1 :

6 sc in magic ring (6)

Info :

Close the magic ring, but not too tight that you can insert the safety eyes easily.

Row 2 :

2 sc in each sc (12)

Row 3 :

(3 sc, sc inc)*3 (15)

Rows 4-5 :

2 rows - 15 sc (15)

Info :

Insert the safety eyes into the middle of the magic ring (pic. 8, 9)

Row 6 :

(3 sc, sc dec)*3 (12)

Info :

Stuff the eye (pic. 10).

Row 7 :

6 sc dec (6)

Info :

Finish with sl.st. Tie off the thread and leave enough for sewing. (pic. 11)

β€” Eyelids. 2 pcs :

Info :

With green yarn. Use a hook 2.0 mm. The eyelids are crocheted in a spiral.

Row 1 :

6 sc in magic ring (6)

Row 2 :

2 sc in each sc (12)

Row 3 :

(1 sc, sc inc)*6 (18)

Rows 4-6 :

3 rows - 18 sc (18)

Info :

Finish with sl.st. Tie off and leave enough thread for sewing (pic. 12, 13).

β€” Paws. 4 pcs :

Info :

With green yarn. Use a hook 2.0 mm.

Row 1 :

2 ch, 12 dc in magic ring, sl.st. (12) (pic. 14-16)

Row 2 :

4 sl.st., (6 ch., puff stitch in the 3th loop from the hook and 1 sc in the 4th, 5th and 6th loops from the hook, 1 sl.st. in the next loop of the first row) * repeat this pattern two more times, 4 sl.st. (pic. 17-22)

Info :

Tie off the thread and leave enough for sewing.

β€” Tongue :

Info :

With red yarn. Use a hook 2.0 mm. Crochet 4 ch.

Row 1 :

Start in the second loop from the hook (pic. 23) and crochet 2 sc, 3 sc in last ch, don't turn the work and crochet continuously in circle direction,1 sc, 1 sc inc (8) (pic. 24)

Info :

Finish with sl.st. Tie off the thread and leave enough for sewing.

β€” Assembly :

Step 1 :

Place the eyes into the eyelids and sew them. (pic. 25-28) Tie off the white yarn in the bottom of the eye. (pic. 29, 30).

Step 2 :

Sew the eyes onto the head/body between the 4th and 8th rows (pic. 32-38).

Step 3 :

Sew the front paws onto the bottom of the frog symmetrically to the muzzle. (pic. 39-44).

Step 4 :

Sew the back paws onto the bottom of the frog (pic. 47-50). The back paws should be placed as on the pictures 45, 46.

Step 5 :

Sew the tongue onto the muzzle (pic. 51, 52).

Step 6 :

Embroider french knots on the back of the frog using the dark green yarn (pic. 53-55). Note: Also you can use green beads for decorating.

Assembly Instructions

  • Place the eyes into the eyelids and sew them securely, then tie off the white yarn at the bottom of the eye before trimming the tail.
  • Sew the completed eyes onto the head/body between the 4th and 8th rows, aligning both eyes symmetrically for an even expression.
  • Join the belly and back by inserting the hook through loops of both pieces and working single crochet around the edge; stuff the body as you go and finish with a slip stitch.
  • Sew the front paws to the bottom of the frog symmetrically near the muzzle, using the long tails left from the paws to stitch them firmly in place.
  • Sew the back paws to the bottom of the frog, positioning them as shown in the photos so the frog sits stably; hide ends inside the body.
  • Sew the tongue onto the muzzle and embroider french knots on the back with dark green yarn (or attach green beads) to create decorative bumps.

Important Notes

  • πŸ’‘The toy must be crocheted with tight stitches to prevent stuffing from showing through; if you see tiny holes, use a smaller hook.
  • πŸ’‘Stuff the body gradually while joining belly and back to keep shape smooth and even and to avoid lumps. You should not overstuff; slightly firm stuffing gives best results.
  • πŸ’‘Pin parts in place before sewing to ensure symmetrical placement of eyes and paws and to make stitching easier and more accurate.
  • πŸ’‘Weave in and hide yarn ends inside the body after assembly to secure pieces and make the final piece tidy and durable.
  • πŸ’‘Use safety eyes or securely sew beads; for toys intended for small children, consider embroidering eyes for safety instead of using beads or safety eyes.

This adorable Little Frog amigurumi is the perfect quick make for gifting or collecting. It fits in the palm of your hand and is full of personality with embroidered bumps and a tiny tongue. Make a whole family of frogs in different colors for a charming handmade set! 🐸🧢

You ask,

we answer.

FAQs

What size will the finished piece be?

The finished amigurumi measures approximately 7 cm (2.7 in) tall when using the recommended DK cotton yarn and 2.0 mm hook.

Can I use different yarn weights for this pattern?

Yes, you can use different yarn weights but the final size will change; adjust hook size accordingly and expect a larger frog with thicker yarn and bigger hook.

Do I need prior crochet experience for this pattern?

This pattern is rated intermediate and assumes familiarity with magic rings, single crochet in a spiral, increases and decreases, and basic assembly skills.

How long does this project typically take to complete?

Most crocheters finish this project in about 2-3 hours, though time will vary with experience level and how carefully you assemble and embroider the details.