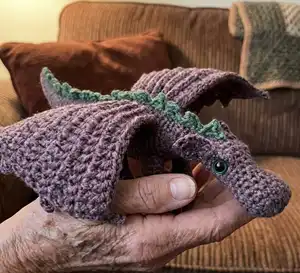
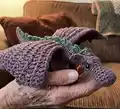
Make a charming little dragon to guard your treasures or sit proudly on a shelf. This pattern gives clear, detailed instructions for a sturdy-winged, poseable amigurumi dragon with textured wings and back spikes. Suitable for crafters who enjoy shaping, sewing and finishing touches that bring personality to handmade toys. Grab your yarn and hook and make a fierce but friendly companion.
Progress Tracker
0% Complete
— Nostrils :
Nostrils (make 2) :
Ch2, work 8 sc into 1st ch, join round with a ss into the first sc - 8 st.
Info :
FO one of them leaving a length of yarn.
Info :
Do not FO the second nostril. To join them together sc into the 1st stitch after the ss on the first nostril, sc into next 7 st. Sc into the 1st stitch after the ss on the second nostril, sc into next 7 st. You now have the start of the nose with 16 st. Use the length of yarn to sew up the gap between the two parts.
— Body :
Round 1 :
Sc in each st around - 16 st.
Round 2 :
[Sc2tog, sc in next 6 st] 2 times - 14 st.
Round 3 :
Sc in each st around - 14 st.
Round 4 :
[Sc2tog, sc in next 5 st] 2 times - 12 st.
Round 5 - 6 :
(2 rounds) Sc in each st around - 12 st.
Round 7 :
Sc in next 5 st, 2 sc in next st, sc in next st, 2 sc in next st, sc in next 4 st - 14 st.
Round 8 - 10 :
(3 rounds) Sc in each st around - 14 st.
Info :
If using safety eyes, fit now between round 8 and 9 on either side of the head.
Round 11 :
Sc in next 6 st, sc2tog, sc in next st, sc2tog, sc in next 3 st - 12 st.
Round 12 :
Sc in next st, sc2tog, sc in next 4 st, sc2tog, sc in next 3 st - 10 st.
Round 13 - 17 :
(5 rounds) Sc in each st around - 10 st.
Round 18 :
[2 sc in next st, sc in next 4 st] 2 times - 12 st.
Round 19 - 20 :
(2 rounds) Sc in each st around - 12 st.
Round 21 :
Sc in next 3 st, [2 sc in next st, sc in next st] 3 times, sc in next 3 st - 15 st.
Round 22 :
Sc in next 3 st, [2 sc in next st, sc in next 2 st] 3 times, sc in next 3 st - 18 st.
Round 23 :
Sc in each st around - 18 st.
Round 24 :
[2 sc in next st, sc in next 2 st] 6 times - 24 st.
Round 25 - 26 :
(2 rounds) Sc in each st around - 24 st.
Round 27 :
[2 sc in next st, sc in next 5 st] 4 times - 28 st.
Round 28 - 31 :
(4 rounds) Sc in each st around - 28 st.
Round 32 :
[Sc2tog, sc in next 5 st] 4 times - 24 st.
Round 33 :
Sc in each st around - 24 st.
Round 34 :
[Sc2tog, sc in next 4 st] 4 times - 20 st.
Round 35 :
Sc in each st around - 20 st.
Round 36 :
[Sc2tog, sc in next 3 st] 4 times - 16 st.
Round 37 :
Sc in each st around - 16 st.
Round 38 :
[Sc2tog, sc in next 6 st] 2 times - 14 st.
Round 39 :
Sc in each st around - 14 st.
Round 40 :
[Sc2tog, sc in next 5 st] 2 times - 12 st.
Round 41 - 50 :
(10 rounds) Sc in each st around - 12 st.
Round 51 :
Sc2tog, sc in next 10 st - 11 st.
Round 52 - 53 :
(2 rounds) Sc in each st around - 11 st.
Round 54 :
Sc2tog, sc in next 9 st - 10 st.
Round 55 - 56 :
(2 rounds) Sc in each st around - 10 st.
Round 57 :
Sc2tog, sc in next 8 st - 9 st.
Round 58 - 59 :
(2 rounds) Sc in each st around - 9 st.
Round 60 :
Sc2tog, sc in next 7 st - 8 st.
Round 61 - 63 :
(3 rounds) Sc in each st around - 8 st.
Round 64 :
Sc2tog, sc in next 6 st - 7 st.
Round 65 - 73 :
(9 rounds) Sc in each st around - 7 st.
Round 74 :
Sc2tog, sc in next 5 st - 6 st.
Round 75 - 76 :
(2 rounds) Sc in each st around - 6 st.
Info :
FO, finish stuffing and sew up end of tail.
— Back Legs :
Info :
Back Legs (make 2): Stuff as you go along.
Round 1 :
Ch 2, work 6 sc into 1st ch - 6 st.
Round 2 :
2 sc in each st around - 12 st.
Round 3 - 5 :
(3 rounds) Sc in each st around – 12 st.
Round 6 :
Sc in next 6 st, [sc2tog] 3 times – 9 st.
Round 7 - 8 :
(2 rounds) Sc in each st around – 9 st.
Round 9 :
Sc in next 6 st, [2 sc in next st] 3 times – 12 st.
Round 10 :
[2 sc in next st, sc in next st] 6 times - 18 st.
Round 11 - 12 :
(2 rounds) Sc in each st around – 18 st.
Round 13 :
Sc in next 3 st, [sc2tog] 2 times, sc in next 5 st, [sc2tog] 2 times, sc in next 2 st – 14 st.
Round 14 :
Sc in next 2 st, [sc2tog] 2 times, sc in next 3 st, [sc2tog] 2 times, sc in next st – 10 st.
Round 15 :
[Sc2tog] 5 times – 5 st.
Info :
FO, leaving a length of yarn. Finish stuffing, then use cream/beige yarn to sew claws. Sew up top of leg.
— Front Legs :
Info :
Front Legs (make 2): Stuff as you go along.
Round 1 :
Ch 2, work 5 sc into 1st ch - 5 st.
Round 2 :
2 sc in each st around - 10 st.
Round 3 - 5 :
(3 rounds) Sc in each st around – 10 st.
Round 6 :
Sc in next 6 st, [sc2tog] 2 times – 8 st.
Round 7 - 12 :
(6 rounds) Sc in each st around – 8 st.
Round 13 :
[Sc2tog, sc in next 2 st] 2 times – 6 st.
Info :
FO, leaving a length of yarn. Finish stuffing, then use cream/beige yarn to sew claws. Sew up top of leg.
— Spikes on back :
Info :
Small – ch 3, sc into 2nd ch from hook, hdc into 3rd ch from hook, ch1.
Info :
Large – ch 3, sc into 2nd ch from hook, YOH, hook into next ch, YOH and pull through st, YOH, pull through 2 loops, YOH, into same st, YOH and pull through st, YOH and through all loops on hook, ch1.
Info :
You make the spikes continuously.
Info :
Work 3 small, 10 large, 3 small, ch 2, sc into 2nd ch from hook, ch 1, FO. Leave a length of yarn to sew to the body. Depending on the length of your dragon you may need to adjust the number of spikes you make to fit along your dragon’s back from behind the eyes to the tip of the tail.
— Wings :
Info :
Wings (make 2): Ch 20.
Row 1 :
Miss 1st ch, sc in next 7 ch, hdc in next 6 ch, dc in next 6 ch, ch 2, turn.
Row 2 :
Fpdc in next 6 st, fphdc in next 6 st, fpsc in next 7 st, ch 1, turn.
Row 3 :
Fpsc in next 7 st, hdc in next 6 st, dc in next 6 st, ch 3, turn.
Row 4 :
Miss 1st ch, ss in next ch, sc in next ch (to make claws), fpdc in next 6 st, fphdc in next 6 st, fpsc in next 7 st, ch 1, turn.
Row 5 :
Fpsc in next 7 st, hdc in next 6 st, dc in next 6 st, ch 2, turn.
Row 6 :
Fpdc in next 6 st, fphdc in next 6 st, fpsc in next 7 st, ch 1, turn.
Row 7 :
Fpsc in next 7 st, hdc in next 6 st, dc in next 6 st, ch 3, turn.
Row 8 :
Miss 1st ch, ss in next ch, sc in next ch, fpdc in next 6 st, fphdc in next 6 st, fpsc in next 7 st, ch 1, turn.
Row 9 :
Fpsc in next 7 st, hdc in next 6 st, dc in next 6 st, ch 2, turn.
Row 10 :
Fpdc in next 6 st, fphdc in next 6 st, fpsc in next 7 st, ch 1, turn.
Row 11 :
Fpsc in next 7 st, hdc in next 6 st, dc in next 6 st, ch 3, turn.
Row 12 :
Miss 1st ch, ss in next ch, sc in next ch, fpdc in next 6 st, fphdc in next 6 st, fpsc in next 7 st.
Info :
Sc into every other row along the base of the wing - 6 st. Ss along the back of the original ch (19 st) until you get to the tip of the wing. Make claw - ch 3, turn, miss 1st ch, ss in next ch, sc in next ch. FO leaving a good length of yarn. Use this to secure the last claw to the rest of the wing, then take yarn through wing to its base, ready to sew onto body. Weave in ends.
— Ears :
Ears (make 2) :
Ch 6, turn. Skip 1st st, sc, dc, sc, ss. Leave the last ch and ss into the back of the previous 4 st. FO, leaving a length of yarn.
— Completing your dragon :
Info :
Sew the spikes along the back from just behind the ears to the tip of the tail. Take your time to make sure they are straight and in the exact middle of the back. This will be helpful when you try to position the wings and the legs.
Info :
If you haven't used safety eyes, embroider eyes or sew on beads for eyes. Embroider a roughly diamond shape in a contrasting colour, then use black for the pupils so they look a bit like cat's eyes.
Info :
Sew the ears onto head above eyes, going over the last chain several times to create the brow bone shape. Weave in any ends.
Info :
Sew the legs on in the positions shown in the photos. Sew on the wings a little distance from either side of the spikes with the front edge about level with the front legs. The ridged side should be the underside of the wings.
Info :
Your fierce little dragon is all finished now!
This Fierce Little Dragon is a playful, handcrafted amigurumi that makes a delightful gift or shelf companion. Full instructions, clear shaping and charming details help you create a dragon with personality and character. Enjoy assembling the parts and watching your dragon come to life — happy crocheting! 🐉🧶