🧢 Beautiful ✨ Detailed πŸ’ Adorable

Feather Moss Gloves Pattern

Feather Moss Gloves Pattern
4.8β˜… Rating
5-7 Hours Time Needed
1.3K Made This
βœ‚οΈ

Intermediate Level

Ideal for those with basic crochet experience, featuring slightly more advanced stitches and techniques to expand your skills.

⏱️

Weekend Treat

Takes 5-7 hours, making it an enjoyable project to finish over a couple of days.

🧣

Snug Essential

Everyday comfort with practical charm, designed for both functionality and style through changing seasons.

About This Feather Moss Gloves Pattern

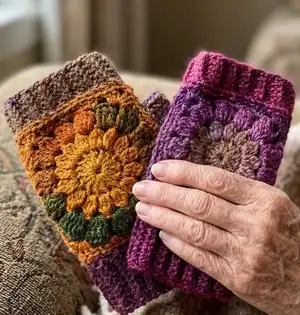
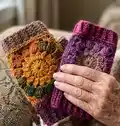
This pattern creates a pair of fingerless gloves constructed from floral-style granny squares joined together with ribbed cuffs for the fingers and wrists. The design uses puff stitches and cluster techniques to create textured petals, then adds comfortable ribbing for a snug fit. You will assemble the squares, add ribbed finger cuffs, form thumb openings and seam the pieces for a polished finish.

Feather Moss Gloves Pattern crochet pattern - detailed view of completed project

It uses DK or worsted weight yarn and a 4mm hook for a fabric that is warm yet flexible. The pattern includes clear step-by-step instructions and photos to guide you through every stage.

Why You'll Love This Feather Moss Gloves Pattern

I absolutely love this pattern because it transforms simple granny-style motifs into a wearable, textured accessory that looks more complex than it is. I enjoy the combination of puff clusters and ribbed cuffs because it balances decorative detail with functional stretch. The joining and cuff techniques let me customize the fit easily, so I can adapt it for different hands. I also love that the pattern uses yarn efficiently and creates a beautiful variegated effect when using tonal or speckled yarns.

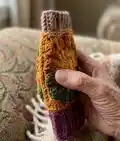
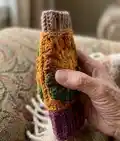
Feather Moss Gloves Pattern step 1 - construction progress Feather Moss Gloves Pattern step 2 - assembly progress Feather Moss Gloves Pattern step 3 - details and accessories Feather Moss Gloves Pattern step 4 - final assembly and finishing

Switch Things Up

I love how easy it is to customize these gloves by changing yarn colors; I often use a solid contrasting color for the ribbed cuffs to make the floral panel stand out.

Want a warmer mitt? Try using a bulkier yarn and a larger hook to create a chunkier, cozier version with the same stitch pattern.

For a mini version, use fingering or sport weight yarn and a smaller hook to make keychain-sized or child's gloves.

I sometimes add embroidery or bead details to the motif center for a bit of sparkle and extra texture on special gift pairs.

Swap the puff stitches for simple dc clusters if you prefer a flatter, subtler petal effect on your squares.

Try alternating two colors every round to create a striped floral motif and a visually dynamic glove panel.

I often adjust finger cuff length by adding or subtracting rib repeatsβ€”shorter if you want more finger freedom, longer for extra warmth.

Consider adding a lining in felt or a soft knit fabric if you plan to wear them in very cold weather for added wind protection.

If you like a looser fit, work the ribbed rows with a hook half a size larger than the one used for the motif squares.

I recommend testing one square and cuff first to perfect your gauge and desired fit before making the second glove; this saves time and yarn.

Common Mistakes & How to Fix Them

βœ— Not pulling the magic circle tail tight enough can leave a hole in the center of your motif; pull the tail firmly and weave it in or tie it off to secure the center. βœ— Skipping stitch counts when making the puff rounds results in uneven petals and mismatched clusters; count your puff clusters after each round to ensure there are 16 puff clusters. βœ— Crocheting the cuff rows too tightly will make it hard to slide your hand in; maintain a slightly loose tension for the ribbed cuff and check gauge after a few repeats. βœ— Joining the squares with the wrong sides facing can flip your motif orientation; place squares right sides facing each other when instructed and double-check before sewing or crocheting seams.

Feather Moss Gloves Pattern

Make cozy, fingerless Feather Moss Gloves with a pretty floral square panel and ribbed cuffs. This pattern walks you through square motifs, joining, ribbed finger cuffs, wrist cuffs and a thumb opening so you can wear them right away. Perfect for gifting or keeping your hands warm while staying nimble.

Intermediate 5-7 Hours

Materials Needed for Feather Moss Gloves Pattern

β€” Main Fabric

  • 01
    Any DK or worsted weight yarn will work for this project - Hayfield Spirit recommended
  • 02
    Hayfield Spirit shade 0405 β‰ˆ170m / 186yds (used in sample) - one skein provides the variegated panels
  • 03
    Small amounts of contrast or solid color yarn for cuffs and joins (approx 10-50g depending on color changes)

β€” Tools Required

  • 01
    Crochet hook size 4mm
  • 02
    Tapestry (yarn) needle for weaving in ends and seaming
  • 03
    Scissors
  • 04
    Stitch markers (optional, helpful when counting rounds)
  • 05
    Measuring tape (to check gauge and finished measurements)

Progress Tracker

0% Complete

β€” Glove Panels :

Round 1 :

Make a magic circle. 1) Ch3 (counts as 1 dc). 2) 1dc in magic circle. Repeat step 2 for a total of 16 dcs. Sl st to the top of your beginning ch3 to join (16dc total). 3) Pull tail of magic circle to tighten. (I like to tie and weave in the tail of the magic circle at this point to stop it coming loose, but of course this is a personal preference, and you can weave in at the end instead :) )

Round 2 :

1) Ch1 (doesn't count as a st), 1 puff st in same st. 2) Ch1. 3) [1 puff st in next st, ch1] in next dc from previous round. Repeat step 3 until you reach your beginning puff st. Sl st to beginning puff st to join. (16 puff sts total)

Round 3 :

1) Sl st into ch1 space. 2) Ch1 (doesn't count as st), dc4tog. 3) Ch2. 4) [Dc4tog, ch2] in next ch sp. 5) Repeat step 4 in each ch1 space, until you reach your beginning dc cluster. Sl st to join (16 dc clusters total).

Round 4 :

1) Sl st into ch2 sp. 2) [Ch1, 3sc] in same ch2 sp. 3) [3sc] in next ch2 sp. 4) [1sc, 1hdc, 1dc] in next ch2 sp, ch3. 5) [1dc, 1hdc, 1sc] in next ch2 sp.

Round 4 Continues :

6) [3sc] in next ch2 sp. 7) [3sc] in next ch2 sp. 8) [1sc, 1hdc, 1dc] in next ch2 sp, ch3. 9) [1dc, 1hdc, 1sc] in next ch2 sp. Repeat steps 6-10 until you reach your beginning sc. Sl st to join. Fasten off.

Info :

Repeat rounds 1-4 until you have a total of 4 squares.

β€” Joining the squares :

Info :

Place 2 squares 'right sides facing down', next to one another (you'll be working along the 'wrong sides').

Step 1 :

Attach your yarn in the top left hand corner of your square on your right. Ch1, 1sc in ch3sp.

Step 2 :

Make 1 sc in next ch3 sp (this will be into the top right corner of your left square).

Step 3 :

1sc in next 12 sts.

Step 4 :

1sc in ch3sp.

Info :

Place squares together 'right sides facing each other', so you're working along the 'wrong side' of the squares.

Step 5 :

1sc in next ch3 sp.

Step 6 :

1sc in next 12 sts.

Step 7 :

1sc in last ch3 sp.

Step 8 :

Sl st to beginning sc to join. (28) Do not fasten off.

β€” Ribbed Cuffs :

Step 1 :

Ch 6, turn.

Step 2 :

1sc in every st back down the chain (5).

Step 3 :

1sl sts in next 2 sts at base of ch, turn.

Step 4 :

Skip the 2 sl sts you just made, 1 blosc in each st back up (5) Ch1, turn.

Step 5 :

1blosc in each st back down the chain (5).

Step 6 :

Sl st in next 2 sts at base of chain, turn.

Step 7 :

Skip 2 sl sts you just made, 1blosc in each st back up the cuff (5) Ch1, turn.

Step 8 :

1blosc in each st back down the cuff.

Step 9 :

Sl st in next 2 sts at base of cuff, turn.

Step 10 :

Sk 2 sl sts you just made, 1 blosc in each st back up the cuff. (5) Ch1, turn.

Info :

Repeat steps 8-10 until you reach your other corner. The next stitch at the base of your cuff should be the sc that you placed in the ch3 corner sp.

Step 11 :

1 blosc in each st back down the cuff.

Step 12 :

Sl st in next 3 sts at base of cuff, turn.

Step 13 :

Skip the 3 sl sts you just made, 1blosc in each st back up the cuff (5) ch1, turn.

Step 14 :

1blosc in each st back down.

Info :

Repeat steps 6-8 until you have 3 sts remaining at the base of your cuff.

Step 15 :

Make 1 sl st in next 3 sts, turn.

Step 16 :

Skip the 3 sl sts you just made, 1blosc in each st back up (5).

Info :

Sl st to join seam together. Fasten off.

β€” Wrist Cuffs :

Info :

Turn work upside down (so the ribbed finger cuffs you just made are at the bottom). Attach yarn in left hand corner, making a knot through, to tie both squares together at the corners.

Step 1 :

Ch1, sc in next ch3 sp.

Step 2 :

1sc in next 12 sts.

Step 3 :

1sc in ch3 sp.

Step 4 :

1sc in next ch3sp.

Step 5 :

1sc in next 12 sts.

Step 6 :

1sc in last ch3 sp.

Step 7 :

Sl st to beginning sc to join.

Step 8 :

Ch8, 1sc in every st back down the ch (7).

Step 9 :

Sl st in next 2 sts at base of ch, turn.

Step 10 :

Skip 2 sl sts you just made, 1blosc in each st back up (7) ch1, turn.

Step 11 :

1blosc in each st back down.

Step 12 :

1 sl st in next 2 sts at base of chain, turn.

Step 13 :

Skip 2 sl sts you just made, 1blosc in each st back up the chain (7) ch1, turn.

Info :

Repeat steps 10-12 until you reach the opposite corner. Your next stitch at the base of your cuff should be the sc that you made in the ch3 sp.

Step 14 :

1blosc in each st back down.

Step 15 :

1sl st in next 3 sts, turn.

Step 16 :

Sk the 3 sl sts you just made,1blosc in each st back up (7) ch1, turn.

Step 17 :

1blosc in each st back down.

Step 18 :

Sl st in next 2 sts, turn.

Step 19 :

Skip 2 sl sts you just made, 1blosc in each st back up (7), ch1, turn.

Info :

Repeat steps 11-13 until you have 3 sts remaining at the base of your cuff.

Info :

Repeat steps 14-16. Sl st to seam the cuff together. Do not fasten off. Turn work on side.

β€” Thumb Cuff :

Step 1 :

1sc in ch 3 sp of both squares (going through the back square ch3 space too, so you're joining them together).

Step 2 :

1sc in next 6 sts (making sure you are going through the identical stitches on the back square too, so you're joining them both together).

Step 3 :

Now, making sure you are only going through the stitches on the front panel, 1sc in next 6 sts.

Step 4 :

1sc in ch3sp.

Step 5 :

1sc in next ch3sp.

Step 6 :

1sc in next 6 sts.

Info :

Sl st to the beginning sc that you began your single, non joining row with.

Step 7 :

Ch6, 1sc in each st back down the ch.

Step 8 :

Sl st in next 2 sts at base of ch, turn.

Step 9 :

Skip 2 sl sts you just made, 1 blosc in each st back up the ch (5), ch1, turn.

Step 10 :

1blosc in each st back down the ch.

Step 11 :

1 sl st in next 2 sts at base of ch, turn.

Step 12 :

Skip 2 sl sts you just made, 1blosc in each st back up the ch (5), ch1, turn.

Info :

Repeat steps 10-12 until you have no more sts available at the base of your cuff.

Step 13 :

Sl st to join your cuff seams together. Fasten off.

β€” Seaming Gloves :

Info :

Attach yarn in ch3 space under finger cuff at left hand side, through both (front & back) panels, joining them together.

Step 1 :

Ch1, 1sc in same sp.

Step 2 :

Now, making sure you're going through the identical sts on the back panel as well - 1sc in next 12 sts.

Step 3 :

1sc through both front and back ch3 sp. Fasten off.

Info :

Weave in all ends, turn the right way out and you are finished!

Assembly Instructions

  • Attach the four motif squares into a front and back panel by placing squares right sides together and crocheting 1sc across the edges, joining corners and sides to form the glove panels, as shown in the joining instructions.
  • Make the ribbed finger cuffs by chaining 6 and working blosc rows up and down the chain, then seam the cuff edges with sl st to form a tube for each finger opening.
  • Join front and back panels along the sides and across the base of the finger cuffs by single crocheting through both panels, ensuring the motifs align neatly before fastening off.
  • Work wrist cuff rows across the assembled panels, using blosc ribs and turning at corners, then seam the wrist cuff edges together with sl st and do not fasten off until thumb is formed.
  • Form the thumb cuff by crocheting into both panels for the base joining stitches, then work the small ribbed thumb cuff and seam it closed with sl st; weave in all ends.

Important Notes

  • πŸ’‘Check your gauge (22 sts x 28 rows = 10cm x 10cm) and adjust hook size if needed to match finished square measurements.
  • πŸ’‘Pull the magic circle tail tight and weave in or tie off early if you prefer to secure the centre of the flower motif.
  • πŸ’‘Work with consistent tension throughout the blosc rib rows and joining rows to ensure a neat seam and comfortable fit.
  • πŸ’‘Pin or line up square edges before joining to make sure motifs are aligned and corners match for a clean finish.

This Feather Moss Fingerless Gloves pattern combines textured floral squares with stretchy ribbed cuffs to create a wearable piece of art. Whether you make a single pair for yourself or a set as gifts, these gloves are stylish, warm and practical. Happy crocheting and enjoy making something cozy and unique! 🧢✨

You ask,

we answer.

FAQs

What size will the finished piece be?

The finished glove fit is written as a regular adult women's fit; each square measures approximately 9.5 cm / 3.75" across and the assembled glove will fit an average adult hand. You can adjust hook size or yarn weight for a different fit.

Can I use different yarn weights for this pattern?

Yes, you can use different yarn weights but this will affect final size and drape; if you choose a different weight, adjust your hook size accordingly and check gauge before continuing.

Do I need prior crochet experience for this pattern?

This pattern is rated intermediate because it uses puff stitches, dc4tog clusters, and joining techniques; familiarity with these stitches and reading round instructions is recommended.

How long does this project typically take to complete?

Most crocheters complete this project in 5-7 hours, depending on experience and how quickly you work through motif construction, joining and ribs.