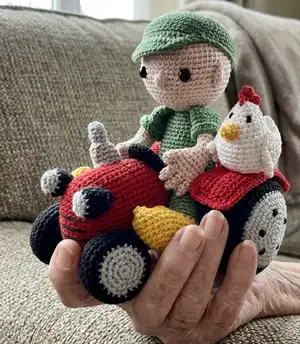
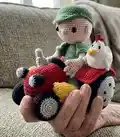
Create a charming Farmer Teun riding his little tractor with this complete crochet pattern. You will make a detailed tractor, wheels, mudguards, lamp and a cute chicken companion — every piece is fully explained. The pattern uses Schachenmayr Catania yarn and gives step-by-step rounds so you can follow along and assemble a delightful handmade toy.
Progress Tracker
0% Complete
— Tractor :
Round 2 :
Ch 1, turn around, 2 sc into the 1st sc, 12 sc, 2 sc into the next sc (= 16 sc)
Round 3-4 :
Ch 1, turn around, 16 sc
Round 5 :
Ch 1, turn around, sc 2 st together, 12 sc, sc 2 st together (= 14 sc)
Round 6 :
Ch 1, turn around, 14 sc
Round 7 :
Continue crocheting a round of sc along the whole work as follows: 4 sc along the side, 3 sc at the corner, 13 sc along the bottom, 3 sc at the corner, 4 sc along the side, 3 sc at the corner, 13 sc along the top, 3 sc into the last sc (= 46 sc)
Info :
Continue crocheting in rounds.
Round 9 :
6 sc, 2 sc into the next sc, 15 sc, 2 sc into the next sc, 6 sc, 2 sc into the next sc, 15 sc, 2 sc into the next sc (= 50 sc)
Round 11 :
7 sc, 2 sc into the next sc, 15 sc, 2 sc into the next sc, 8 sc, 2 sc into the next sc, 15 sc, 2 sc into the next sc, 1 sc (= 54 sc)
Round 18 :
ch 54, skip 10 sc, 1 sc into the 11th sc, 43 sc
Round 19 :
54 sc into the ch, 44 sc (= 98 sc)
— Top :
Info :
Attach the red yarn into the 1st remaining sc of round 17.
Round 1 :
10 sc along the sc.
Round 2-22 :
Ch 1, turn around, 10 sc
Info :
Attach the yarn onto the side of the 1st sc of the 1st round and make a round sc along the work as follows: 21 sc along the side, 2 sc at the corner, 8 sc along the top, 2 sc at the corner, 21 sc along the side (=54 sc)
Info :
Ch 1, turn around and sc the st together with the remaining loops of round 18, work from inside the tractor.
— Bottom :
Info :
The bottom is made in back and forth going rounds. Make 1 ch after each round and turn around. Ch 11 with red.
Round 40 :
Continue crocheting a round of sc along the whole work as follows: 37 sc along the side, 2 sc at the corner, 8 sc along the bottom, 2 sc at the corner, 37 sc along the side, 2 sc at the corner, 8 sc along the top, 2 sc into the last sc. (=98 sc)
Info :
Don't fasten off, sc the st together with the sc of the upper part with a round of sc. Stuff the tractor while crocheting.
Info :
Embroider with black 4 stripes at the front of the tractor. Use the picture as a guide.
— Back wheels :
Round 1 :
6 sc into the 1st ch, 1 sl into the 1st sc
Round 2 :
2 sc in every sc (= 12 sc)
Round 3 :
2 sc in every 2nd sc (= 18 sc)
Round 4 :
6 times (1 sc, 2 sc into the next sc, 1 sc) (= 24 sc)
Round 5 :
2 sc in every 4th sc (= 30 sc)
Round 6 :
6 times (2 sc, 2 sc into the next sc, 2 sc) (= 36 sc)
Round 7 :
2 sc in every 6th sc (= 42 sc)
Round 8 :
6 times (3 sc, 2 sc into the next sc, 3 sc) (= 48 sc)
Info :
Continue with black.
Round 9 :
2 sc in every 4th sc (= 60 sc)
Round 10 :
2 sc in every 10th sc (=66 sc)
Round 11 :
6 times (5 sc, 2 sc into the next sc, 5 sc) (= 72 sc)
Round 12 :
2 sc in every 12th sc (= 78 sc)
Round 17 :
Sc every 12th and 13th sc together (= 72 sc)
Round 18 :
6 times (5 sc, sc 2 st together, 5 sc) (= 66 sc)
Round 19 :
Sc every 10th and 11th sc together (= 60 sc)
Round 20 :
Sc every 4th and 5th sc together (= 48 sc)
Info :
Continue with grey.
Round 21 :
6 times (3 sc, sc 2 st together, 3 sc) (= 42 sc)
Round 22 :
Sc every 6th and 7th sc together (= 36 sc)
Round 23 :
6 times (2 sc, sc 2 st together, 2 sc ) (= 30 sc)
Round 24 :
Sc every 4th and 5th sc together (= 24 sc)
Round 25 :
6 times (1 sc, sc 2 st together, 1 sc) (= 18 sc)
Round 26 :
Sc every 2nd and 3rd sc together (= 12 sc)
Round 27 :
Sc every 1st and 2nd st together (= 6 sc)
Info :
Fasten off. Close the hole and weave in the end. Embroider with black 5 spots divided at round 5. Make another wheel. Sew the wheels onto the side of the tractor.
— Mudguard :
Info :
The Mudguard is made in back and forth going rounds. Make 1 ch after each round and turn around. Ch 27 with red.
Round 6 :
Continue crocheting a round of sc along the whole mudguard as follows: 4 sc along the side, 2 sc at the corner, 24 sc along the bottom, 2 sc at the corner, 4 sc along the side, 2 sc at the corner, 24 sc along the top, 2 sc into the last sc.
Info :
Fasten off. Make another part like this, but don't fasten off. Put the both parts on top of each other and crochet the st together with a round of sc. Fasten off. Make another mudguard and sew the mudguards onto the wheels.
— Front wheels :
Round 1 :
6 sc into the 1st ch, 1 sl into the 1st sc
Round 2 :
2 sc in every sc (= 12 sc)
Round 3 :
2 sc in every 2nd sc (= 18 sc)
Round 4 :
6 times (1 sc, 2 sc into the next sc, 1 sc) (= 24 sc)
Info :
Continue with black.
Round 5 :
2 sc in every 4th sc (= 30 sc)
Round 6 :
6 times (2 sc, 2 sc into the next sc, 2 sc) (= 36 sc)
Round 10 :
6 times (2 sc, sc 2 st together, 2 sc) (= 30 sc)
Round 11 :
Sc every 4th and 5th sc together (= 24 sc)
Round 12 :
6 times (1 sc, sc 2 st together, 1 sc) (= 18 sc)
Round 13 :
Sc every 2nd and 3rd sc together (= 12 sc)
Round 14 :
Sc every 1st and 2nd st together (= 6 sc)
Info :
Fasten off. Close the hole and weave in the end.
Info :
Make another front wheel and sew the wheel onto the side of the tractor.
— Lamp :
Round 1 :
6 sc into the 1st ch, 1 sl into the 1st sc
Round 2 :
2 sc in every sc (= 12 sc)
Info :
Continue with black.
Round 3 :
12 sc, into the back loops only.
Round 5 :
Sc every 3rd and 4th sc together (= 9 sc)
Round 7 :
Sc every 2nd and 3rd sc together (= 6 sc)
Info :
Fasten off. Close the hole and weave in the end. Make another lamp and sew the lamps at the side of the tractor.
— Pipe :
Round 1 :
6 sc into the 1st ch, 1 sl into the 1st sc
Round 2 :
6 sc, into the back loops only.
Round 5 :
2 sc in every sc, into the front loops only (= 12 sc)
Round 6 :
12 sc, into the back loops only.
Info :
End with 1 sl into the 1st sc and fasten off. Stuff the pipe and sew it on top of the tractor.
— Steering wheel :
Info :
Ch 18 with black, 1 sl into the 1st ch to make a circle.
Round 2 :
2 sc in every 3rd sc (= 24 sc)
Round 4 :
Sc every 3rd and 4th sc together (= 18 sc)
Round 5 :
Fold the work in half and sc the st together with the remaining loops of round 1 (= 18 sc)
Info :
Fasten off. Sew the steering wheel onto the tractor.
— Chair :
Round 1 :
6 sc into the 1st ch, 1 sl into the 1st sc
Round 2 :
4 sc into the 1st sc, 2 sc, 4 sc into the next sc, 2 sc (= 12 sc)
Round 3 :
1 sc, 3 times (2 sc into the next sc), 3 sc, 3 times (2 sc into the next sc), 2 sc (= 18 sc)
Round 4 :
2 sc, 3 times (2 sc into the next sc), 6 sc, 3 times(2 sc into the next sc), 4 sc (= 24 sc)
Round 5 :
3 sc, 3 times (2 sc into the next sc, 1 sc), 6 sc, 3 times (2 sc into the next sc, 1 sc), 3 sc (= 30 sc)
Round 6 :
4 sc, 3 times (2 sc into the next sc, 1 sc), 9 sc, 3 times (2 sc into the next sc, 1 sc), 5 sc (= 36 sc)
Round 7 :
6 sc, 3 times (2 sc into the next sc, 2 sc), 9 sc, 3 times (2 sc into the next sc, 2 sc), 3 sc (= 42 sc)
Info :
Make another part like this, but don't fasten off. Put the both parts on top of each other and crochet the st together with a round of sc. Continue crocheting 9 sc, ch 1, turn around, sc 2 st together, 14 sc, sc 2 st together, ch 1, turn around, sc 2 st together, 12 sc, sc 2 st together.
Info :
Fasten off. Sew the chair at the back of the tractor.
— Farmer :
Info :
Body and head: Start at the bottom of the body. Ch 2 with green.
Round 1 :
6 sc into the 1st ch, 1 sl into the 1st sc
Round 2 :
2 sc in every sc (= 12 sc)
Round 3 :
2 sc in every 2nd sc (= 18 sc)
Round 4 :
6 times (1 sc, 2 sc into the next sc, 1 sc) (= 24 sc)
Round 5 :
2 sc in every 4th sc (= 30 sc)
Round 6 :
6 times (2 sc, 2 sc into the next sc, 2 sc) (= 36 sc)
Round 15 :
6 times (sc 2 st together, 2 sc), 12 sc (= 30 sc)
Round 19 :
28 sc, sc 2 st together (= 29 sc)
Round 20 :
2 times (sc 2 st together), 9 sc, 3 times (sc 2 st together), 8 sc, sc 2 st together (= 23 sc)
Round 21 :
2 times (sc 2 st together), 6 sc, 3 times (sc 2 st together), 7 sc (= 18 sc)
Round 22 :
Sc every 2nd and 3rd sc together (= 12 sc)
Info :
Continue with pink.
Round 23 :
2 sc in every sc (= 24 sc)
Round 24 :
2 sc in every 4th sc (= 30 sc)
Round 25 :
6 times (2 sc, 2 sc into the next sc, 2 sc) (= 36 sc)
Round 26 :
2 sc in every 6th sc (= 42 sc)
Round 28 :
6 times (3 sc, 2 sc into the next sc, 3 sc) (= 48 sc)
Round 32 :
16 sc, 1 popcorn of 4 dc (4 dc into the 1st st, but don't finish the st completely, skip the last yarn over and pull through. There are 5 loops onto the hook. Pull the yarn over the hook and pull through all 5 loops), 31 sc (= 48 sc)
Info :
Attach the safety eyes between round 33 and round 34 with 9 st between them.
Round 38 :
6 times (3 sc, sc 2 st together, 3 sc) (= 42 sc)
Round 40 :
Sc every 6th and 7th sc together (= 36 sc)
Round 41 :
6 times (2 sc, sc 2 st together, 2 sc) (= 30 sc)
Round 42 :
Sc every 4th and 5th sc together (= 24 sc)
Round 43 :
6 times (1 sc, sc 2 st together, 1 sc) (= 18 sc)
Round 44 :
Sc every 2nd and 3rd sc together (= 12 sc)
Round 45 :
Sc every 1st and 2nd st together (= 6 sc)
Info :
Fasten off. Close the hole and weave in the end.
— Ear :
Round 1 :
6 sc into the 1st ch, 1 sl into the 1st sc
Round 2 :
4 times (2 sc into the next sc), leave the rest of the st unworked.
Info :
Fasten off. Make another ear and sew the ears onto the side of the head between round 31 and round 35.
— Legs :
Info :
Start with the wooden shoes. Ch 2 with yellow.
Round 1 :
6 sc into the 1st ch, 1 sl into the 1st sc
Round 2 :
4 sc into the 1st sc, 2 sc, 4 sc into the next sc, 2 sc (= 12 sc)
Round 3 :
1 sc, 3 times (2 sc into the next sc), 3 sc 3 times (2 sc into the next sc), 2 sc (= 18 sc)
Round 4 :
2 sc, 3 times (2 sc into the next sc), 6 sc, 3 times (2 sc into the next sc), 4 sc (= 24 sc)
Round 5 :
4 sc, 3 times (2 sc into the next sc), 9 sc, 3 times (2 sc into the next sc), 5 sc (= 30 sc)
Round 8 :
12 sc, ch 4, leave the rest of the st unworked.
Round 9 :
Skip 21 sc, 1 sc into the 22th sc, 8 sc, 4 sc into the ch (= 12 sc)
Round 10 :
6 times (sc 2 st together) (= 6 sc)
Info :
Fasten off. Close the hole and weave in the end.
Info :
Attach the yellow yarn into the 1st sc left from the 1st crocheted part.
Round A1 :
4 sc, ch 4, skip 13 sc, 1 sc into the 14th sc, 3 sc, 4 sc along the ch (= 16 sc)
Round A3 :
Sc every 3rd and 4th sc together (= 12 sc)
Round A4 :
Sc every 1st and 2nd st together (= 6 sc)
Info :
Fasten off. Close the hole and weave in the end. Stuff the front of the wooden shoe.
Info :
Attach the green yarn into the 1st sc left from the 2nd crocheted part.
Round B1 :
13 sc, 4 sc along the ch
Round B2 :
5 sc, 2 times (sc 2 st together), 8 sc (= 15 sc)
Round B17 :
13 sc, leave the rest of the st unworked. Stuff the legs lightly.
Round B18 :
Fold the leg in half and sc the st together with 7 sc.
Info :
Fasten off. Make another leg and sew the legs at the bottom of the body.
— Arm :
Info :
Start making the thumb and fingers.
Thumb Round 1 :
Ch 2 with pink. 5 sc into the 1st ch, 1 sl into the 1st sc
Info :
Fasten off. Lay the thumb aside.
Finger Round 1 :
Ch 2 with pink. 4 sc into the 1st ch, 1 sl into the 1st sc
Info :
Fasten off. Make 2 more fingers, don't fasten off the last finger.
Finger Round 4 :
Crochet the fingers together as follows (make sure the yarn ends end up inside): Continue crocheting 2 sc of the 2nd finger, 4 sc of the 3rd finger, 2 sc of the 2nd finger, 4 sc of the 1st finger (= 12 sc)
Round 5 :
4 sc, 5 sc along the thumb, 8 sc (= 17 sc)
Round 6 :
4 sc, 2 times (sc 2 st together), 9 sc (=15 sc)
Round 8 :
Sc every 4th and 5th sc together (= 12 sc)
Round 9 :
Sc every 5th and 6th sc together (=10 sc)
Info :
Continue with green.
Round 15 :
2 sc in every 2nd sc (= 15 sc)
Round 16 :
2 sc in every 3rd sc, into the front loops only (= 20 sc)
Round 18 :
Sc every 3rd and 4th sc together (= 15 sc)
Round 19 :
Sc the st together with the remaining loops of round 17 (= 15 sc)
Round 20 :
2 sc in every 5th sc (= 18 sc)
Round 24 :
Sc every 2nd and 3rd sc together (= 12 sc)
Round 25 :
4 sc, leave the rest of the st unworked
Round 26 :
Fold the work in half and sc the st together with 5 sc (don't stuff the arm).
Info :
Fasten off. Make another arm and sew the arms onto the side of the body.
— Cap :
Round 1 :
6 sc into the 1st ch, 1 sl into the 1st sc
Round 2 :
2 sc in every sc (= 12 sc)
Round 3 :
2 sc in every 2nd sc (= 18 sc)
Round 4 :
6 times (1 sc, 2 sc into the next sc, 1 sc) (= 24 sc)
Round 5 :
2 sc in every 4th sc (= 30 sc)
Round 6 :
6 times (2 sc, 2 sc into the next sc, 2 sc) (= 36 sc)
Round 7 :
2 sc in every 6th sc (= 42 sc)
Round 8 :
6 times (3 sc, 2 sc into the next sc, 3 sc) (= 48 sc)
Round 10 :
2 sc in every 8th sc (= 54 sc)
Round 16 :
Ch 1, turn around, 20 sc into the back loops of the sl
Round 17-18 :
Ch 1, turn around, 20 sc
Round 19 :
Ch 1, turn around, sc 2 st together, 16 sc, sc 2 st together (= 18 sc)
Round 20 :
Ch 1, turn around, sc 2 st together, 14 sc, sc 2 st together (= 16 sc)
Round 21 :
Ch 1, turn around, sc 2 st together, 12 sc, sc 2 st together (= 14 sc)
Info :
Sew the cap onto the head of the farmer.
— Chicken :
Info :
Ch 2 with off white.
Round 1 :
6 sc into the 1st ch, 1 sl into the 1st sc
Round 2 :
4 sc into the 1st sc, 2 sc, 4 sc into the next sc, 2 sc (= 12 sc)
Round 3 :
1 sc, 3 times (2 sc into the next sc), 3 sc 3 times (2 sc into the next sc), 2 sc (= 18 sc)
Round 4 :
2 sc, 3 times (2 sc into the next sc), 6 sc, 3 times (2 sc into the next sc), 4 sc (= 24 sc)
Round 5 :
3 sc, 3 times (2 sc into the next sc, 1 sc), 6 sc, 3 times (2 sc into the next sc, 1 sc), 3 sc (= 30 sc)
Round 9 :
ch 6, skip 12 sc, 1 sc into the 13th sc, 17 sc
Round 10 :
6 sc into the ch, 18 sc (= 24 sc)
Round 12 :
Sc every 3rd and 4th sc together (= 18 sc)
Round 15 :
Sc every 2nd and 3rd sc together (= 12 sc)
Round 18 :
Sc every 1st and 2nd st together (= 6 sc)
Info :
Fasten off. Close the hole and weave in the end. Stuff the head.
Info :
Attach the off white yarn into the 1st remaining sc of round 9, left from the head.
Round C1 :
12 sc, 6 sc along the ch (= 18 sc)
Round C3 :
Sc every 2nd and 3rd sc together (= 12 sc)
Round C5 :
Stuff the body and tail.
Round C6 :
Sc every 1st and 2nd st together (= 6 sc)
— Beak :
Round 1 :
6 sc into the 1st ch, 1 sl into the 1st sc
Info :
End with 1 sl into the 1st sc and fasten off. Sew the beak onto the head. Embroider with black the eyes above the beak.
— Crest :
Round 1 :
1 dc into the 3rd ch, 1 dc, 1 sl, 1 dc, 1 sl
Info :
Fasten off. Sew the crest onto the top of the head.
— Left wing :
Info :
Ch 2 with off white.
Round 1 :
6 sc into the 1st ch, 1 sl into the 1st sc
Round 2 :
2 sc in every sc (= 12 sc)
Round 3 :
ch 4, 3 sc into the ch, 1 sc at the circle, ch 3, 2 sc into the ch, 1 sc at the circle, ch 2, 1 sc into the ch, 3 sc at the circle, 2 times (2 dc into the next sc), 3 sc, 1 sl
— Right wing :
Info :
Make the right wing at the same way as the left wing till round 2.
Round 3 :
ch 2, 1 sc into the ch, 1 sc at the circle, ch 3, 2 sc into the ch, 1 sc at the circle, ch 4, 3 sc into the ch, 3 sc at the circle, 2 times (2 dc into the next sc), 3 sc, 1 sl
Info :
Fasten off. Sew the wings onto the side of the body with the longest feather on top. Sew the chicken onto the left mudguard. Put the farmer onto the tractor.
This Farmer Teun and tractor pattern brings a playful farm scene to life with layered details and a cuddly companion. The set is perfect as a handmade gift or a charming shelf display with lots of customizable options. Enjoy stitching every round and watching your tractor and farmer take shape! 🧶🚜