🧢 Beautiful ✨ Detailed πŸ’ Adorable

Frog Phone Pouch Amigurumi Pattern

Frog Phone Pouch Amigurumi Pattern
4.4β˜… Rating
5-7 Hours Time Needed
2.4K Made This
βœ‚οΈ

Intermediate Level

Ideal for those with basic crochet experience, featuring slightly more advanced stitches and techniques to expand your skills.

⏱️

Weekend Treat

Takes 5-7 hours, making it an enjoyable project to finish over a couple of days.

🧸

Cute Companion

An adorable friend to cherish, handcrafted with love to bring comfort and joy for years to come.

About This Frog Phone Pouch Amigurumi Pattern

This pattern teaches you how to crochet a phone pouch with a mounted frog amigurumi on the front. You will crochet the pouch body, lid and strap, plus the frog's head, body, legs, arms, eyes and crown. Clear round-by-round instructions make it easy to follow and assemble using fabric glue and some sewing.

Frog Phone Pouch Amigurumi Pattern crochet pattern - detailed view of completed project

Includes exact stitch counts and placement notes for accurate assembly and a professional finish. Great for crafters who enjoy small projects with cute, wearable results.

Why You'll Love This Frog Phone Pouch Amigurumi Pattern

I absolutely love this pattern because it combines practical function with a whimsical amigurumi character that brings a smile. I enjoyed designing the frog so it sits perfectly on the pouch while keeping the construction sturdy. I appreciate that the instructions include exact rounds and placement notes, which makes assembly quick and reliable. I love how adaptable the design isβ€”change the yarn or colors and the personality of the frog transforms instantly. Making this pattern feels rewarding and it makes a delightful handmade gift.

Frog Phone Pouch Amigurumi Pattern step 1 - construction progress Frog Phone Pouch Amigurumi Pattern step 2 - assembly progress Frog Phone Pouch Amigurumi Pattern step 3 - details and accessories Frog Phone Pouch Amigurumi Pattern step 4 - final assembly and finishing

Switch Things Up

I love experimenting with yarn colors, and you can too by changing the frog color to blue, pink or even a patterned variegated yarn.

I sometimes make the pouch larger by switching to a thicker yarn and a bigger hook for a chunky, cozy look.

I also reduce the strap length to create a wristlet version β€” try different lengths until you find the perfect carry option.

I often switch the crown color or add tiny embroidered details to personalize each frog's personality.

I like adding a soft fabric lining inside the pouch for extra protection; you can sew in a lining after finishing the crochet work.

I sometimes replace fabric glue with careful hand-stitching for a stronger permanent attachment when the pouch will see heavy use.

I enjoy swapping the buttons for decorative wooden or metal buttons to coordinate with outfits or seasons.

I often convert the frog into a keychain by making a mini version and adding a metal keyring to the strap.

I like to embroider different mouth expressions to change the frog’s mood β€” a smile, a grin, or a tiny tongue give different personalities.

I recommend trying safety eyes for a child-safe toy, or embroidering eyes for a fully washable option.

I sometimes add tiny accessories like a bow, scarf or a tiny crocheted heart to make the frog extra gift-worthy.

I encourage you to experiment with texture by alternating stitches on the pouch body for a unique finish.

Common Mistakes & How to Fix Them

βœ— Skipping the foundation chain counts can distort the pouch shape; always count your starting chains and verify the stitch count before proceeding. βœ— Using double crochet for the pouch will cause stretching and sagging; use single crochet as instructed (x-stitch or v-stitch) for a firm fabric. βœ— Forgetting to weave in ends before assembly leads to loose tails later; weave in ends as you finish each piece to keep edges tidy. βœ— Not stuffing the head evenly creates lumps or flat spots; stuff gradually and evenly, checking the shape as you add fiberfill. βœ— Placing eyes or the mouth without checking rows causes misplacement; mark row positions and test-placement with pins or glue before permanently attaching.

Frog Phone Pouch Amigurumi Pattern

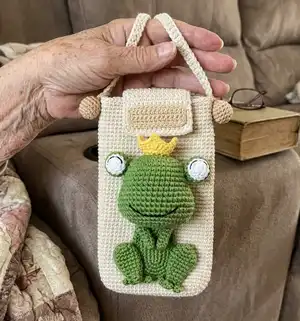
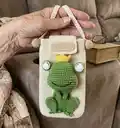
Make a charming frog phone pouch that doubles as a playful amigurumi accent. This pattern guides you step-by-step to crochet the pouch, lid, strap and a cute frog applique with head, body, legs, arms, eyes and crown. You will love the clear rounds and assembly notes to paste and sew pieces securely into the pouch. Perfect for gifting or making a unique, handmade accessory to carry your phone in style.

Intermediate 5-7 Hours

Materials Needed for Frog Phone Pouch Amigurumi Pattern

β€” Main Fabric

  • 01
    YarnArt Jeans yarn, 165m/50g - Jeans 05 (main pouch color)
  • 02
    YarnArt Jeans yarn, 165m/50g - Jeans 37 (green for frog)
  • 03
    YarnArt Jeans yarn, 165m/50g - Jeans 35 (yellow for crown)
  • 04
    Polyester fiberfill for stuffing amigurumi parts

β€” Tools Required

  • 01
    Crochet hook size 2.3 mm
  • 02
    Two 15 mm buttons
  • 03
    Polyester fiberfill
  • 04
    Stitch markers
  • 05
    Fabric glue (for pasting pieces into pouch)
  • 06
    Yarn needle for sewing and weaving ends

Progress Tracker

0% Complete

β€” Bag :

Infos :

There are 2 ways to make a single crochet: v-stitch (yarn over single crochet) and x-stitch (yarn under single crochet). There are a lot of video tutorials on youtube, you can watch on it. I use x-stitch (yarn under single crochet). And I think you shouldn’t use double crochet, because the pouch will quickly stretch and become mushy.

Info :

Make 24 ch, start in the second ch from hook

Round 1 :

22 sc, 3 sc in the last stitch, continue on the other side of the foundation chain, 21 sc, inc (48)

Round 2 :

inc, 21 sc, 3 inc, 21 sc, 2 inc (54)

Round 3 :

inc, 24 sc, 3 inc, 24 sc, 2 inc (60)

Round 4-51 :

60 sc (60)

Info :

Fasten off and weave the yarn.

β€” Lid of pouch :

Info :

Leaving a long tail for sewing, make 15 ch, start in the second ch from hook

Round 1 :

14 sc, turn

Round 2-13 :

14 sc. Cut and weave the yarn.

Info :

Sew the lid into the pouch between rows 50-51.
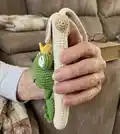
β€” Shoulder-strap :

Info :

Make 3 ch, start in the second ch from hook: 2 sc, turn

Round 2 :

2 sc, turn

Info :

Crochet repeat 2 sc until the shoulder-strap is about 113 cm. Fasten off and weave the yarn.

Info :

Sew the shoulder - strap and button into the pouch.

β€” Head :

Info :

Start in green

Round 1 :

6 sc in the magic ring (6)

Round 2 :

6 inc (12)

Round 3 :

(3 inc, 3 sc)*2 (18)

Round 4 :

(1 sc, inc)*3, 4 sc, (inc, 1 sc)*2, inc, 3 sc (24)

Round 5 :

(1 sc, inc)*4, 5 sc, (inc, 1 sc)*3, inc, 4 sc (32)

Round 6 :

(7 sc, inc)*4 (36)

Round 7-11 :

36 sc (36)

Round 12 :

6 sc, 6 inc, 12 sc, 6 inc, 6 sc (48)

Round 13-17 :

48 sc (48)

Round 18 :

6 sc, 6 dec, 12 sc, 6 dec, 6 sc (36)

Round 19 :

5 sc, dec, 4 sc, dec, 10 sc, dec, 4 sc, dec, 5 sc (32)

Round 20 :

(dec, 2 sc)*8 (24)

Info :

Stuff the head

Round 21 :

(1 sc, dec)*8 (16)

Round 22 :

8 dec (8)

Info :

Slst and stuff the head, then fasten off and weave the yarn.

Info :

Sew the mouse between rows 14-17 with black yarn.

β€” Eye :

Info :

Start in white: make 2

Round 1 :

6 sc in the magic ring (6)

Round 2 :

6 inc (12)

Round 3-4 :

12 sc (12)

Round 5 :

6 dec (6)

Info :

Stuff, slst, fasten off and weave the yarn. Sew the eyes between rows 2-3 with black yarn.

Info :

Start in green: make 2

Round 1 :

6 sc in the magic ring (6)

Round 2 :

6 inc (12)

Round 3 :

(3 sc, inc)*3 (15)

Round 4 :

15 sc (15)

Info :

Slst, fasten off and weave the yarn.

Info :

Use fabric glue to paste the white eye into the green eye

Info :

Use fabric glue to paste the eyes into the head between rows 5-9.

β€” Crown :

Info :

Start in yellow

Round 1 :

Leaving a long tail for sewing the crown into the top of head, make 18 ch, close round, 1 sc in the each ch around : 18 sc

Round 2 :

3 sc, 1 hdc, (1 dc, 3 ch, slst in the third ch from hook, 1 dc)* in the same stitch, 1 hdc, 1 sc, 1 hdc, (1 dc, 3 ch, slst in the third ch from hook, 1 dc)* in the same stitch, 1 hdc, 1 sc, 1 hdc, (1 dc, 3 ch, slst in the third ch from hook, 1 dc)* in the same stitch, 1 hdc, 3 sc. Slst, fasten off and weave the yarn.

β€” Body :

Info :

Start in green

Info :

Make 9 ch, start in the second ch from hook

Round 1 :

7 sc, 3 sc in the last stitch, continue on the other side of the foundation chain, 6 sc, inc (18)

Round 2 :

inc, 6 sc, 3 inc, 6 sc, 2 inc (24)

Round 3 :

1 sc, inc. 6 sc, (1 sc, inc)*3, 6 sc, (1 sc, inc)*2 (30)

Round 4 :

(4 sc, inc)*6 (36)

Round 5 :

2 sc, inc, (5 sc, inc)*5, 3 sc (42)

Info :

Slst, fasten off and weave the yarn.

β€” Leg :

Info :

Leg (make 2). Start in green

Round 1 :

6 sc in the magic ring (6)

Round 2 :

6 inc (12)

Round 3 :

(3 sc, inc)*3 (15)

Round 4-5 :

15 sc (15)

Round 6 :

(3 sc, dec)*3 (12)

Round 7-8 :

12 sc (12)

Round 9 :

(4 sc, dec)*2 (10)

Round 10 :

10 sc (10)

Round 11 :

(dec, 3 sc)*2 (8)

Info :

Don’t stuff. Slst, fasten off and weave the yarn.

Item Name (Toe) :

Start in green. Make 4 ch, start in the second ch from hook: 3 sc in the second ch from hook, 2 slst (the first toe). Don’t cut the yarn, make 4 ch, start in the second ch from hook: 3 sc in the second ch from hook, 2 slst (the second toe). Don’t cut the yarn, make 4 ch, start in the second ch from hook: 3 sc in the second ch from hook, 2 slst (the third toe). Fasten off the yarn, leaving a long tail for sewing the toe into the leg at row 11.

β€” Arm :

Info :

Arm (make 2). Start in white

Round 1 :

6 sc in the magic ring (6)

Round 2-8 :

6 sc (6)

Info :

Slst and fasten off the yarn, leaving a long tail for sewing. Don’t stuff the arms.

β€” Assembling :

Step 1 :

Use fabric glue to paste the head into the pouch between rows 21-38.

Step 2 :

Use fabric glue to paste the body into the pouch.

Step 3 :

Use fabric glue to paste the legs into the pouch.

Step 4 :

Sew the arms into the pouch.

Assembly Instructions

  • Use fabric glue to paste the head into the pouch between rows 21-38.
  • Use fabric glue to paste the body into the pouch.
  • Use fabric glue to paste the legs into the pouch.
  • Sew the arms into the pouch, positioning them symmetrically and reinforcing with a few secure stitches.

Important Notes

  • πŸ’‘Use stitch markers or a scrap yarn marker to identify the start of each round for accurate counting and shaping.
  • πŸ’‘Use x-stitch (yarn under single crochet) as recommended to create a firm fabric for the pouch and avoid double crochet which stretches out.
  • πŸ’‘When attaching the frog pieces, test placement with pins or fabric glue before permanently sewing to ensure correct alignment.
  • πŸ’‘Fasten off and weave in ends after finishing each piece to prevent long tails when assembling and to keep the inside tidy.

This cute Frog Phone Pouch pattern combines a useful everyday accessory with a playful amigurumi frog applique. It makes a perfect handmade gift for friends or a delightful treat for yourself. Enjoy crocheting and customizing this project for many smiles and cozy pockets. 🧢🐸

You ask,

we answer.

FAQs

What size will the finished piece be?

If you use the recommended YarnArt Jeans yarn and 2.3 mm hook, the finished phone pouch will measure approximately Length: 17 cm and Width: 10 cm.

Can I use different yarn weights for this pattern?

Yes, you can use different yarn weights but this will change the final size and fabric. Use an appropriate hook and adjust stitch counts if necessary to maintain proportions.

Do I need prior crochet experience for this pattern?

This pattern is rated intermediate because it includes amigurumi shapes, shaping rounds, and assembly work; basic knowledge of single crochet, increases and decreases is recommended.

How long does this project typically take to complete?

Most crocheters complete this project in about 5-7 hours depending on experience and whether you make custom modifications.

How should I attach the amigurumi pieces to the pouch?

The pattern suggests using fabric glue to paste the head, body and legs into the pouch and sewing the arms and strap in place. Test placement with pins or temporary adhesive before final sewing.