About This Crochet Puff Quilt Pattern
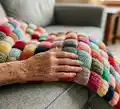
This pattern teaches you to make a heavy-weight, quilt-like crochet blanket using individual stuffed squares worked in flat rounds. Each square is quick to make and sews together with simple whip and mattress stitch techniques to create a tactile, textured blanket.

Perfect for stash-busting, the pattern is written in US terms and uses basic half double crochet stitches. You can make the blanket any size by adding or subtracting squares.
Why You'll Love This Crochet Puff Quilt Pattern
I absolutely love this pattern because it turns small, portable squares into a large, quilt-like blanket that feels cozy and substantial. I enjoy using scraps and mixing colors, which gives each blanket a playful, one-of-a-kind look. The seaming tutorials are simple but make a huge difference in the finished appearance, and I love how the mattress stitch creates neat rows. This pattern is forgiving and flexible, so I can change colors and sizes as I go. Sharing this method helps others learn seaming and finishing techniques I use for all my blankets.
Switch Things Up
I love that you can completely change the mood of this blanket by swapping color palettes; try pastels for a soft nursery throw or jewel tones for a dramatic living room accent.
I often switch yarn weight and hook size to create different finished square sizes — using a bulkier yarn and larger hook makes a cozy, chunky version.
I sometimes add a simple border in a contrasting color to frame the quilt and give it a polished finish.
If you prefer fewer seams, try making larger squares (adjust chains and rounds) and follow the same stuffing and seaming process.
I recommend experimenting with yarn textures — cotton gives a crisp puff while acrylic adds loft and softness; try mixing fibers thoughtfully.
I like to embroider simple motifs on select squares before seaming to add unique accents and personalization.
For a modern look, arrange colors in an ombre or gradient across rows rather than random placement.
I occasionally add small appliques or tiny crocheted motifs to a few squares for character, such as flowers or hearts.
If portability is important, make small sets of squares and join them later — perfect for travel projects and quick progress.
I also recommend testing one full sewn row first to confirm seam appearance, then tweak stitch-pickup placement if seams show on the front.
Common Mistakes & How to Fix Them
✗ Skipping the instruction to work the second side of the chain can leave one edge unfinished; follow the pattern by rotating your work and hdc along the second side of the chain to finish the square edges.
✗ Failing to secure the starting tail along the second side of the chain will leave ends to weave in later; lay your starting tail across the second side and crochet over it to secure the tail without weaving it in.
✗ Not using a stitch marker when you lose count in rounds can cause mismatched stitch totals; place a stitch marker at the beginning of each round to keep track of the starting stitch and maintain accurate counts.
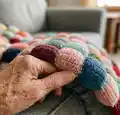
✗ Stuffing either too little or too much will change the square size and texture; begin lightly stuffing and add stuffing gradually until the square has the recommended firm, quilt-like feel before closing.
✗ Seaming along the very edge of the squares will produce visible seams; pick up strands slightly off the very edge as directed to keep seam lines hidden on the front of the blanket.
✗ Not leaving a long tail when fastening off will make seaming harder and shorten the attachable length; leave approximately a 20"-24" tail to use when whip stitching and seaming squares together.