About This Bonnie Beanie Amigurumi Pattern
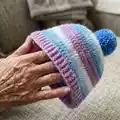
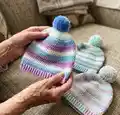
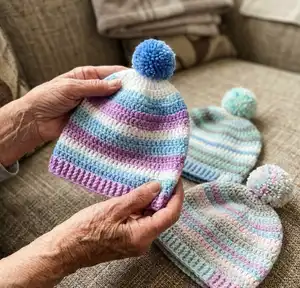
This pattern creates the Bonnie Beanie — a soft, striped baby hat worked in continuous rounds with a neat ribbed brim and a pom-pom finish. It includes detailed round-by-round instructions for five baby sizes from 0–24 months. The design showcases Paintbox Yarns Baby DK Prints and uses simple increases and single (double) crochet stitches for an easy learning experience.
The pattern is written using US terminology with UK equivalents shown in brackets. Instructions are provided for the smallest size with changes for larger sizes indicated in round brackets afterwards.
Why You'll Love This Bonnie Beanie Amigurumi Pattern
I absolutely love this pattern because it turns a simple hat into a charming, gift-ready piece with very little effort. I designed the stripes and pom-pom to be playful yet practical, and the ribbed brim gives a snug fit for little ones. I enjoy how quickly one beanie can be made — it's perfect for practicing continuous-round crochet and finishing techniques. Making several in different Paintbox Print colorways is a fast, satisfying project that always delights new parents.
Switch Things Up
I love how easy it is to customize this beanie by changing colorways — try alternating solid and variegated yarn for a different stripe effect.
You can make a mini version for a keychain by using thinner yarn and a smaller hook, or go chunkier with bulky yarn and larger hooks for an adult-sized slouchy hat.
I often switch the pom-pom for a crocheted flower or a button for a different look that suits the recipient.
Try working the brim in a taller stitch (HDC or DC) for a floppier edge, or do extra rib rounds for a deeper, warmer turn-up brim.
If you want ear coverage, continue extra rounds before starting the brim to lengthen the body slightly.
I sometimes add a small tab or applique to the brim for personalization — initials or a tiny heart are sweet options.
Playing with hook sizes across the hat body and brim can alter the drape; using a slightly smaller hook for the brim gives a firmer, crisper edge.
To make matching sets, stitch a coordinating pair of booties or mittens using the same color changes and yarn to create a cohesive gift set.
Experiment with textured stitches for the body such as moss stitch or alternating front/back loop rows to add visual interest while keeping the same shaping rounds.
I recommend testing one small color repeat swatch to see how the Paintbox Prints stripe before committing to the whole hat — it helps plan placement of key color bands.
Common Mistakes & How to Fix Them
✗ Skipping the magic ring start can leave a hole at the crown; always begin with a magic ring and pull tight to close the centre.
✗ Forgetting to place a place marker after the second round causes confusion in continuous rounds; mark the last stitch of the round and move the marker up as you work.
✗ Using the wrong hook for the brim will change the fabric width and tension; switch to the US D/3 (3mm) hook for the brim as instructed.
✗ Not working in continuous rounds can create a visible seam and mismatch in stitch alignment; follow the continuous round method to keep the hat smooth.
✗ Overstuffing or pulling the yarn too tightly when finishing the crown distorts shape; maintain even tension and avoid pulling excessively when closing the top.