🧢 Beautiful ✨ Detailed πŸ’ Adorable

Starfish Amigurumi Pattern

Starfish Amigurumi Pattern
4.5β˜… Rating
2-3 Hours Time Needed
1.2K Made This
βœ‚οΈ

Intermediate Level

Ideal for those with basic crochet experience, featuring slightly more advanced stitches and techniques to expand your skills.

⏱️

Bite-Sized Project

Finishes in 2-4 hoursβ€”perfect for an afternoon of creative relaxation.

🏑

Cozy Accent

A warm touch for your space that transforms ordinary corners into inviting nooks filled with handmade charm.

About This Starfish Amigurumi Pattern

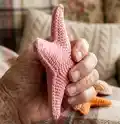
This pattern teaches you to crochet charming starfish in two sizes: thin and large. The instructions are written step-by-step for tight, neat stitches using 100% cotton yarn and a very small hook. You will also learn a simple wet-glue shaping technique to make the arms hold their shape and look professional. All instructions are clear and supported by photos for shaping and finishing.

Starfish Amigurumi Pattern crochet pattern - detailed view of completed project

Perfect for making beach-themed decor, gifts, or a small collection of sea creatures. The pattern includes materials, abbreviations, shaping tips, and color/embellishment ideas.

Why You'll Love This Starfish Amigurumi Pattern

I absolutely love this pattern because it transforms simple stitches into delicate, sculptural starfish with a lot of character. I enjoy the gentle shaping step β€” it makes each starfish feel handmade and unique. The small-hook technique produces a crisp, professional finish that I find very satisfying to work. I also love that the pattern includes two sizes, so you can mix and match for displays or gifts.

Starfish Amigurumi Pattern step 1 - construction progress Starfish Amigurumi Pattern step 2 - assembly progress Starfish Amigurumi Pattern step 3 - details and accessories Starfish Amigurumi Pattern step 4 - final assembly and finishing

Switch Things Up

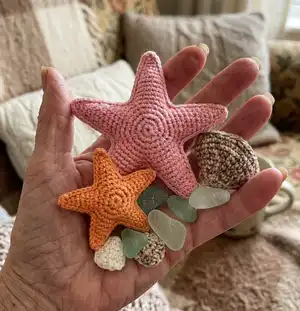
I love changing up colors to create different moods β€” soft pastels make calm decorative pieces while bright corals and oranges make cheerful beachy accents.

To make a bigger or smaller starfish simply switch yarn weight and hook size; bulky yarn with a larger hook makes a chunky statement piece while thinner yarn makes tiny ornaments.

I often add a light wash of diluted acrylic paint or watercolors after shaping to give subtle shading to the arms and center.

Try embroidering tiny dots or lines along the arms for a more realistic sea-star texture before or after shaping.

If you want a plush, slightly padded starfish, you can lightly stuff the center before final rounds, but keep stuffing minimal so shaping still works well.

For ornaments, add a small loop of thread at the top arm and hang them from shells, mirrors, or garlands for coastal decor.

You can create a matching set by making thin and large sizes in complementary colors and arranging them on a tray or in a shadow box.

Experiment with metallic thread for a subtle shimmer or add a thin layer of clear varnish over glitter for a seaside sparkle effect.

I sometimes stitch on tiny seed beads before shaping to suggest barnacles or texture β€” do this before gluing so beads stay secure.

For a softer, less stiff result simply wet-block with water instead of glue and shape until dry; this keeps the cotton feel and flexibility.

I also like adding a contrasting edge with single crochet in a second color to make the arms pop and add definition.

Common Mistakes & How to Fix Them

βœ— Using a hook that is too large will produce loose stitches and a floppy starfish; use a smaller hook (1.5 mm recommended) to keep stitches tight and the shape firm. βœ— Skipping the count after rounds can lead to incorrect stitch distribution and uneven arms; always count your stitches at the end of each round to ensure accuracy. βœ— Not shaping while wet will cause the starfish to lose form and droop; shape the piece when wet with the glue-water mix and leave it pinned until fully dry. βœ— Overstiffening with too much glue will make the starfish feel hard and lose the cotton texture; use a 2:1 water to glue mix or 1:1 for stiffer results depending on preference.

Starfish Amigurumi Pattern

Make beautiful crocheted starfish in two sizes with clear step-by-step instructions and shaping tips. You will learn how to crochet thin and large starfish using 100% cotton yarn and a very small hook for tight, neat stitches. This pattern includes shaping with a glue-water mix and finishing tips so your starfish keep their form. Perfect for beachy decor, gifts, or a small handmade collection.

Intermediate 2-3 Hours

Materials Needed for Starfish Amigurumi Pattern

β€” Main Fabric

  • 01
    100% cotton yarn (recommended weight with approximately 125 m per 50 g)
  • 02
    Madame Tricote "Camilla" (100% cotton, 50g = 125m) - used in sample
  • 03
    Suggested alternatives: Kartopu "Organica", Anchor "Creativa Fino", Schachenmayr "Catania" (all 100% cotton, similar weight)
  • 04
    No large quantities required; one small skein (50g) is more than enough for a few small starfish

β€” Tools Required

  • 01
    Crochet hook size 1.5 mm (recommended)
  • 02
    Alternative hook sizes: 1.75 mm or 2.00 mm if 1.5 mm is uncomfortable
  • 03
    Scissors
  • 04
    Needle to weave in ends
  • 05
    Stitch marker (optional)
  • 06
    Rubber gloves (optional for shaping with glue)
  • 07
    White glue and water for shaping mixture
  • 08
    Pins and towel for drying shaped starfish

Progress Tracker

0% Complete

β€” Abbreviations :

Infos :

CH - CHAIN. SL ST - SLIP STITCH. SC - SINGLE CROCHET. HDC - HALF DOUBLE CROCHET. DC - DOUBLE CROCHET. ST(S) - STITCH(ES). (6) - NUMBER OF STITCHES YOU SHOULD HAVE AT THE END OF THE ROUND.

β€” Materials :

Infos :

For crocheting: 100% cotton yarn. Crochet hook. Scissors. (Needle to weave in ends). I used: Madame Tricote "Camilla" (100% cotton, 50g=125m). 1,5 mm hook. For shaping: White glue. Water. Rubber gloves (optional).

β€” Thin starfish :

Round 1 :

5 sc in a magic ring (5)

Round 2 :

2 sc in each st (10)

Round 3 :

* ch 15, sl st in 2nd ch from hook, sl st in next, sc in next 3 sts, hdc in next 4 sts, dc in last 5 sts; skip next sc of rnd 2 and sl st in next; repeat from * 4 more times;

Round 4 :

sc in each st all around skipping only last and first sts of each arm (see photos below)

Round 5 :

sl st in each st all around.

Info :

Fasten off and weave in yarn ends.

β€” Large starfish :

Round 1 :

5 sc in a magic ring (5)

Round 2 :

2 sc in each st (10)

Round 3 :

* ch 15, sl st in 2nd ch from hook, sl st in next, sc in next 3 sts, hdc in next 4 sts, dc in last 5 sts; skip next sc of rnd 2 and sl st in next; repeat from *4 more times;

Round 4 :

sc in each st all around skipping only last and first sts of each arm

Round 5 :

sc in each st all around

Round 6 :

sl st in each st all around.

Info :

Fasten off and weave in yarn ends.

β€” Shaping the starfish :

Info :

In a cup mix 2 parts of water with 1 part of glue.

Info :

Immerse the crocheted starfish into the glue and water mixture (wear rubber gloves if necessary) until it’s fully wet.

Info :

Carefully squeeze out excess glue-water mix.

Info :

Start shaping it by gently pulling at legs of the starfish and pinching them slightly together and giving it a desired shape.

Info :

For thin starfish I used the β€œwrong” side of crochet as an outside of the fish. For large starfish use β€œright” side.

Info :

Continue until you are satisfied with the shape.

Info :

Leave it to dry on a towel.

Assembly Instructions

  • Fasten off and weave in yarn ends after completing the last round of the starfish.
  • When shaping, immerse the finished crochet starfish into the glue-water mix (2 parts water : 1 part glue) until fully wet, then carefully squeeze out excess.
  • Shape the arms by gently pulling and pinching each leg to the desired profile; for thin starfish use the wrong side out, for large starfish use the right side out.
  • Pin the shaped starfish to a towel while drying to maintain the intended form and allow it to dry completely before handling.
  • If you prefer a stiffer result, use a 1:1 glue-to-water ratio; wear rubber gloves if you have sensitive skin while handling glue.
  • Embellish after shaping by painting with diluted acrylics or watercolors, adding glitter or stitching on seed beads before shaping if desired.

Important Notes

  • πŸ’‘Use a very small hook (1.5 mm recommended) to achieve tight, neat stitches and a crisp finished shape.
  • πŸ’‘Place a stitch marker at the beginning of each round to keep track of rounds and avoid miscounts.
  • πŸ’‘When using glue for shaping, protect your hands with rubber gloves and dry the piece pinned to a towel to preserve the correct shape.

This starfish pattern brings a little bit of the shore into your home with handmade charm and delicate shaping. Try both thin and large versions to create a layered beach display or a set of tiny gifts. Use pastel or bright cotton yarns and add paint or beads for extra personality. 🧢✨

You ask,

we answer.

FAQs

What size will the finished piece be?

The finished starfish size depends on yarn and hook; using 100% cotton and a 1.5 mm hook the thin and large versions will be small decorations roughly palm-sized, perfect for tabletop displays.

Can I use different yarn weights for this pattern?

Yes, you can use different yarn weights, but this will affect the final size and texture; use an appropriate hook for your yarn and expect larger hooks and bulkier yarn to produce a chunkier starfish.

Do I need prior crochet experience for this pattern?

This pattern is rated intermediate, so basic knowledge of single crochet, half double crochet, double crochet, slip stitch, and crochet in the round is recommended for best results.

How long does this project typically take to complete?

Most crocheters complete a single starfish in 2-3 hours including shaping and drying preparation, though time may vary based on experience and size chosen.