๐Ÿงถ Beautiful โœจ Detailed ๐Ÿ’ Adorable

Blue Tang Fish Amigurumi Pattern

Blue Tang Fish Amigurumi Pattern
3.9โ˜… Rating
5-7 Hours Time Needed
4.2K Made This
โœ‚๏ธ

Intermediate Level

Ideal for those with basic crochet experience, featuring slightly more advanced stitches and techniques to expand your skills.

โฑ๏ธ

Weekend Treat

Takes 5-7 hours, making it an enjoyable project to finish over a couple of days.

๐Ÿงธ

Cute Companion

An adorable friend to cherish, handcrafted with love to bring comfort and joy for years to come.

About This Blue Tang Fish Amigurumi Pattern

This pattern creates a charming Blue Tang amigurumi with clear step-by-step instructions from body to tail and separate dorsal fin pieces. It uses super bulky yarn for a squishy, fast make and color-change details to mimic the real fish. Perfect for crafters who enjoy shaping and small sewn-on parts.

Blue Tang Fish Amigurumi Pattern crochet pattern - detailed view of completed project

Includes full materials and abbreviations, assembly tips, and precise stitch counts for each round. Photos and notes guide you through color changes and finishing for a polished result.

Why You'll Love This Blue Tang Fish Amigurumi Pattern

I absolutely love this pattern because it captures the playful shape and bright colors of a Blue Tang in a small, satisfying project. I enjoy how quickly the super bulky yarn works up into a plush, tactile toy that still shows charming detail. The design balances simple rounds with clever color-change placements that make the fish feel alive. I took care to write exact stitch counts so you can reproduce the same cute proportions every time.

Blue Tang Fish Amigurumi Pattern step 1 - construction progress Blue Tang Fish Amigurumi Pattern step 2 - assembly progress Blue Tang Fish Amigurumi Pattern step 3 - details and accessories Blue Tang Fish Amigurumi Pattern step 4 - final assembly and finishing

Switch Things Up

I love customizing this fish by swapping colors; try pastel blues and mint for a softer look that still keeps the shape.

I often change yarn weight and hook size to make tiny keychain versions or a much larger cuddly fish as a statement piece.

I recommend adding embroidered eyelashes or a tiny smile to give your fish a different personality before attaching the eyes.

I sometimes replace safety eyes with French knot embroidered eyes for a softer, baby-safe toy option.

Try adding a small loop at the top with a chain of 6-8 ch to turn your fish into an ornament or hanging mobile.

For a textured finish, experiment with surface crochet for scalloped scales down the body using a contrasting color.

I like to slightly stuff the dorsal fins stiffer by using scrap yarn inside to hold shape better, rather than overstuffing the body.

Consider sewing a tiny bell or rattle inside the head section if you want a playful sound when shaken.

If you want posable fins, you can carefully insert thin craft wire into fins and secure the ends by stitching inside the fin before closing.

I also enjoy making a school of fish by varying colors and stripe patterns to create a colorful display for a nursery or shelf.

Common Mistakes & How to Fix Them

โœ— Skipping stitch markers during rounds with increases and decreases can cause uneven shaping; place a marker at the start of every round and move it each round to stay aligned. โœ— Forgetting to stuff gradually results in lumps or flattened sections; add stuffing in small amounts while checking shape frequently to maintain smooth curves. โœ— Changing colors without securing ends can lead to unraveling later; weave in or secure color ends as instructed before continuing to the next color change. โœ— Not counting stitches at the end of each round often creates mismatched rounds; count your stitches after each round, especially after rounds with many increases or decreases.

Blue Tang Fish Amigurumi Pattern

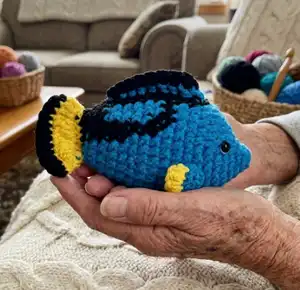
Bring the cheerful Blue Tang (Dory-style) to life with this detailed crochet amigurumi pattern. You will enjoy step-by-step rounds, clear materials and tool lists, and helpful assembly notes to complete a cute, pocket-sized fish. Perfect for gifting or adding a handmade friend to your ocean collection. Follow color-change notes to recreate the iconic blue, black and yellow markings.

Intermediate 5-7 Hours

Materials Needed for Blue Tang Fish Amigurumi Pattern

โ€” Main Fabric

  • 01
    Super Bulky yarn (Category 6) - Main color: Blue (amount depends on size, approx 50-100g)
  • 02
    Accent yarn: Black - small amount for stripes and edging (approx 10-20g)
  • 03
    Accent yarn: Yellow - small amount for fins and tail (approx 10-20g)
  • 04
    Fiberfill stuffing - small bag for filling the body
  • 05
    Plastic safety eyes 8mm (2 pieces) for facial details

โ€” Tools Required

  • 01
    Crochet hook size 3.5mm (E)
  • 02
    Stitch marker
  • 03
    Sewing needle
  • 04
    Scissors
  • 05
    Hot glue gun
  • 06
    Polyester fiberfill stuffing
  • 07
    Plastic safety eyes 8mm (2 pieces)

Progress Tracker

0% Complete

โ€” Body :

Info :

CROCHET FROM THE BODY UP TO THE TAIL ( NO SEW). Begin with Blue yarn. *When the text is bold and underlined, switch to BLACK yarn*

Row 1 :

5 SC in an MR (5)

Row 2 :

2SC, INC, 2SC (6)

Row 3 :

INC, SC, 2INC, SC, INC (10)

Row 4 :

SC, 7INC, 2SC (17)

Row 5 :

4SC, (INC, SC) 4 times, INC, 4SC (22)

Row 6 :

5SC, (INC, SC) 6 times, 5SC (28)

Row 7 :

8SC, INC, 10SC, INC, 8SC (30)

Row 8 :

14SC, 2SC, 14SC (30)

Row 9-10 :

13SC, 4SC, 13SC (30)

Row 11 :

10SC, 10SC, 10SC (30)

Row 12 :

9SC, 2SC, 2SC, 4SC, 2SC, 2SC, 9SC (30)

Row 13 :

9SC, SC, 3SC, 4SC, 3SC, SC, 9SC (30)

Row 14 :

3SC, DEC, 3SC, DEC, 3SC, DEC, 2SC, DEC, SC, DEC, SC, 2SC, DEC, 3SC, DEC (24)

Row 15-16 :

6SC, 2SC, 3SC, 3SC, 2SC, 2SC, 6SC (24)

Row 17 :

2SC, DEC, 2SC, (DEC, 2SC) 3 times, DEC, 2SC, DEC (18)

Row 18 :

5SC, 9SC, 4SC (18)

Row 19 :

(SC, DEC) 2 times, (SC, DEC) 3 times, SC, DEC

Info :

*Stuffing*

Info :

Cut the Black and Blue yarn

Info :

Change to Yellow yarn

Row 20 :

Crochet 2 side together with 6SC

Row 21 :

Turn, 2CH, DC-INC 6 times (12)

Info :

Change to Black yarn

Row 22 :

Turn, CH, 12SC (12)

Info :

Weave in the yarn end and cut

โ€” DORSAL FINS :

Part 1 :

Begin with Blue yarn (Make 2)

Info :

Pick up the yarn from row 7, apart 8 stitch

Row 1 :

(Chains 1, HDC, 3DC, HDC) in one stitch (5)

Info :

Change to Yellow yarn

Row 2 :

Turn, CH, 5SC (5)

Info :

Weave in the yarn end and cut

Part 2 :

Begin with Blue yarn

Info :

Pick up the yarn from R8 to R16, in the vertical line from head to tail

Row 1 :

(Chains 1, SC, 7DC, SC) in one stitch (9)

Info :

Change to Black yarn

Row 2 :

Turn, CH, 9SC (9)

Info :

Weave in the yarn end and cut

Info :

Attach the eyes at R5-R6, apart 8 stitch

Assembly Instructions

  • Attach the two dorsal fin Part 1 pieces to the picked-up positions from row 7, spacing them as indicated and sewing securely with a yarn needle.
  • Attach dorsal fin Part 2 (long fin) along the vertical picked-up line from R8 to R16, sewing evenly so the fin follows the head-to-tail centerline.
  • Insert safety eyes at rounds R5-R6, positioned apart by 8 stitches, and secure with safety backs or sew them in place before stuffing is complete.
  • Stuff the body firmly before closing at Row 20-22, then sew the tail seam and weave in all yarn ends to finish.
  • Weave in all yarn ends and trim excess, and use a little hot glue if needed for extra security on small decorative bits.

Important Notes

  • ๐Ÿ’กUse stitch markers to mark the start of each round, especially when working color changes and shaping sections.
  • ๐Ÿ’กStuff the fish gradually to maintain smooth curves; overstuffing can distort shaping.
  • ๐Ÿ’กSecurely fasten and weave in color change ends to avoid unraveling, particularly where black stripes meet blue.

You did it โ€” your little Blue Tang is complete and ready to swim into its new home! ๐Ÿ  This pattern makes a cheerful, pocket-sized amigurumi with bold color details that pop. ๐Ÿงถ Share your creation, give as a handmade gift, or make a whole school of fish to brighten any room!

You ask,

we answer.

FAQs

What size will the finished piece be?

The finished amigurumi measures approximately 9-12 cm long when using super bulky yarn and a 3.5mm hook; actual size may vary with tension and yarn brand.

Can I use different yarn weights for this pattern?

Yes, you can use different yarn weights but this will change the final size and density; adjust your hook size accordingly and note that details will be smaller with thinner yarn.

Do I need prior crochet experience for this pattern?

This pattern is rated intermediate due to shaping, color changes, and picked-up stitches; basic knowledge of single crochet, increases, decreases, and color changes is recommended.

How long does this project typically take to complete?

Most crocheters finish this pattern in about 5-7 hours using super bulky yarn, though time will vary depending on experience and how many finishing details you add.