About This Crochet Landscape Rings Pattern
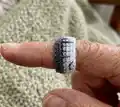
This pattern teaches you how to crochet tiny landscape-inspired rings approximately 20mm in diameter, working in three stacked colour bands. It uses basic stitches—chain, double crochet and slip stitch—so you can complete each ring quickly. The pattern also includes simple embroidery steps to add birds, tree trunks or building lines for extra character.
Easy to customise with your favourite Scheepjes Sugar Rush colours and embroidery accents. Perfect for gifts, jewellery sets, or small craft markets.
Why You'll Love This Crochet Landscape Rings Pattern
I absolutely love this pattern because it turns tiny stripes of crochet into miniature wearable art that sparks conversation. I enjoy how quickly each ring comes together, making it satisfying to make multiple colourways in one sitting. The embroidery step lets me personalise each ring, adding small landscape details that feel like a tiny snapshot. I also love that the stitches are simple, so I can crochet while watching a show or chatting with friends.
Switch Things Up
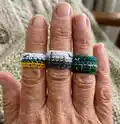
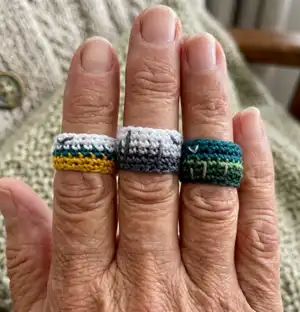
I love experimenting with colours, so I often swap the three main bands for unexpected palettes like pastels or monochrome greys.
I sometimes use a finer yarn and a 1.25 mm hook to make delicate mini rings suitable for a thin finger.
For a chunkier statement piece I use a bulkier yarn and increase the starting chain by a few stitches to keep the ring comfortable.
I enjoy adding tiny beads between stitches before closing the round to create a subtle sparkle along the band.
Try embroidering different motifs: tiny hearts, waves, or city skylines instead of V-shaped birds for unique themes.
I often make matching sets by repeating the pattern in coordinated colours so they look great stacked together.
To make a gift-ready set, I stitch three rings in different sizes by changing chain length slightly for small, medium and large options.
I also like to back the inside with a thin felt circle glued and sewn in place to make the ring more comfortable for sensitive skin.
For market sales I tag each set with care instructions and colourway names to inspire customers and show variations.
When teaching this project, I ask students to experiment with embroidery placement before stitching permanently to find the most flattering composition.
Sometimes I combine two rings with a small jump ring to make a double-band ring that stays aligned on the finger for a bold look.
I recommend trying metallic embroidery thread for a subtle shimmer that complements the yarn colours beautifully.
Common Mistakes & How to Fix Them
✗ Making the initial chain too tight; hold a looser tension on the starting chain so the ring can be joined without distortion and will sit flat.
✗ Joining the chain twisted causes the ring to look uneven; before joining, lay the chain flat and confirm it is not twisted then join with a slip stitch.
✗ Forgetting to change colours at the right row can produce muddy bands; plan your colour changes and secure yarn ends as you switch to keep clear stripes.
✗ Not weaving in ends neatly leads to bulk under the ring; weave in ends close to the work and trim excess to maintain a smooth inner circle.
✗ Working inconsistent tension across rows creates wavy edges; maintain steady tension and check your stitch gauge every few rounds to keep the band even.