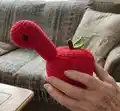
🧢 Beautiful ✨ Detailed πŸ’ Adorable

Appletosaurus Amigurumi Pattern

Appletosaurus Amigurumi Pattern
4.1β˜… Rating
5-7 Hours Time Needed
3.5K Made This
βœ‚οΈ

Intermediate Level

Ideal for those with basic crochet experience, featuring slightly more advanced stitches and techniques to expand your skills.

⏱️

Weekend Treat

Takes 5-7 hours, making it an enjoyable project to finish over a couple of days.

🧸

Cute Companion

An adorable friend to cherish, handcrafted with love to bring comfort and joy for years to come.

About This Appletosaurus Amigurumi Pattern

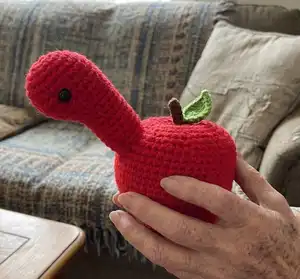
This pattern makes a cute Appletosaurus β€” an apple-themed dinosaur amigurumi with legs, tail, head, leaf, stem and decorative spots. It combines basic amigurumi shaping with invisible decreases and a joined-leg technique so the body is seamless and sturdy. Clear round-by-round instructions and photo references help you shape and assemble each piece.

Appletosaurus Amigurumi Pattern crochet pattern - detailed view of completed project

Suitable for intermediate crocheters familiar with single crochet, increases and decreases. Final toy measures approximately 10 cm tall using the recommended yarn and hook.

Why You'll Love This Appletosaurus Amigurumi Pattern

I absolutely love this pattern because it blends a playful character with simple, satisfying construction. The apple concept makes the design instantly charming and unique, and I enjoy how the join-the-legs round creates a seamless body. I also love that the pattern includes invisible closing and decreasing techniques that give a polished, professional finish. Making this little Appletosaurus always brightens my day β€” it is quick to crochet yet full of personality.

Appletosaurus Amigurumi Pattern step 1 - construction progress Appletosaurus Amigurumi Pattern step 2 - assembly progress Appletosaurus Amigurumi Pattern step 3 - details and accessories Appletosaurus Amigurumi Pattern step 4 - final assembly and finishing

Switch Things Up

I love experimenting with colourways for this pattern β€” try soft pastel reds and mint greens for a nursery-friendly Appletosaurus or bold, high-contrast colours for a playful look.

To make a mini keychain version, use a finer yarn and a smaller hook; for a larger plush, choose a bulkier yarn and a bigger hook to create a cuddly size.

I often swap the green spots for tiny embroidered stars or felt circles for a different texture and visual interest.

Try changing the position and size of the leaf and stem for unique character β€” a tilted stem or a larger leaf gives a cheeky expression.

If you want posable limbs, add thin floral wire inside the legs and tail before stuffing to give gentle pose ability.

I sometimes add a tiny crocheted scarf or a little felt tag with a name for personalization when gifting.

For a seasonal twist, use autumnal browns and oranges and replace spots with tiny embroidered leaves to create a fall-themed Appletosaurus.

I recommend testing eye placement on a scrap round before securing β€” small changes in placement really change the personality.

If you want a stitched mouth, use a contrasting embroidery thread and place it between the eyes to express different moods.

Lastly, I like to experiment with trims like a little collar or crocheted bow to make each Appletosaurus feel unique and special.

Common Mistakes & How to Fix Them

βœ— Placing safety eyes too low or too close together can make the face look out of proportion; place the eyes between rounds 7-8, ten stitches apart as instructed to get the correct look. βœ— Forgetting to stuff gradually results in lumps or an uneven shape; stuff firmly as you go and continue stuffing while decreasing to keep a smooth silhouette. βœ— Skipping stitch counts during increases and decreases leads to mismatched rounds; count your stitches at the end of each round, especially after join rounds and shape changes. βœ— Not securing the long tail after the invisible close can cause the top to open later; complete the invisible close, pull tight to create the dip, then make a few securing stitches on the bottom and weave in ends.

Appletosaurus Amigurumi Pattern

Make a delightful Appletosaurus β€” an apple-shaped dinosaur amigurumi perfect for handmade gifts and home decor. This pattern guides you through each piece with clear step-by-step rounds and helpful photos so you can create a balanced, cuddly companion. With simple shaping and charming details like leaf, stem and spots, you will love assembling this tiny prehistoric friend.

Intermediate 5-7 Hours

Materials Needed for Appletosaurus Amigurumi Pattern

β€” Main Fabric

  • 01
    Stylecraft Special DK - Matador (red) - DK weight (used for body, legs, head and tail)
  • 02
    Stylecraft Special DK - Grass Green (green) - DK weight (used for leaf and spots)
  • 03
    Stylecraft Special DK - Gingerbread (brown) - DK weight (used for stem)

β€” Tools Required

  • 01
    2.5 mm Crochet Hook
  • 02
    Two 6mm safety eyes
  • 03
    Stitch markers
  • 04
    Yarn needle
  • 05
    Fibrefill (polyester stuffing)
  • 06
    Scissors

Progress Tracker

0% Complete

β€” Techniques used in this pattern :

Info :

How to close amigurumi invisibly 1. Insert needle in the FLO of each stitch around 2. Pull tight to close 3. Insert needle through centre exiting a few rounds down 4. Weave in the end and admire your work!

Info :

How to decrease invisibly 1. Insert hook into FLO of first stitch 2. Insert hook into FLO of next stitch 3. Yarn over and pull through two loops 4. Yarn over and pull through two loops again. Invisible decrease complete!

β€” Legs (make four) :

Info :

Using Matador

Round 1 :

6sc in MR (6)

Round 2 :

inc each st around (12)

Round 3 :

in BLO sc each st around (12)

Round 4 :

sc each st around (12)

Info :

Cut yarn and weave in ends (photo 1)

β€” Body :

Info :

Using Matador

Round 1 :

6sc in MR (6)

Round 2 :

inc each st around (12)

Round 3 :

*1sc, inc* rep 6 times (18)

Round 4 :

*2sc, inc* rep 6 times (24)

Round 5 :

2sc, with the body still on your hook (photo 2) Insert hook through any st in leg 1 and through the next st of rnd 4 (photo 3) complete sc, complete a further 2sc in this way, 3sc, 3sc through leg 2 and rnd 4, 3sc, 3sc through leg 3 and rnd 4, 3sc, 3sc through leg 4 and rnd 4, sc (24)

Info :

All four legs should now be attached to the body (photo 4)

Round 6 :

2sc, 9sc around leg 1, 3sc, 9sc around leg 2, 3sc, 9sc around leg 3, 3sc, 9 sc around leg 4, sc (48)

Round 7-11 :

sc each st around (48) (5 rnds)

Round 12 :

*7sc, inc* rep 6 times (54)

Round 13-20 :

sc each st around (54) (8 rnds)

Round 21 :

*7sc, dec* rep 6 times (48)

Round 22 :

*6sc, dec* rep 6 times (42)

Round 23 :

*5sc, dec* rep 6 times (36)

Info :

Start to stuff firmly and continue to stuff as we decrease.

Round 24 :

*4sc, dec* rep 6 times (30)

Round 25 :

*3sc, dec* rep 6 times (24)

Round 26 :

*2sc, dec* rep 6 times (18)

Info :

Stop stuffing here.

Round 27 :

sc each st around (18)

Round 28 :

*1sc, dec* rep 6 times (12)

Round 29 :

sc each st around (12)

Round 30 :

dec 6 times (6)

Info :

Cut yarn leaving a long tail.

Info :

Complete invisible close up to step 2 (photo 6) Insert the needle into the centre, push it through the body coming out directly at the bottom (photo 7 and 8) Pull the yarn tight making a dip in the top of the body (photo 9) Make a few sts on the bottom to secure. This should also raise the tummy slightly. Weave in ends.

β€” Head :

Info :

Using Matador

Round 1 :

6sc in MR (6)

Round 2 :

inc each st around (12)

Round 3 :

*1sc, inc* rep 6 times (18)

Round 4 :

*2sc, inc* rep 6 times (24)

Round 5-9 :

sc each st around (24) (5 rnds)

Round 10 :

6sc, *sc, dec* rep 4 times, 6sc (20)

Round 11 :

4sc, *sc, dec* rep 4 times, 4sc (16)

Info :

Insert safety eyes between rnds 7 - 8 ten sts apart so they appear either side of the head.

Round 12-18 :

sc each st around (16) (7 Rnds)

Info :

Finish the final rnd with a slst to join. Cut yarn leaving a long tail.

Round 8 :

*3sc, inc* rep 3 times (15)

Round 9-10 :

sc each st around (15) (2 rnds)

Round 11 :

6sc, 3inc, 6sc (18)

Round 12-13 :

sc each st around (18) (2 rnds)

Info :

Finish the final rnd with a slst to join. Cut yarn leaving a long tail. Head and tail shown in (photo 10)

β€” Tail :

Info :

Using Matador

Round 1 :

6sc in MR (6)

Round 2 :

*sc, inc* rep 3 times (9)

Round 3-4 :

sc each st around (9) (2 rnds)

Round 5 :

*2sc, inc* rep 3 times (12)

Round 6-7 :

sc each st around (12) (2 rnds)

Round 8 :

*3sc, inc* rep 3 times (15)

Round 9-10 :

sc each st around (15) (2 rnds)

Round 11 :

6sc, 3inc, 6sc (18)

Round 12-13 :

sc each st around (18) (2 rnds)

Info :

Finish the final rnd with a slst to join. Cut yarn leaving a long tail.

Info :

Head and tail shown in (photo 10)

β€” Leaf :

Info :

Using Grass Green

Round 1 :

ch8, sc in 2nd st from hook, hdc, dc, dcinc, dc, hdc, work the following sts in the final st (sc, ch2, slst in 2nd ch from hook, sc) Now working down the other side of the ch, hdc, dc, dcinc, dc, hdc, sc, slst to join (16)

Info :

Cut yarn leaving a long tail.

β€” Stem :

Info :

Using Gingerbread

Round 1 :

Ch10, slst in 2nd ch from hook, 8slst (9)

Info :

Cut yarn leaving a long tail. Leaf and stem shown in (photo 11)

β€” Spots :

Info :

Using Grass green

Item Name (Small Spots P1) :

Small Spots (make two) Rnd 1 6sc in MR close with a slst (6) Cut yarn leaving a long tail.

Item Name (Medium Spots P2) :

Medium Spots (make two) Rnd 1 8sc in MR close with slst (8) Cut yarn leaving a long tail.

Item Name (Large Spots P3) :

Large Spots (make two) Rnd 1 6sc in MR (6) Rnd 2 inc each st around close with slst (12) Cut yarn leaving a long tail.

Info :

All spots shown in (photo 12)

β€” Assembly :

Info :

We will use the long tails to attach everything.

Info :

Using a few small sts attach the leaf half way up the stem (photo 13) then sew in the centre of the dip (photo 14 and 15)

Info :

Stuff head firmly and sew over rnds 18 - 22. You may need to adjust this positioning if you find your Appletosaurus won't balance correctly. (photo 16)

Info :

Stuff tail firmly and sew over rnds 14 - 19 ensuring the 3 increases from rnd 11 are towards the top (photo 17)

Info :

Sew the spots on each side towards the rear (photo 18)

Assembly Instructions

  • Using the long tails from leaf and stem, attach the leaf halfway up the stem with a few small stitches, then sew in the centre of the dip for a neat finish.
  • Stuff the head firmly and sew it to the body over rounds 18-22; adjust placement so the Appletosaurus balances correctly before securing.
  • Stuff the tail firmly and sew it to the body over rounds 14-19, aligning the three increases from round 11 towards the top for correct shaping.
  • Sew the green spots on each side of the rear of the body, spacing them evenly as shown in the photo references.
  • Weave in all long tails neatly after assembly and make a few securing stitches through the bottom to prevent the invisible close from loosening.

Important Notes

  • πŸ’‘Use stitch markers to mark the start of each round, especially for rounds where you join legs or change shaping.
  • πŸ’‘Stuff firmly but evenly, adding stuffing gradually as you decrease to retain a smooth, rounded shape.
  • πŸ’‘Weave in ends as you go where possible to keep finishing quick and tidy and avoid bulky joins.

This Appletosaurus pattern is a playful mix of fruit and dino charm β€” perfect for gifts, decor, or a quick handmade project. It sews up fast and looks delightful from every angle, with a sweet leaf and stem detail. Give it as a tiny companion or keep it on your desk for a cheerful crochet reminder. 🧢🍎

You ask,

we answer.

FAQs

What size will the finished piece be?

The finished amigurumi measures approximately 10 cm tall when using the recommended Stylecraft Special DK yarn and 2.5 mm hook.

Can I use different yarn weights for this pattern?

Yes, you can use different yarn weights but this will affect the final size. If you use a thicker yarn, try a larger hook and remember proportions will change.

Do I need prior crochet experience for this pattern?

This pattern is rated intermediate; familiarity with single crochet, increases, decreases and invisible decrease/close techniques is recommended.

How long does this project typically take to complete?

Most crocheters complete this project in 5-7 hours, though time may vary based on experience and how many details you add.