🧢 Beautiful ✨ Detailed πŸ’ Adorable

Animal Friends of Pica Pau Amigurumi Pattern

Animal Friends of Pica Pau Amigurumi Pattern
4.5β˜… Rating
5-7 Hours Time Needed
3.8K Made This
βœ‚οΈ

Intermediate Level

Ideal for those with basic crochet experience, featuring slightly more advanced stitches and techniques to expand your skills.

⏱️

Weekend Treat

Takes 5-7 hours, making it an enjoyable project to finish over a couple of days.

🧸

Cute Companion

An adorable friend to cherish, handcrafted with love to bring comfort and joy for years to come.

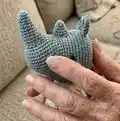
About This Animal Friends of Pica Pau Amigurumi Pattern

This pattern collection creates a series of small amigurumi animal friends, each with distinctive shapes and charming personalities. You will learn toy-focused techniques like working in spirals, invisible decreases, and joining parts. The patterns emphasize dense stitching and tidy finishing to keep stuffing from showing through.

Animal Friends of Pica Pau Amigurumi Pattern crochet pattern - detailed view of completed project

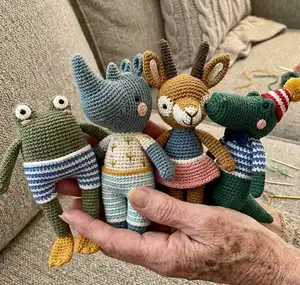
Perfect for making handmade gifts or building a whimsical toy collection, the instructions are detailed and supported by tool and yarn guidance. You will find helpful notes on materials, stitch placement, and assembly methods.

Why You'll Love This Animal Friends of Pica Pau Amigurumi Pattern

I absolutely love this collection because it brings playful characters to life with simple, thoughtful design choices that highlight personality in every piece. I enjoy the balance between structure and whimsy β€” you can make toys that are sturdy and child-safe while still being endlessly charming. I also appreciate how the book teaches core amigurumi techniques, which makes each pattern a learning experience as well as a creative project. Watching someone hold a finished toy and smile is the best part of sharing these patterns.

Animal Friends of Pica Pau Amigurumi Pattern step 1 - construction progress Animal Friends of Pica Pau Amigurumi Pattern step 2 - assembly progress Animal Friends of Pica Pau Amigurumi Pattern step 3 - details and accessories Animal Friends of Pica Pau Amigurumi Pattern step 4 - final assembly and finishing

Switch Things Up

I love customizing these amigurumi β€” changing colors can totally alter a character's personality and mood so I often test different palettes before settling on one.

If you want a softer toy, switch to a wool blend and slightly larger hook for a plush finish; conversely, use a thinner cotton and smaller hook for mini keychain versions.

I sometimes embroider extra facial expressions or freckles to personalize each friend; embroidery adds character without complicated sewing.

Try adding small crocheted accessories like scarves, hats, or tiny backpacks to create themed sets or seasonal characters for gifts.

To make the toys posable, consider inserting thin craft wire into limbs; this lets you adjust arms and legs while still keeping the exterior soft.

Experiment with safety eye sizes and positions β€” moving eyes up or down the face significantly changes the expression and charm.

If making toys for small children, I replace plastic eyes with embroidered features to ensure safety while keeping a sweet look.

Mix textured yarns for contrast: use boucle or chenille for a fuzzy mane or tail, while keeping the body in smooth cotton for durability.

Scale the design by changing yarn weight and hooks: bulky yarn and big hooks produce a cozy cuddle toy, while fingering yarn creates tiny collectible pals.

I like to create small themed sets (forest animals, sea creatures) by tweaking color combos and accessories so they look cohesive when displayed together.

Finally, I often add felt or fabric elements glued or sewn on as clothes for a mixed-media effect; always secure attachments well for durability.

Common Mistakes & How to Fix Them

βœ— Skipping stitch markers when working in continuous rounds leads to misplaced rounds and counting errors; place a marker at the first stitch of each round and move it up as you work. βœ— Overstuffing toy parts causes stretched stitches and distorted shapes; stuff gradually and evenly, adding small amounts to shape while stitching to maintain smooth contours. βœ— Using a hook that is too large for the yarn results in a loose fabric where stuffing shows through; use a hook two or three sizes smaller than garment recommendations to produce a dense fabric suitable for toys. βœ— Not securing safety eyes properly can lead to faults or hazards; insert safety eyes according to manufacturer instructions and, for small children, consider embroidering features or using glue and washers for extra security. βœ— Neglecting to weave in ends as you go creates a messy finish and excessive tail management at the end; weave in ends progressively and trim neatly to keep seams tidy.

Animal Friends of Pica Pau Amigurumi Pattern

Discover a charming collection of animal amigurumi designs inspired by the Animal Friends of Pica Pau. This book-style pattern set guides you through yarn choices, hook selection, and essential techniques so you can create adorable handmade friends. With clear step-by-step instructions and helpful tips, you will enjoy making lovable toys for gifts or your own collection.

Intermediate 5-7 Hours

Materials Needed for Animal Friends of Pica Pau Amigurumi Pattern

β€” Main Fabric

  • 01
    Cotton yarn (recommended for toys) - sport to DK weight options, commonly 200–400 m per 100 g
  • 02
    Wool yarn - various weights, offers warmth and elasticity (avoid very hairy wools for amigurumi)
  • 03
    Alpaca yarn - soft and luxurious, use cautiously due to cost and shedding
  • 04
    Acrylic yarn - widely available in many colors and textures, good for colorful toys
  • 05
    Nylon/acrylic blends - durable, smooth and colorfast options
  • 06
    T-shirt yarn and thick rope yarns - used for larger chunky pieces or props
  • 07
    Sheep's wool roving - used for textured details or felting (not for structural amigurumi fabric)
  • 08
    Plant-based fibers: cotton, flax, jute, rayon, hemp, bamboo - useful for specific textures
  • 09
    Exotic fibers referenced: banana, pineapple, palm fibers (specialty uses)
  • 10
    General guidance: 200-400 meters per 100 grams yarn weights are common for toy making

β€” Tools Required

  • 01
    Crochet hook sizes from 2.0 mm to 10.0 mm depending on yarn (common: 2.0 mm, 2.25 mm, 2.5 mm, 2.75 mm, 3.0 mm, 3.25 mm, 3.5 mm, 4.0 mm)
  • 02
    Crochet hook size 2.75mm stainless steel recommended for many toys
  • 03
    Yarn needles / tapestry needles (size 16 or 18 recommended)
  • 04
    Safety eyes (various sizes) or alternatives for facial features
  • 05
    Polyester fiberfill stuffing
  • 06
    Stitch markers (or paperclips, safety pins, hair clips)
  • 07
    Scissors (small sharp pair recommended)
  • 08
    Pins for assembly
  • 09
    Measuring tape or ruler
  • 10
    Optional: pliers for securing safety eye washers

Progress Tracker

0% Complete

β€” Tools and Supplies :

Info :

One of the most interesting things about crochet is the fact that a hook and a strand of yarn are all you need to start working. If you have been crocheting for years, or have someone who crochets in the family, it is likely you already have a case filled with hooks and needles in various sizes and from different origins.

Info :

High quality hooks and yarns can save hours of frustration; always have a backup of favorite hooks. Hooks may be made of stainless steel, aluminum, wood, bamboo, or plastic; stainless steel hooks under 2.00 mm are strong, larger ones between 2.0 and 3.5 mm are excellent for amigurumi with sport or DK weight yarn.

β€” Anatomy of a Crochet Hook :

Info :

Point: The end inserted into stitches; a rounded blunt tip slides through yarn without splitting. Throat: Catches the yarn and allows you to pull it through loops. Shaft: Holds the loops; diameter determines stitch size. Thumb rest: Flat area for thumb and finger placement. Handle: Provides balance and leverage when present.

β€” Sizes and Conversions :

Info :

Hook sizes are indicated with metric, UK and US systems. Examples include 2 mm = UK 14, 2.25 mm = UK 13 = US B/1, 2.75 mm = US C/2, 3.25 mm = US D/3, 3.5 mm = US E/4, 4 mm = US G/6 and so on up to 10 mm = US N/15.

β€” Materials and Yarns :

Info :

Hooks were historically made from bone or glass; today common materials include stainless steel, aluminum, plastic, bamboo and wood. Stainless steel: strong and suitable for small hooks. Aluminum: light, wide range of sizes. Wood/bamboo: decorative and good for thicker yarns. Plastic/acrylic: used for thicker materials like T-shirt yarn or roving.

Info :

Yarns: Natural fibers (cotton, flax, jute, rayon, hemp), Protein fibers (wool, alpaca, angora, mohair, silk), Synthetic fibers (acrylic, nylon), and blended options are discussed. For toys, cotton is recommended by the author for its low elasticity and durability. Yarn weight notes: the yarns commonly used for crochet toys are between 200 and 400 meters per 100 grams.

β€” Other essential tools and supplies :

Infos :

Yarn needles and tapestry needles are used for joining motifs, sewing and finishing pieces; they have a blunt tip and large eye (author uses number 16 or 18). Pins, scissors, stitch markers, stuffing, and facial features (plastic safety eyes with washers) are listed as essential. Polyester fiberfill is recommended for stuffing as it is inexpensive, washable, and hypoallergenic.

β€” Crochet Introduction :

Info :

Crochet creates fabric by interlocking loops of thread using a crochet hook. The term crochet is derived from French meaning "small hook". When selecting a hook, consider comfort and how the hook feels in your hand.

β€” Hold the hook and yarn (hand position) :

Info :

There is no strict "best" way to hold a hook; many hold it like a pencil (pencil grip) or like a knife (knife grip). The free hand controls thread tension and holds the work; you can weave the yarn through fingers or place it between palm and fingers. Keep the working hand "in shape" to avoid strain and practice before and after crocheting sessions.

Item Name (P1) :

Pencil grip: Hold the hook as you would a pencil, grasping between thumb and index finger in the middle of the flat section (thumb rest).

Item Name (P2) :

Knife grip: Hold the hook like a knife, grasping between thumb and index finger and resting the end of the hook against the palm.

β€” Stitches :

Info :

All crochet stitches are made by a combination of movements: yarn over, insert hook into stitch, and draw yarn through loops. The book will explain basic stitches commonly used in amigurumi: chain, single crochet, half double crochet, double crochet, and variants. The author recommends mastering a few core stitches and adapting techniques to your needs.

β€” Slip Knot :

Info :

Almost all crochet works begin with the slip knot. The slip knot is the first loop you need to make on your hook. The slip knot does not count as a stitch; the author often makes another knot to secure it.

Round 1 :

1 Make a loop shape with the tail end of the yarn.

Round 2 :

2 Insert the hook into it and draw another loop through it.

Round 3 :

3 Pull the yarn tail to tighten the loop around the hook.

β€” 01 Chain stitch (abbreviation: ch) :

Info :

This stitch is the basis for most crochet works: if you are working in rows, your first row will almost always be chain stitches (a foundation chain). It is used to join motifs and as a turning stitch.

Round 1 :

1 Holding the slip knot, wrap the yarn from back to front around the hook (yarn over). You can wind the yarn over the hook or twist the hook to go under the yarn.

Round 2 :

2 Draw the hook backward to pull the yarn through the loop on the hook (the slip knot).

Round 3 :

3 You will form a new loop, which is your first chain stitch. Repeat the previous steps to form as many chain stitches as required.

Info :

Foundation chain: The string of chain stitches you have to crochet to make a flat fabric worked in rows; it is the equivalent of casting on. Note: To help maintain an even foundation chain, change your grip on the crocheted chains so you are always holding them near the hook.

Info :

Turning chain: When crocheting in rows, turning chains are used to bring the hook up to the height of the stitches to be worked. Each stitch type has a corresponding number of turning chains: 1 for single crochet, 2 for half double crochet, and 3 for double crochet. Note: For half double crochet or longer stitches the turning chain counts as the first stitch.

Assembly Instructions

  • Use a blunt tapestry needle (size 16 or 18) to join motifs and sew parts together; a whipstitch or mattress stitch gives a neat seam for amigurumi pieces.
  • Position safety eyes before finishing rounds and secure with the washer on the inside; if concerned about safety, place glue behind the washer or embroider the eyes instead.
  • Pin parts in place before sewing to ensure correct placement and symmetry; adjust spacing with pins and check photos for reference before securing.
  • Attach head to body by aligning the neck rounds with the body opening, then sew using small, tight stitches and weave in the yarn tail to secure.
  • Sew limbs to the body using a needle and matching yarn; insert the needle through matching rounds and use a ladder stitch to hide the seam and keep the limb secure.

Important Notes

  • πŸ’‘Use stitch markers to keep track of rounds and the first stitch of each round, especially when working in spirals or changing colors.
  • πŸ’‘Stuff parts gradually and evenly; overstuffing will distort the shape while too little stuffing will make the toy look deflated.
  • πŸ’‘Always pin or temporarily attach parts before sewing to confirm placement and symmetry, then sew securely with small stitches.
  • πŸ’‘Maintain consistent tension throughout your work to produce even stitches and a professional-looking result.
  • πŸ’‘Weave in yarn ends as you go to prevent a long finisher session and reduce visible tails on the inside of the toy.

This delightful collection brings 20 colorful amigurumi characters to life with clear, friendly instruction and beautiful photography. Whether you are making gifts or building your own toy zoo, each pattern is crafted for personality and playfulness. Enjoy the tactile joy of crocheting and gifting handmade friends. 🧢😊🧡

You ask,

we answer.

FAQs

What size will the finished piece be?

Finished sizes vary by character and yarn/hook choice; using the recommended yarn weight and a smaller hook typically yields toys around 15-25 cm tall depending on the model.

Can I use different yarn weights for this pattern?

Yes, you can use different yarn weights but the final size and fabric density will change; choose a hook two or three sizes smaller than recommended for garments to ensure a dense amigurumi fabric.

Do I need prior crochet experience for this pattern?

This collection is rated intermediate and assumes basic knowledge of single crochet, increases, decreases, and working in spirals; beginners can follow the introductory sections and practice core stitches first.

How long does this project typically take to complete?

Most crocheters complete an individual character in 5-7 hours depending on complexity and finishing time, though simple minis may be faster.

What type of stuffing is recommended?

Polyester fiberfill is recommendedβ€”it's inexpensive, washable, hypoallergenic and easy to find; stuff gradually for controlled shaping.