🧢 Beautiful ✨ Detailed πŸ’ Adorable

Brighten Your Day Crochet Rainbow Stuffie Amigurumi Pattern

Brighten Your Day Crochet Rainbow Stuffie Amigurumi Pattern
4.1β˜… Rating
2-3 Hours Time Needed
3.3K Made This
βœ‚οΈ

Beginner Friendly Level

Perfect for those just starting their crochet journey, with clear instructions and simple techniques

⏱️

Bite-Sized Project

Finishes in 2-4 hoursβ€”perfect for an afternoon of creative relaxation.

🎁

Tiny Treasure

Small, sweet, and gift-worthy creations that fit perfectly in the palm of your hand with detailed charm.

About This Brighten Your Day Crochet Rainbow Stuffie Amigurumi Pattern

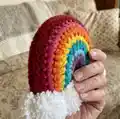
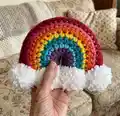
This pattern creates a small, stuffed crochet rainbow with colourful stripes and fluffy pom-pom clouds along the bottom. The rainbow is worked as two identical single crochet pieces that are seamed together and lightly stuffed for shape. It uses Bernat Softee Chunky (#6 bulky) yarn in several contrast colours to create the layered arc effect.

Brighten Your Day Crochet Rainbow Stuffie Amigurumi Pattern crochet pattern - detailed view of completed project

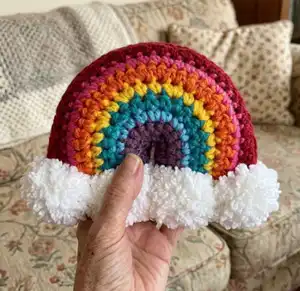
The pattern includes detailed row-by-row instructions for both the front and back pieces, a flat slip stitch join method for neat seams, and a simple pom-pom tutorial. Finished size is approximately 7" x 6" using the recommended yarn and 6 mm hook.

Why You'll Love This Brighten Your Day Crochet Rainbow Stuffie Amigurumi Pattern

I absolutely love this pattern because it brings instant colour and cheer to any space with minimal time investment. I designed it to be approachable β€” the stitches are simple but the finished result feels special and handmade. I enjoy how the chunky yarn makes the stripes pop and the pom-pom clouds add a playful, tactile finish. This pattern is perfect for giving as a quick, thoughtful gift or for using up small amounts of colourful yarn from your stash.

Brighten Your Day Crochet Rainbow Stuffie Amigurumi Pattern step 1 - construction progress Brighten Your Day Crochet Rainbow Stuffie Amigurumi Pattern step 2 - assembly progress Brighten Your Day Crochet Rainbow Stuffie Amigurumi Pattern step 3 - details and accessories Brighten Your Day Crochet Rainbow Stuffie Amigurumi Pattern step 4 - final assembly and finishing

Switch Things Up

I love swapping colours to create different moods β€” try pastel tones for a soft nursery look or jewel tones for a vibrant statement piece.

You can make a mini keychain version by using DK yarn and a smaller hook to create a tiny rainbow that fits on a bag or keys.

For a chunkier, cuddly version, use a bulkier yarn and a larger hook to increase the finished size and plushness.

I sometimes embroider little raindrops under the clouds for an extra decorative detail that adds personality to the design.

Try using variegated yarn for one of the arcs to add a subtle colour shift without changing yarns between rows.

If you want a flat ornament, skip stuffing and make a single layer, then sew the edge and add a hanging loop at the top.

I like to attach little bells or beads inside the pom-poms for a playful jingle when the piece is handled.

Swap the pom-poms for small crocheted clouds if you prefer a more structured, long-lasting cloud edge.

Experiment with embroidery floss to add facial features or tiny accents on the rainbow to make characterful, giftable items.

Make a set in multiple sizes and colours to create a cheerful mobile or wall display β€” mix and match yarn weights for visual interest.

Common Mistakes & How to Fix Them

βœ— Skipping the colour change technique can leave loose loops or messy joins; work to the last 2 loops on the hook, yarn over with the new colour and pull through 2 loops to complete the stitch before proceeding. βœ— Not aligning stripes when sewing front and back together may cause a mismatched look; pin or match stripes carefully before seaming and use the same contrast colour when joining to keep the row alignment consistent. βœ— Understuffing or overstuffing the piece will distort the rainbow shape; stuff gradually, checking the shape often and aiming for firm but slightly pliable stuffing to keep the arc smooth. βœ— Neglecting to fasten off and weave in ends after each colour can leave tails exposed; break yarn and weave in ends at each colour change or use small tidy knots to secure before finishing. βœ— Cutting pom-pom loops unevenly gives irregular cloud shapes; trim carefully and rotate the pom-pom as you trim to maintain a uniform round shape. βœ— Using a different gauge without adjusting hook size results in an incorrectly sized rainbow; test the gauge (10 sc and 11 rows = 4") and change hook size as needed to match the gauge.

Brighten Your Day Crochet Rainbow Stuffie Amigurumi Pattern

Make a cheerful rainbow stuffie to brighten any space or make a thoughtful handmade gift. This pattern uses chunky yarn and simple single crochet shaping so you can create bright stripes and fluffy pom-pom clouds with ease. Follow step-by-step row instructions, yarn colour changes, and finishing tips to sew the two pieces together for a polished, playful result. Perfect for gifting or as a quick, colourful home accent.

Beginner Friendly 2-3 Hours

Materials Needed for Brighten Your Day Crochet Rainbow Stuffie Amigurumi Pattern

β€” Main Fabric

  • 01
    Bernat Softee Chunky Yarn (#6 Bulky) 3.5 oz [100 g] / 108 yds [99 m]
  • 02
    Contrast A - Dark Mauve (28323) - 1 ball or 7 yds [7 m]
  • 03
    Contrast B - Ultra Blue (28742) - 1 ball or 4 yds [4 m]
  • 04
    Contrast C - Emerald (28200) - 1 ball or 6 yds [6 m]
  • 05
    Contrast D - Glowing Gold (28607) - 1 ball or 6 yds [6 m]
  • 06
    Contrast E - Pumpkin (28630) - 1 ball or 8 yds [8 m]
  • 07
    Contrast F - Hot Pink (28416) - 1 ball or 9 yds [9 m]
  • 08
    Contrast G - Wine (28532) - 1 ball or 21 yds [20 m]
  • 09
    Contrast H - Natural (28008) - 1 ball or 21 yds [20 m]

β€” Tools Required

  • 01
    US J/10 (6 mm) crochet hook or size needed to obtain gauge
  • 02
    Stuffing (polyester fiberfill)
  • 03
    Piece of cardboard 2" [5 cm] for winding pom-poms
  • 04
    Scissors
  • 05
    Yarn needle for sewing and weaving in ends
  • 06
    Pins for positioning pieces while seaming (optional)

Progress Tracker

0% Complete

β€” Pattern Instructions :

Info :

A cute little rainbow to brighten your day! This colorful stuffie is worked in two simply shaped single crochet stitch pieces that are seamed together and stuffed before fluffy pom-pom clouds are attached across the bottom.

Info :

Note: To change color, work to last 2 loops on hook, yoh with new color. Pull through 2 loops on hook to complete st and proceed in new color.

Front and Back (make alike) :

With A, ch 8.

1st row :

(RS). 1 sc in 2nd ch from hook (counts as ch 1. 1 sc). 1 sc in next ch. 2 sc in next ch. 1 sc in next ch. 2 sc in next ch. 1 sc in each of last 2 ch. Turn. (9 sc).

2nd row :

Ch 1. 1 sc in each of first 2 sc. 2 sc in each of next 5 sc. 1 sc in each of last 2 sc. Join B. Break A. Turn. (14 sc).

3rd row :

With B, ch 1. 1 sc in each sc across. Join C. Break B. Turn.

4th row :

With C, ch 1. 1 sc in each of first 3 sc. 2 sc in next sc. 1 sc in next sc. 2 sc in next sc. 1 sc in each of next 3 sc. Join D. Break C. Turn. (18 sc).

5th row :

With D, ch 1. 1 sc in each of first 5 sc. 2 sc in next sc. 1 sc in next sc. 2 sc in next sc. 1 sc in each of next 2 sc. 2 sc in next sc. 1 sc in next sc. 2 sc in next sc. 1 sc in each of next 5 sc. Join E. Break D. Turn. (22 sc).

6th row :

With E, ch 1. 1 sc in each of first 4 sc. 2 sc in next sc. (1 sc in next sc. 2 sc in next sc) 3 times. (2 sc in next sc. 1 sc in next sc) 4 times. 1 sc in each of last 3 sc. Join F. Break E. Turn. (30 sc).

7th row :

With F, ch 1. 1 sc in each sc across. Join G. Break F. Turn.

8th row :

With G, ch 1. 1 sc in each of first 10 sc. (2 sc in next sc. 1 sc in next sc) twice. 2 sc in each of next 2 sc. (1 sc in next sc. 2 sc in next sc) twice. 1 sc in each of last 10 sc. Turn. (36 sc).

9th row :

Ch 1. 1 sc in each sc across. Fasten off.

β€” Flat Slip Stitch Join Method :

Info :

Flat Slip Stitch Join Method = With RS facing, insert hook into back loop only of first stitch on one side of seam and into back loop only of first stitch on other side of seam. With working yarn behind both pieces, pull up a loop through back loops and loop on hook to slip stitch the seams together. Repeat for each set of stitches along seam.

β€” Finishing :

Info :

With WS facing each other, sew Front and Back tog using appropriate color while aligning stripes and leaving a small opening for stuffing. Stuff stuffie, making sure to maintain Rainbow shape. Sew opening closed.

Info :

Note: To sew the inner arc of Rainbow closed, I used a strand of A and a flat slip stitch join method across. To seam top arc of Rainbow closed, I used a strand of G and flat slip stitch join method across. To sew the bottoms of the Rainbow closed, I used a strand of yarn (any shade) and sewed them together.

β€” Pom-Poms :

2" [5 cm] Pom-Poms (make 4) :

Wind yarn around 2" [5 cm] piece of cardboard 40 times. Tie tightly in the middle and leave a long end for attaching to Rainbow. Cut loops at both ends and trim to smooth round shape.

Info :

Using long ends, sew 2 pom-poms evenly across each bottom of Rainbow (as shown in photo).

Assembly Instructions

  • With WS (wrong sides) facing, align Front and Back pieces so the colour stripes match, then sew them together using the appropriate contrast color, leaving a small opening for stuffing.
  • Stuff the rainbow through the opening, shaping the arc as you go so the rainbow maintains its curved form; close and sew the opening securely when stuffing is complete.
  • To close the inner arc of the rainbow, use a strand of Contrast A (Dark Mauve) and the Flat Slip Stitch Join Method across the seam for a neat, flat join.
  • To close the top arc of the rainbow, use a strand of Contrast G (Wine) and the Flat Slip Stitch Join Method across the seam to keep the top edge tidy.
  • Make four 2" [5 cm] pom-poms and use the long yarn tails to sew two pom-poms evenly spaced across each bottom edge of the rainbow for the cloud detail.

Important Notes

  • πŸ’‘Use the specified colour change method (work to last 2 loops, yoh with new colour and pull through 2 loops) to keep colour transitions tidy.
  • πŸ’‘Match stripes carefully before seaming and pin pieces together to ensure symmetrical alignment across the seam.
  • πŸ’‘Test your gauge before beginning; 10 sc and 11 rows = 4" [10 cm] to ensure the finished rainbow measures approximately 7" x 6".
  • πŸ’‘Stuff gradually and evenly to maintain the rainbow curve without overfilling, which can distort the shape.

This bright little rainbow is designed to bring a smile and a pop of colour to any nook of your home! The chunky yarn stripes and fluffy pom-poms make it a tactile, joyful accent you can finish in an afternoon. Make a bunch in different colourways as personalised gifts or playful decor pieces. 🌈🧢✨

You ask,

we answer.

FAQs

What size will the finished piece be?

The finished rainbow measures approximately 7" [18 cm] wide x 6" [15 cm] tall when using the recommended Bernat Softee Chunky yarn and a US J/10 (6 mm) hook.

Can I use different yarn weights for this pattern?

Yes, you can use different yarn weights, but this will change the final size; adjust your hook to obtain the gauge of 10 sc and 11 rows = 4" [10 cm] for similar dimensions.

Do I need prior crochet experience for this pattern?

This pattern is rated Beginner Friendly and uses basic single crochet shaping and simple colour changes, so basic crochet knowledge is sufficient.

How long does this project typically take to complete?

Most crocheters can finish this rainbow in about 2-3 hours, though time may vary depending on experience and how much time you spend on finishing and pom-poms.