🧢 Beautiful ✨ Detailed πŸ’ Adorable

Vinyl Record Coasters Pattern

Vinyl Record Coasters Pattern
4.1β˜… Rating
2-3 Hours Time Needed
3.3K Made This
βœ‚οΈ

Beginner Friendly Level

Perfect for those just starting their crochet journey, with clear instructions and simple techniques

⏱️

Bite-Sized Project

Finishes in 2-4 hoursβ€”perfect for an afternoon of creative relaxation.

🏑

Cozy Accent

A warm touch for your space that transforms ordinary corners into inviting nooks filled with handmade charm.

About This Vinyl Record Coasters Pattern

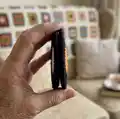
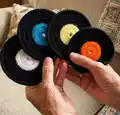
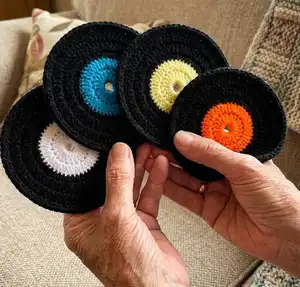
This pattern creates fun, circular vinyl record coasters worked in rounds with a contrasting centre. You will make a small insert in a contrast colour then work the black vinyl portion to form the record. The pattern includes both UK and US terminology so you can follow whichever version you prefer. Finished coasters measure approximately 13cm / 5.5 inches across.

Vinyl Record Coasters Pattern crochet pattern - detailed view of completed project

Perfect for using scrap yarn and quick makes, these coasters are a stylish, handmade home accessory. Detailed row-by-row instructions and finishing notes are provided for neat results.

Why You'll Love This Vinyl Record Coasters Pattern

I absolutely love this pattern because it turns simple stitches into a playful, nostalgic coaster that brings personality to any table. I enjoy how quickly each coaster comes together, making it satisfying to complete multiple in an afternoon. The contrast centre gives you a chance to use small scraps of bright yarn, which I always find rewarding. I also appreciate including both UK and US terms so more crocheters can use the pattern comfortably.

Vinyl Record Coasters Pattern step 1 - construction progress Vinyl Record Coasters Pattern step 2 - assembly progress Vinyl Record Coasters Pattern step 3 - details and accessories Vinyl Record Coasters Pattern step 4 - final assembly and finishing

Switch Things Up

I love to change up the contrast centre to make themed coaster sets; try pastel centres for a soft look or neon for a bold retro set.

I often switch yarn weight and hook size to create mini keyring versions or large placemat-style records; adjust counts as needed.

I sometimes add embroidered lines radiating from the centre to mimic record grooves for extra detail and texture.

I recommend trying variegated yarn for the centre to give each coaster a unique spin without extra effort.

For a sturdier coaster, I use a slightly thicker yarn for the vinyl portion or add a thin felt backing glued in place for protection.

I like to crochet multiple contrast inserts in different colours then work the black vinyl rounds to match, mixing and matching for sets.

To make coaster sets as gifts I personaliz e them with stitched initials on the reverse using the contrasting yarn tail.

I sometimes use metallic thread in the centre for a subtle shimmer that catches the light and feels special.

Want to make them washable? I choose yarns labeled machine washable and weave ends tightly to prevent fraying after laundering.

I also experiment with combining two thin threads held together to create slightly thicker texture while keeping stitch definition.

Finally, I enjoy making a full collection in seasonal coloursβ€”think pastel spring tones, autumnal blends, or festive metallic accentsβ€”so the pattern is great for customization.

Common Mistakes & How to Fix Them

βœ— Skipping the stitch marker when working continuous rounds causes you to lose track of the start of the round; place a marker at the last stitch of each row as suggested so you always know where the round begins. βœ— Cutting ends too short before securing them can cause your ends to pull out later; leave the 10cm ends as instructed and weave them in securely through the back of the nearest stitches before trimming flush. βœ— Working with inconsistent tension makes the coaster edges ripple or become too tight; maintain even, relaxed tension and check your gauge by measuring the coaster as you work to keep it approximately 13cm. βœ— Rushing increases without counting results in incorrect stitch counts and a misshapen coaster; count stitch totals at the end of each row (the pattern shows expected counts) and correct any mistakes right away.

Vinyl Record Coasters Pattern

Create charming vinyl record coasters to add a retro touch to your home. This pattern gives clear UK and US term versions so you can work in the terminology you prefer. The project is small, satisfying and perfect for using up scrap yarn while making a practical decorative set. Ideal for gifting or decorating tabletops with handmade flair.

Beginner Friendly 2-3 Hours

Materials Needed for Vinyl Record Coasters Pattern

β€” Main Fabric

  • 01
    Hayfield Bonus Black 0965 – 15g (main vinyl colour)
  • 02
    Hayfield Bonus Contrast – 2g (contrast centre colour)

β€” Tools Required

  • 01
    3mm Crochet Hook
  • 02
    Wool Needle (for sewing/weaving ends)
  • 03
    Stitch Marker (to mark last stitch of each round)
  • 04
    Scissors (for cutting ends)

Progress Tracker

0% Complete

β€” Contrast Insert (UK) :

Row 1 :

leaving a 10cm end, ch8, sl st to join (8)

Row 2 :

ch2, tr x21 into centre circle, sl st to join at top of ch2 (22, ch2 counts as 1st st)

Row 3 :

ch2, trinc into base of same st, trinc) x21, sl st to join at top of ch2 (44, ch2 counts as 1st st)

Info :

F/O leaving a 10cm end.

Info :

Secure ends with a couple of small sts before weaving through back of nearest tr sts and cutting flush to finish.

β€” Vinyl (UK) :

Row 4 :

leaving a 10cm end, FP(htr) into top of any of the tr sts in previous row, FP(htr) into next 43 sts, sl st to join at top of 1st FP(htr) (44)

Row 5 :

ch2, trinc into next st, (tr into next st, trinc) x21, sl st to join at top of ch2 (66, ch2 counts as 1st st)

Row 6 :

ch2, tr into next st, trinc, (tr into next 2sts, trinc) x21, sl st to join at top of ch2 (88, ch2 counts as 1st st)

Info :

THE COASTER WILL BE SLIGHTLY WAVY AT THIS STAGE BUT THE LAST ROW WILL FLATTEN IT BACK OUT.

Row 7 :

ch1, htr into next 87sts, sl st to join at top of ch1 (88, ch1 counts as 1st st)

Info :

F/O leaving a 10cm end.

Info :

Secure ends with a couple of small sts before weaving through back of nearest htr sts and cutting flush to finish.

β€” Contrast Insert (US) :

Row 1 :

leaving a 10cm end, ch8, sl st to join (8)

Row 2 :

ch2, dc x21 into centre circle, sl st to join at top of ch2 (22, ch2 counts as 1st st)

Row 3 :

ch2, dcinc into base of same st, dcinc) x21, sl st to join at top of ch2 (44, ch2 counts as 1st st)

Info :

F/O leaving a 10cm end.

Info :

Secure ends with a couple of small sts before weaving through back of nearest dc sts and cutting flush to finish.

β€” Vinyl (US) :

Row 4 :

leaving a 10cm end, FP(hdc) into top of any of the dc sts in previous row, FP(hdc) into next 43 sts, sl st to join at top of 1st FP(hdc) (44)

Row 5 :

ch2, dcinc into next st, (dc into next st, dcinc) x21, sl st to join at top of ch2 (66, ch2 counts as 1st st)

Row 6 :

ch2, dc into next st, dcinc, (dc into next 2sts, dcinc) x21, sl st to join at top of ch2 (88, ch2 counts as 1st st)

Info :

THE COASTER WILL BE SLIGHTLY WAVY AT THIS STAGE BUT THE LAST ROW WILL FLATTEN IT BACK OUT.

Row 7 :

ch1, hdc into next 87sts, sl st to join at top of ch1 (88, ch1 counts as 1st st)

Info :

F/O leaving a 10cm end.

Info :

Secure ends with a couple of small sts before weaving through back of nearest hdc sts and cutting flush to finish.

Assembly Instructions

  • Secure ends of contrast insert and vinyl rounds by making a couple of small stitches and then weaving the 10cm tails through the back of the nearest stitches before trimming flush.
  • When joining rounds, place a stitch marker at the last stitch of each round as described in the note so you can keep track of your continuous rounds.
  • After completing Row 6 the coaster may be slightly wavy; work Row 7 (the final row) as instructed to flatten the coaster back out and check the edge.
  • Weave the ends through the back posts of the nearest stitches (tr, dc, htr or hdc depending on version) for a tidy finish and to conceal tails completely.
  • Block lightly or press with a warm steam (if yarn allows) to smooth and set the coaster shape before display or gifting.

Important Notes

  • πŸ’‘Unless stated work in continuous rounds marking last stitch of each row with a stitch marker before proceeding with the next.
  • πŸ’‘Leave a 10cm end when fastening off so you have enough length to securely weave in and finish neatly.
  • πŸ’‘Secure ends with a couple of small stitches before weaving through the back of the nearest stitches and cutting flush to finish.
  • πŸ’‘The coaster may be slightly wavy after increases; the final row is designed to flatten the piece back out, so work the last row as stated.

These vinyl record coasters bring retro style to your table with a handmade twist. Fun to make and perfect for using small scrap yarns, they make charming gifts or quick craft fair items. Add bright contrast centres to personalize each coaster and enjoy a set full of character! 🧢🏠

You ask,

we answer.

FAQs

What size will the finished piece be?

The final coaster measures approximately 13cm / 5.5 inches across when worked with the recommended yarn and a 3mm hook.

Can I use different yarn weights for this pattern?

Yes, changing yarn weight will alter the finished size; use an appropriate hook for the yarn chosen and expect variations in final diameter.

Do I need prior crochet experience for this pattern?

This pattern is beginner friendly, so basic knowledge of stitches such as chains, half treble/half double, and treble/double crochet will be enough to complete it.

How long does this project typically take to complete?

Most crafters complete each coaster in 20-45 minutes and a full set in a few hours; overall time varies depending on speed and number of coasters made.