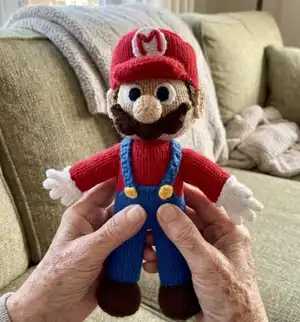
Bring Nintendo nostalgia to life with this detailed Super Mario crochet pattern. You will create a charming, fully assembled Mario amigurumi with hat, moustache, overalls and accessories. The pattern walks you through each piece — head, hat, arms, hands, pants, shoes and finishing — with clear rounds and assembly steps. Perfect for crafters who enjoy a multi-piece, character-based project.
Progress Tracker
0% Complete
— The head (in beige) (worked in spirals) :
Round 2 :
inc1sc in every st. =12
Round 3 :
1sc, inc1sc in next st. Repeat all round. =18
Round 4 :
2sc, inc1sc in next st. Repeat all round. =24
Round 5 :
3sc, inc1sc in next st. Repeat all round. =30
Round 6 :
Crochet 2sc and move your stitcher marker/starting point of the round to this point. Continue to work on the next step, do not finish the round.
Round 7 :
4sc, inc1sc in next st. Repeat all round. =36
Round 8 :
5sc, inc1sc in next st. Repeat all round. =42
Round 9 :
6sc, inc1sc in next st. Repeat all round. =48
Round 10 :
7sc, inc1sc in next st, 7sc, inc1sc in next st. Move your stitch marker/starting point of the round to this point. Continue to work on the next step. Do not finish the round.
Round 11 :
9sc, inc1sc in next st. Repeat all round. =55
Round 12 :
10sc, inc1sc in next st. Repeat all round. =60
Round 13 :
11sc, inc1sc in next st. Repeat all round. =65
Round 14 :
Crochet 12 rounds of sc. =65
Round 15 :
11sc, sc2tog. Repeat all round. =60
Round 16 :
10sc, sc2tog. Repeat all round. =55
Round 17 :
Crochet 5sc and move your stitch marker/starting point of the round to this point. Continue to work on the next step, do not finish the round.
Round 18 :
9sc, sc2tog. Repeat all round. =50
Round 19 :
6sc, sc2tog, 6sc, sc2tog, 4sc. Move your stitch marker/starting point of the round to this point. Continue to work on the next step, do not finish the round. =48
Round 20 :
6sc, sc2tog. Repeat all round. =42
Round 21 :
5sc, sc2tog. Repeat all round. =36
Round 22 :
4sc, sc2tog. Repeat all round. =30
Round 23 :
Crochet 3sc and move your stitch marker/starting point of the round to this point. Continue to work on the next step, do not finish the round.
Round 24 :
Stuff the head with fiberfill.
Round 25 :
3sc, sc2tog. Repeat all round. =24
Round 26 :
2sc, sc2tog. Repeat all round. =18
Round 27 :
Stuff the head with fiberfill.
Round 28 :
1sc, sc2tog. Repeat all round. =12
Round 29 :
sc2tog and repeat all round. =6
Round 30 :
sc3tog, sc2tog and fasten off.
— The ears (in beige) (worked in spirals) :
Round 2 :
inc1sc in every st. =12
Round 3 :
1sc, inc1sc in next st. Repeat all round. =18
Round 4 :
1sc, inc1sc in next st, 1sc, inc1sc in next st, 1sc, 13slst. =18
Round 5 :
8sc, 1slst and fasten off.
— The nose (in beige) (worked in spirals) :
Round 2 :
inc1sc in every st. =12
Round 3 :
1sc, inc1sc in next st. Repeat all round. =18
Round 4 :
Crochet 3 rounds of sc. =18
Round 5 :
1slst, slst2tog. Repeat all round. =12
Round 6 :
1slst and fatsen off.
Round 7 :
Stuff the nose with fiberfill.
— The hair (in brown) (worked in flat) :
Step 2 :
Crochet 4 rows of sc. After each row, ch1 and turn. =30
Step 3 :
skip 2st, crochet 8dc in next st, skip 2st, crochet 1slst in next st. Repeat until the end of the round.
— The sideburns (in brown) (worked in flat) :
Step 2 :
Start working in the 2nd ch st as counted from the crochet hook: 7sc. ch1, turn. =7
— The eyeballs (in white) (worked in spirals) :
Round 2 :
inc1sc in every st. =12
Round 3 :
inc1sc in next st, 1slst and fasten off.
— The pupils (in black) (worked in spirals) :
Round 2 :
1slst and fasten off.
— The hat, part one (in red) (worked in spirals) :
Round 2 :
inc1sc in every st. ch1, turn. =8
Round 3 :
Continue to work in flat: repeat 4x(1sc, inc1sc in next st). ch1, turn. =12
Round 4 :
Repeat 4x(2sc, inc1sc in next st). ch1, turn. =16
Round 5 :
Repeat 4x(3sc, inc1sc in next st). ch1, turn. =20
Round 6 :
Repeat 4x(4sc, inc1sc in next st). ch1, turn. =24
Round 7 :
Repeat 4x(5sc, inc1sc in next st). ch1, turn. =28
Round 8 :
Crochet 2 rows of sc. ch1, turn. =28
Round 9 :
Repeat 4x(5sc, sc2tog). ch1, turn. =24
Round 10 :
Repeat 4x(4sc, sc2tog). ch1, turn. =20
Round 11 :
Repeat 4x(3sc, sc2tog). ch1, turn. =16
Round 12 :
Repeat 4x(2sc, sc2tog). ch1, turn. =12
Round 13 :
Repeat 4x(1sc, sc2tog). ch1, turn. =8
Round 14 :
Repeat 4x(sc2tog). ch1, turn. =4
Round 15 :
sc2tog, sc2tog. ch1, turn. =2
Round 16 :
1slst and fasten off.
— The hat, part two (in red) (worked in spirals) :
Round 1 :
ch60, close the ch with a slst. =60
Round 2 :
Crochet 6 rounds of sc. =60
Round 3 :
30sc, repeat 5x(5sc, inc1sc in next st). =65
Round 4 :
30sc, repeat 5x(6sc, inc1sc in next st). =70
Round 5 :
Repeat 3x(8sc, sc2tog), 40sc. =67
Round 6 :
Repeat 3x(7sc, sc2tog), 40sc. =64
Round 7 :
Repeat 8x(6sc, sc2tog). =54
Round 8 :
Repeat 8x(5sc, sc2tog). =48
Round 9 :
Repeat 3x(4sc, sc2tog), repeat 3x(8sc, sc2tog). =42
Round 10 :
Repeat 3x(3sc, sc2tog), repeat 3x(7sc, sc2tog). =36
Round 11 :
Repeat 3x(2sc, sc2tog), repeat 3x(6sc, sc2tog). =30
Round 12 :
Repeat 3x(1sc, sc2tog), repeat 3x(5sc, sc2tog). =24
Round 13 :
Repeat 3x(sc2tog), repeat 3x(4sc, sc2tog). =18
Round 14 :
3sc, repeat 3x(3sc, sc2tog). =15
Round 15 :
1sc, repeat 7x(sc2tog). =8
Round 16 :
4sc, sc2tog, sc2tog. =6
Round 17 :
sc3tog, sc2tog, fasten off.
— The circle on the hat (in white) (worked in spirals) :
Round 2 :
inc1sc in every st. =12
Round 3 :
1sc, inc1sc in next st. Repeat all round. =18
Round 4 :
2sc, inc1sc in next st. Repeat all roun.d. =24
Round 5 :
1slst and fasten off.
— The embroidery on the hat (in red) :
Step 1 :
Make a ch of slst of about 10cm / 4" in length.
Step 2 :
Do not fasten off yet.
Step 3 :
Sew the chain onto the white circle into the shape of an 'M'. If necessary, add or remove a couple ch st to make it fit.
— The moustache (in brown) (worked in flat) :
Step 2 :
Start working in the 2nd ch st as counted from the crochet hook: 19sc, inc2sc in last st. Turn. =22
Step 3 :
Continue to work on the bottom of the foundation chain: 19sc, inc2sc in next st. You have now created a new round counting 42st. =44
Step 4 :
Continue to work in spirals: 19sc, repeat 3x(inc1sc in next st), 19sc, repeat 3x(inc1sc in next st). =50
Step 5 :
1sc, skip 2st, crochet 8dc in next st, skip 1st, crochet 1slst in next st.
Step 6 :
1sc, skip 2st, crochet 8dc in next st, skip 2st, crochet 1slst in next st, 1sc, skip 2st, crochet 8dc in next st, skip 1st, crochet 8dc in next st, 1sc, skip 2st, crochet 8dc in next st, 0sc.
Step 7 :
skip 1 st, crochet 1slst in next st, 0sc.
Step 8 :
Repeat steps 5, 6 and 7 once more.
Step 9 :
Crochet 35sc, 1slst and fasten off.
Step 10 :
Double fold the moustache, sew the two parts onto each other and stuff the moustache with fiberfill while doing so.
— The arms (in red) (worked in spirals) :
Step 1 :
ch20, close the ch with a slst.
Step 2 :
Crochet 25 rounds of sc. =25
Step 3 :
Cut off the red yarn and continue to work in white: crochet 2 rounds of sc. =25
Step 4 :
Fold the red end of the arm inwards, as pictured below.
Step 5 :
Fold back 1 round of sc of the white part.
Step 6 :
Secure both folds by sewing the layers onto each other.
Step 7 :
Repeat 4x(2sc, inc1sc in next st). 2sc. =18
Step 8 :
Flatten the hand. 2sc, skip 12sc, crochet 4sc.
Step 9 :
Crochet 2 rounds of sc. =6
Step 10 :
sc2tog and repeat all round. =3
Step 11 :
1slst and fasten off.
Step 12 :
Cast on next to the 1st finger. Crochet 3sc, skip 6st, 3sc. =6
Step 13 :
Crochet 2 rounds of sc. =6
Step 14 :
sc2tog and repeat all round. =3
Step 15 :
1slst and fasten off.
Step 16 :
Cast on on one of the remaining stitches. Crochet 3 rounds of sc. =6
Step 17 :
sc2tog and repeat all round. =3
Step 18 :
1slst and fasten off.
Step 19 :
Cast on on the remaining hole for the thumb.
Step 21 :
sc2tog and repeat all round. =3
Step 22 :
1slst and fasten off.
Step 23 :
Make 2 in total.
Step 24 :
Place the hands inside the arms and sew them in place. Make sure not to stuff the arms with fiberfill.
— The hands (in beige) (worked in spirals) :
Round 2 :
1sc, inc1sc in next st. Repeat all round. =15
Round 3 :
Crochet 2 rounds of sc. =15
Round 4 :
2sc, inc1sc in next st. Repeat all round. =20
Round 6 :
Skip 6st, crochet 1sc. Move your stitch marker/starting point of the round to this point. Continue to work on the next step, do not finish the round. =14
Round 7 :
Repeat 4x(2sc, inc1sc in next st). 2sc. =18
Round 8 :
Flatten the hand. 2sc, skip 12sc, crochet 4sc.
Round 9 :
Crochet 2 rounds of sc. =6
Round 10 :
sc2tog and repeat all round. =3
Round 11 :
1slst and fasten off.
Round 12 :
Cast on next to the 1st finger. Crochet 3sc, skip 6st, 3sc. =6
Round 13 :
Crochet 2 rounds of sc. =6
Round 14 :
sc2tog and repeat all round. =3
Round 15 :
1slst and fasten off.
— The belly (in red) (worked in spirals) :
Round 1 :
ch50, close the ch with a slst. =50
Round 2 :
Crochet 19 rounds of sc. =50
Round 3 :
3sc, sc2tog. Repeat all round. =40
Round 4 :
2sc, sc2tog. Repeat all round. =30
Round 5 :
1sc, sc2tog. Repeat all round. =20
Round 6 :
Fasten off, leave a strand of 30cm / 12" attached to the belly. Use this later on to sew on the head.
Round 7 :
Stuff the belly with fiberfill.
— The buttons (in yellow) (worked in spirals) :
Round 2 :
1slst and fasten off.
— The shoes (in brown) (worked in spirals) :
Round 2 :
Start working in the 2nd ch st as counted from the crochet hook: 3sc, inc2sc in next st. Turn. =6
Round 3 :
Continue to work on the bottom side of the foundation chain: 3sc, inc2sc in next st. You have now created a new round counting 12sc. =12
Round 4 :
Continue to work in spirals: repeat 2x(4sc, inc1sc in next st, inc1sc in next st). =16
Round 5 :
4sc, repeat 4x(inc1sc in next st), 4sc, repeat 4x(inc1sc in next st). =24
Round 6 :
4sc, repeat 4x(1sc, inc1sc in next st), 4sc, repeat 4x(1sc, inc1sc in next st). =32
Round 7 :
4sc, repeat 4x(2sc, inc1sc in next st), 4sc, repeat 4x(2sc, inc1sc in next st). =40
Round 8 :
4sc, repeat 4x(3sc, inc1sc in next st), 4sc, repeat 4x(3sc, inc1sc in next st). =48
Round 9 :
Crochet 5 rounds of sc. =48
Round 10 :
4sc, repeat 4x(3sc, sc2tog), 24sc. =44
Round 12 :
4sc, repeat 4x(2sc, sc2tog), 24sc. =40
Round 14 :
4sc, repeat 4x(1sc, sc2tog), 4sc, repeat 4x(3sc, sc2tog). =32
Round 15 :
16sc, repeat 4x(1sc, sc2tog). =20
Round 16 :
Stuff the shoe with fiberfill.
Round 17 :
4sc, repeat 2x(sc2tog), 4sc, repeat 4x(sc2tog). =14
Round 18 :
sc2tog and repeat all round. =7
Round 19 :
Stuff the shoe with fiberfill.
Round 20 :
Push the sides of the remaining gap towards each other by pushing the shoe into a more oval shape and sew the remaining hole shut.
— The pants (in blue) (worked in spirals) :
Round 1 :
ch25, close the ch with a slst. =25
Round 2 :
Crochet 19 rounds of sc. =25
Round 3 :
Cut off the yarn, but do not fasten off.
Round 4 :
Repeat steps 1 and 2.
Round 5 :
Continue to work on the 1st leg, continue to crochet where you cut off the yarn at step 3. Continue to use the yarn of the 2nd leg. Crochet 25sc on the 1st leg, and 25 on the 2nd. You have now created a new round counting 50sc. =50
Round 6 :
Crochet 13 rounds of sc. =50
Round 7 :
8sc, 1slst and turn.
Round 8 :
Start working in the 3rd loop as counted from the crochet hook (the last sc of step 7): crochet 1slst, 15sc, 1slst, turn. =17
Round 9 :
Start working in the 3rd loop as counted from the crochet hook: 1slst, 14sc, 1slst, turn. =16
Round 10 :
Start working in the 3rd loop as counted from the crochet hook: 1slst, 12sc, 1slst. =14
— The braces (in blue) (worked in flat) :
Step 1 :
Make the back of the pants face you and locate the 9sc right in the centre of the pants.
Step 2 :
Cast on the yarn on the left 3sc of those 9sc.
Step 3 :
Crochet 34 rows of sc in those 3sc. After each row, ch1 and turn. After the last row, fasten off.
Step 4 :
Keep a distance of 3sc between the first brace and the second.
Step 5 :
Cast on the yarn on the right 3sc of the 9sc in the centre of the pants.
Step 6 :
Crochet 34 rows of sc in those 3sc. After each row, ch1 and turn. After the last row, fasten off.
Step 7 :
Sew the belly inside the pants.
Step 8 :
Stuff the pants and belly.
— How to sew all parts together :
Step 1 :
Sew the buttons onto the ends of the braces.
Step 2 :
Flip the braces over to the front of the body and sew them onto the pants.
Step 3 :
Sew the arms onto the body.
Step 4 :
Sew the shoes onto the pants.
Step 5 :
Sew the 1st part of the hat, the brim, onto the 2nd part of the hat. Stuff the hat.
Step 6 :
Sew the white circle with embroidery onto the front of the hat.
Step 7 :
Sew the hair onto the back of the hat.
Step 8 :
Sew the nose and ears onto the head, right in the middle.
Step 9 :
Sew the moustache onto the head, right below the nose.
Step 10 :
Sew the pupils onto the eyeballs.
Step 11 :
Sew the eyes onto the head, right next to the nose.
Step 12 :
Sew the sideburns right in front of the ears.
Step 13 :
Sew the hat onto the head.
This Super Mario amigurumi pattern gives you all the steps to create a beloved video game icon from head to toe. Whether you make one for yourself or as a handmade gift, the finished Mario is full of character and charm. Happy crocheting and enjoy bringing this classic plumber to life! 🧶🧵