🧢 Beautiful ✨ Detailed πŸ’ Adorable

Cowboy Cat Hat Pattern

Cowboy Cat Hat Pattern
4.5β˜… Rating
2-3 Hours Time Needed
2.9K Made This
βœ‚οΈ

Intermediate Level

Ideal for those with basic crochet experience, featuring slightly more advanced stitches and techniques to expand your skills.

⏱️

Bite-Sized Project

Finishes in 2-4 hoursβ€”perfect for an afternoon of creative relaxation.

🧣

Snug Essential

Everyday comfort with practical charm, designed for both functionality and style through changing seasons.

About This Cowboy Cat Hat Pattern

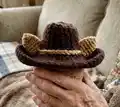
This pattern creates a small cowboy hat designed to fit adult cats (approx. 7-15lbs) and toy or miniature dog breeds. It features a shaped crown, ear holes, a curled brim, and an optional chin strap for secure wear. The hat is worked top-down in the round and uses simple increases, double crochet bridge shaping, and a final edging to create the classic cowboy look.

Cowboy Cat Hat Pattern crochet pattern - detailed view of completed project

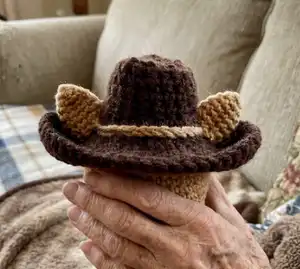
Finished hat measures about 3.5" tall with a 12" circumference and ear holes placed to accommodate cat ears. The pattern includes materials, stitch key, full round-by-round instructions, and finishing options to make the indent permanent.

Why You'll Love This Cowboy Cat Hat Pattern

I absolutely love this pattern because it turns a simple idea into a perfectly shaped, wearable accessory that pets can actually wear. I adore the playful cowboy silhouette and the way small shaping details (like the ear holes and pinched top) give the hat personality. I also appreciate that it uses common stitches so you can focus on shaping rather than learning new techniques. Sewing the band and pinching the crown is so satisfying and gives a professional, finished look that always delights me. Making one in bright colors or classic browns is a quick, rewarding project I enjoy gifting to friends with pets.

Cowboy Cat Hat Pattern step 1 - construction progress Cowboy Cat Hat Pattern step 2 - assembly progress Cowboy Cat Hat Pattern step 3 - details and accessories Cowboy Cat Hat Pattern step 4 - final assembly and finishing

Switch Things Up

I love customizing this hat by changing yarn color and weight; try bright pinks for a playful hat or classic brown for a traditional look.

I often switch to a bulkier yarn and a larger hook to create a chunkier, more dramatic brim for photographs.

To make a mini keychain or ornament, use fingering yarn and a very small hook to create a tiny version that captures the shape.

I sometimes add a braided or crocheted band with contrasting yarn for a decorative accent that really stands out.

Try embellishing the band with small buttons, a metal concho, or a tiny embroidered star to give a real cowboy feel.

If you want more structure in the brim, I add a length of floral wire inside the last row before finishing so the brim can be shaped and hold its fold.

For a safer option for very active pets, skip the chin strap and tack the hat lightly to a collar or use Velcro tabs to keep it in place temporarily.

I like to experiment with brim width by working additional rounds of edging or by using a larger hook for the final round to create a flared brim.

Try making a coordinating outfit by crocheting a small bow tie or bandana using the same yarn and colors as the hat.

Dont be afraid to alter ear hole placement to match your pets ear set; place them slightly wider or narrower by counting stitches before you cut yarn.

Common Mistakes & How to Fix Them

βœ— Skipping the note about working continuously until Round 9 can distort ear hole placement; follow the instruction to not slip stitch to join and work continuously until Round 9. βœ— Forgetting to count stitches after increases will throw off later shaping; count your stitches at the end of each round and confirm the bracketed stitch count. βœ— Pulling your tension too tight when working the ch 10 bridge can prevent the brim from flattening properly; use relaxed tension when working around ch spaces and block lightly if needed. βœ— Not pinching and securing the crown before finishing can lose the cowboy indent; pinch the top, test the look, then sew or tack the sides or follow the alternate permanent sewing method. βœ— Sewing the band on unevenly makes the hat look lopsided; place the band around the center, pin evenly, and baste or sew with small consistent stitches for symmetry.

Cowboy Cat Hat Pattern

Make an adorable cowboy-style hat for your cat or small dog with this friendly intermediate crochet pattern. Youll create a shaped hat with ear holes, a curled brim, and an optional chin strap β€” perfect for photos, costumes, or just for fun. Clear round-by-round instructions, materials list, and finishing tips help you make a polished, wearable accessory your pet can actually wear.

Intermediate 2-3 Hours

Materials Needed for Cowboy Cat Hat Pattern

β€” Main Fabric

  • 01
    Bulky / 5 weight yarn (Red Heart Saver Chunky or similar) Brown - 20g / 0.75oz, approx 34m / 38yd
  • 02
    Worsted / 4 weight yarn (Red Heart Super Saver or similar) Tan - small amount for band (>1g / 0.1oz, >2m/yd)
  • 03
    Extra small amounts of contrast yarn for decorative band if desired

β€” Tools Required

  • 01
    Crochet hook size 4.5mm (7) or as needed to obtain gauge
  • 02
    Optional: Crochet hook size 3.5mm (E-4) for scaling down the pattern
  • 03
    Yarn needle for finishing
  • 04
    Scissors
  • 05
    Stitch markers (recommended)
  • 06
    Pins for positioning band and sewing

Progress Tracker

0% Complete

β€” Info :

Infos :

Sizing: These hats are designed to fit adult cats (approx. 7-15lbs) and toy / miniature dog breeds. The finished hat measures about 3.5" tall with a 12" circumference, 2.5" forehead allowance, and 2.5" ear holes. To easily scale down this pattern for kittens/smaller pets, follow the pattern as written but substituting a 3.5mm / E-4 hook and Worsted / 4 / Medium weight yarn. Stitch Key (US terms): ch - chain. dc - double crochet. hdc - half double crochet. sk - skip. sp - space. ss - slip stitch. st - stitch. Special Stitches & Techniques: Dc in the ch sp (Round 9): indicates the dc stitches are made around (not in) the chs from the previous round. Notes: The hat is worked in the round, from the top down. Beginning chains do not count as stitches. Slip stitches at the end of each round are made in the top of the first dc from that round. Stitch counts are indicated after each round in [brackets], construction notes appear in (italic gray parenthesis). See Resources section at the end of the pattern for supporting images and video links. Gauge: 12 dc x 5 rows = 4" (10cm) square. Printing: To save on ink, print only page 2.

β€” Hat :

Round 1 :

in brown form a magic ring, sc 8 in the magic ring [8]

Round 2 :

sc 2 in each st all the way around [16]

Round 3 :

sc in each st all the way around [16]

Round 4 :

*(sc in the next 3 sts, sc 2 in the next st), repeat from * 3 more times [20]

Round 5 :

sc in each st all the way around [20]

Round 6 :

*(sc in the next 4 sts, sc 2 in the next st), repeat from * 3 more times [24]

Round 7 :

sc in each st all the way around, ss into the next st [24]

Round 8 :

repeat round 7, ss to join [24]

Round 9 :

(this round forms the ear holes) Ch 2 (does not count as stitch), Dc 2 in each of the next 6 sts, Ch 10, sk the next 6 sts, Dc 2 in each of the next 6 sts, Ch 10, sk the next 6 sts, ss to join [24]

Round 10 :

ch 1, * (sc in the first 3 sts, sc 2 in the next st), repeat from * 2 more times, Working around the ch 10 sp, (hdc 1, dc 10, hdc 1), *(sc in the first 3 sts, sc 2 in the next st), repeat from * 2 more times Working around the next ch 10 sp, (hdc 1, dc 10, hdc 1), ss to join. [54]

Round 11 :

turn, ch 1, sc in each st all the way around (creates a solid edge and helps the edges of the hat turn up like a cowboy hat). Ss to join and fasten off. [54]

β€” Band :

Band (P1) :

In tan, ch 35, ss to join. Place the band around the center of the hat and sew on the hat.

β€” Chin straps (2 - optional) :

Chin straps (2 - optional) :

Attach your yarn to the underside of the hat around the center 2 dc stitches from Round 10 above (should be the 5th and 6th dc, located at the middle of the ear hole). Ch 25, fasten off. Repeat on the other side.

β€” Finishing :

Finishing :

Weave in any ends. Turn the sides of the hat (near the ear holes) upwards. Push the top of the hat in down slightly so that it is indented about .5" and pinch the sides together to create the "cowboy" look. Alternately, to make the indent permanent, turn the hat inside out, fold in half so the ear holes line up, and sew both sides together along Round 2. Turn right side out.

Assembly Instructions

  • Place the tan band around the center of the hat and sew it in place with small, even stitches so the seam is hidden.
  • If adding chin straps, attach yarn to the underside of the hat at the center two dc stitches from Round 10 (these are the 5th and 6th dc at the middle of the ear hole), ch 25, fasten off, and repeat on the other side.
  • Turn the sides of the hat near the ear holes upwards, then push and pinch the crown top inward about 0.5" to form the cowboy indent and tack the sides together to secure the shape.
  • To make the indent permanent, turn the hat inside out, fold so ear holes align, and sew both sides together along Round 2, then turn the hat right side out.
  • Weave in all yarn ends and sew any loose edges securely; block lightly if desired to shape the brim for a polished finish.

Important Notes

  • πŸ’‘The hat is worked in the round, from the top down; follow round counts carefully to maintain shape.
  • πŸ’‘Beginning chains do not count as stitches; counts shown in brackets indicate actual stitch totals.
  • πŸ’‘Slip stitches at the end of each round are made in the top of the first dc from that round to create a neat join.
  • πŸ’‘Stitch counts are indicated after each round in [brackets], and construction notes appear in parentheses for clarity.

This cowboy cat hat is a playful, handcrafted accessory that adds charm to photos and special occasions. It mixes simple stitches with clever shaping to create a classic cowboy silhouette that pets can wear comfortably. Try it in classic brown or bright colors for a fun twist β€” your pet will be the star of the show! 🐱🧢🧡

You ask,

we answer.

FAQs

What size will the finished piece be?

The finished hat measures about 3.5" tall with a 12" circumference, 2.5" forehead allowance, and 2.5" ear holes when using the recommended yarn and hook.

Can I make this hat smaller for kittens?

Yes. To scale down the pattern for kittens or smaller pets, follow the same instructions but substitute a 3.5mm / E-4 hook and Worsted / 4 weight yarn; this will produce a smaller finished hat.

Do I need any special crochet skills to complete this pattern?

This pattern is rated intermediate and uses basic stitches (sc, hdc, dc) plus working in the round and shaping; basic crochet experience is recommended for best results.

How long will this project take to complete?

Most crocheters can finish this project in 2-3 hours, depending on experience and whether you add band or chin straps.

How can I make the cowboy indent permanent?

To make the indent permanent, turn the hat inside out, fold in half so the ear holes line up, and sew both sides together along Round 2. Turn the hat right side out when finished.