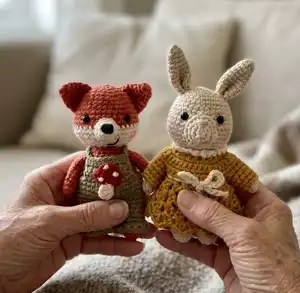
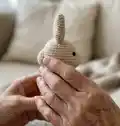
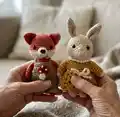
Create two charming autumn friends with this detailed crochet pattern: Victor Fox and Anna Bunny. You will enjoy working small pieces, color changes, and cute outfit options designed for play and display. The pattern includes full instructions for bodies, faces, outfits and finishing touches so you can crochet, dress, and style them with confidence.
Progress Tracker
0% Complete
— Victor Fox :
Info :
Note: all the parts of Victor Fox and Anna Bunny are crocheted in X stitches unless otherwise stated. Using DK Cotton by Ricorumi and the specified hooks throughout.
— Head :
Info :
Using color 025 (fox) and the 2.5 mm hook, make a magic ring:
Round 01 :
sc 6 into the ring (6)
Round 03 :
(sc 1, inc) x6 (18)
Round 04 :
(sc 2, inc) x6 (24)
Round 05 :
(sc 3, inc) x6 (30)
Round 06-07 :
(2 rounds) sc around (30)
Round 08 :
(sc 4, inc) x6 (36)
Round 09-11 :
(3 rounds) sc around (36)
Info :
On the next round, we'll start alternating colors to form Victor's cream snout. At each color change, make the last "yarn under" in the new color.
Round 12 :
(sc 17, inc) in 025 (fox), (sc 17, inc) in 002 (cream) (38)
Round 13-15 :
(3 rounds) sc 19 in 025 (fox), sc 19 in 002 (cream) (38)
Round 16 :
[(sc 2, dec) x4, sc 3] in 025 (fox), [(sc 2, dec) x4, sc 3] in 002 (cream) (30)
Info :
Insert the 5 mm safety eyes between rounds 10 and 11, 7 stitches apart, centering them above the color cream part. Stuff the head firmly.
Round 17 :
(sc 1, dec) x5 in 025 (fox), (sc 1, dec) x5 in 002 (cream) (20)
Round 18 :
dec x5 in 025 (fox), dec x5 in 002 (cream) (10)
Info :
Finish stuffing. Fasten off, leaving a long tail. With a yarn needle and color 002 (cream), make a whip stitch in the front loops of the last 10 stitches and tighten to close the hole. Weave in end.
— Muzzle :
Info :
Using color 002 (cream) and the 2.5 mm hook, make a magic ring:
Round 01 :
sc 6 into the ring (6)
Round 02 :
(sc 2, inc) x2 (8)
Round 03 :
(sc 3, inc) x2 (10)
Round 04 :
sc 2, inc, sc 4, inc, sc 2 (12)
Info :
Fasten off, leaving a tail for sewing. Using color 060 (black), embroider the nose at the end of the muzzle. Stuff the muzzle lightly and sew it between rounds 11 and 14, centered between the eyes. Using color 060 (black), embroider a smiling mouth under the muzzle, 3 stitches wide. Put some blusher on the cheeks.
— Ears (make 2) :
Info :
Using color 025 (fox) and the 2.5 mm hook, make a magic ring:
Round 01 :
sc 6 into the ring (6)
Round 02 :
(sc 1, inc) x3 (9)
Round 04 :
(sc 2, inc) x3 (12)
Round 05 :
(sc 3, inc) x3 (15)
Info :
Fasten off, leaving a tail for sewing. Sew the ears on each side of the head, between rounds 4 and 8.
— Legs (make 2) :
Info :
Using color 025 (fox) and the 2.5 mm hook, make a magic ring:
Round 01 :
sc 5 into the ring (5)
Round 03 :
BLO sc around (10)
Round 04 :
sc 1, dec x4, sc 1 (6)
Round 05 :
FLO *sc 1, inc x4, sc 1* (10)
Round 06-09 :
(4 rounds) sc around (10)
Info :
Stuff the legs firmly. 1st leg: fasten off and weave in end. 2nd leg: don't fasten off, continue with the body!
— Body :
Info :
At the end of leg 2, make a few replacement sc (I made 3): you should now be in the middle of the inner part of the leg:
Round 10 :
ch 2, insert your hook in leg 1 (in the middle of the inner part): sc 4, inc, sc 5, on the other side of chain 2: inc x2, and now back on leg 2: sc 5, inc, sc 4 (28)
Round 11-14 :
(4 rounds) sc around (28)
Info :
Note: on round 15, adjust the number of stitches before and after the bobble stitch, if necessary, so that the belly button is centered!
Round 15 :
sc 15, 3dc-bobble stitch, sc 12 (28)
Round 16-17 :
(2 rounds) sc around (28)
Round 18 :
(sc 5, dec) x4 (24)
Round 20 :
(sc 4, dec) x4 (20)
Round 22 :
(sc 3, dec) x4 (16)
Info :
Fasten off, leaving a tail for sewing. Stuff the body firmly! Sew the head on the body.
— Arms (make 2) :
Info :
Using color 025 (fox) and the 2.5 mm hook, make a magic ring:
Round 01 :
sc 6 into the ring (6)
Round 02-10 :
(9 rounds) sc around (6)
Info :
Fasten off, leaving a tail for sewing. Don't stuff the arms. Sew them on each side of the body, between rounds 20 & 21. Note: you can insert a small piece of wire into the body and thread the arms onto it before sewing them to the body if you want posable positions.
— Tail :
Info :
Using color 002 (crème) and the 2.5 mm hook, make a magic ring:
Round 01 :
sc 4 into the ring (4)
Round 03 :
sc 2, inc, sc 1, inc (7)
Round 04 :
sc 3, inc, sc 3 (8)
Round 06 :
Change to color 025 (fox): (sc 3, inc) x2 (10)
Round 07-11 :
(5 rounds) sc around (10)
Round 12 :
sc 1, dec x2, sc 1, dec x2 (6)
Info :
Stuff the tail lightly. Pinch the top of the tail and close the opening with 3 sc, inserting the hook in both sides at the same time. Fasten off, leaving a tail for sewing. Sew the tail at the back of the body, between rounds 12 and 13.
— Anna Bunny :
Info :
Follow Victor Fox's instructions for body, legs and arms using color 051 (mastic). Below are Anna's specific head, muzzle and ear instructions.
— Head :
Info :
Using color 051 (mastic) and the 2.5 mm hook, make a magic ring:
Round 01 :
sc 6 into the ring (6)
Round 03 :
(sc 1, inc) x6 (18)
Round 04 :
(sc 2, inc) x6 (24)
Round 05 :
(sc 3, inc) x6 (30)
Round 06-07 :
(2 rounds) sc around (30)
Round 08 :
(sc 4, inc) x6 (36)
Round 09-11 :
(3 rounds) sc around (36)
Round 12 :
(sc 17, inc) x2 (38)
Round 13-15 :
(3 rounds) sc around (38)
Round 16 :
(sc 2, dec) x4, (sc 3, dec) x4, sc 2 (30)
Info :
Insert the 5 mm safety eyes between rounds 9 and 10, 7 stitches apart. Stuff the head firmly.
Round 17 :
(sc 1, dec) x10 (20)
Info :
Finish stuffing. Fasten off leaving a long tail. With a yarn needle, make a whip stitch in the front loops of the last 10 stitches and tighten to close the hole. Weave in end.
— Muzzle :
Info :
Using color 002 (crème) and the 2.5 mm hook, make a magic ring:
Round 01 :
sc 6 into the ring (6)
Round 03 :
(sc 1, inc) x6 (18)
Info :
Fasten off, leaving a tail for sewing. Using color 011 (pink), embroider the nose between rounds 2 and 3, 2 stitches wide, then a line descending under the starting magic ring. Using color 010 (smokey pink), embroider a smiling mouth between rounds 2 and 3. Sew the muzzle on the head, between rounds 9 and 15, centered between the eyes. Put some blusher on the cheeks.
— Ears (make 2) :
Info :
Using color 051 (mastic) and the 2.5 mm hook, make a magic ring:
Round 01 :
sc 6 into the ring (6)
Round 02 :
(sc 2, inc) x2 (8)
Round 04 :
(sc 3, inc) x2 (10)
Round 06 :
(sc 4, inc) x2 (12)
Round 07-10 :
(4 rounds) sc around (12)
Info :
Fasten off leaving a tail for sewing. Fold the ears in half and sew them on each side of the head, between rounds 4 and 6.
— Legs, Body, Arms :
Info :
Follow Victor Fox's instructions for legs, body and arms, using color 051 (mastic) for Anna.
— Tail (Anna) :
Round 01 :
Using color 051 (mastic) and the 2.5 mm hook, sc 6 into the ring (6)
Info :
Pinch the top of the tail without stuffing it and close the opening with 3 sc, inserting the hook in both sides at the same time. Fasten off, leaving a tail for sewing. Sew the tail at the back of the body, between rounds 12 and 13.
— Outfits (Victor & Anna) :
Info :
All outfits are crocheted in V stitches unless otherwise stated. The patterns below contain model variations and finishing touch instructions. Follow color and hook size specified for each item.
— Victor's Wardrobe - Sweater / Pant Outfit :
Info :
Note: the outfit is crocheted from top to bottom. Using color 052 light brown (model 1) or 075 reed (model 2) and the 2.5 mm hook, chain 25 and begin in the 2nd stitch from hook:
Round 01 :
sc 24, ch 1, turn (24)
Round 02 :
(sc 2, inc) x8, ch 1, turn (32)
Round 03 :
(sc 3, inc) x8, ch 1, turn (40)
Round 04 :
sc across, ch 1, turn (40)
Round 05 :
sc 6, ch 4, skip 8 stitches (=1st armhole), sc 12, ch 4, skip 8 stitches (=2nd armhole), sc 6, ch 1, turn (32)
Round 06 :
sc across, close with a sl st in 1st stitch (32)
Round 07 :
(sc 7, inc) x4 (36)
Round 08 :
sc 34, ch 2, skip 2 stitches (=beginning of the tail hole) (36)
Round 09 :
ch 2, skip 2 stitches (=end of the tail hole), sc 34 (36)
Info :
Change to color 057 chocolate (model 1) or 076 marsh green (model 2) :
Round 10 :
BLO sc around (36)
Round 11 :
(sc 7, dec) x4 (32)
Info :
1st leg of pants: Sc 1 to be centered, and put the stitch marker in the next stitch. Round 13 sc 14, leave the following stitches (14). Begin next round in the marked stitch: Rounds 14-17 (4 rounds) sc around (14). Fasten off and weave in end.
Info :
2nd leg of pants: Determine the 2 central stitches on each side and leave them free: crochet the 2nd leg in the remaining 14 stitches. Rounds 13-17 (5 rounds) sc around (14). Fasten off and weave in end. Close the opening left by the center stitches with a few stitches.
Info :
Sweater bottom: Using color 052 or 075 and the 2.5 mm hook, hold the outfit upside down and insert the hook in the front loops of round 10: 01 sc around (36). Fasten off and weave in end.
Info :
Sleeves (make 2): Using color 052 or 075 and the 2.5 mm hook, hold the outfit upright and insert the hook in the armhole corner, at the back: 01 sc around: the 4 sl st and the 8 skipped stitches (12). 02-05 (4 rounds) sc around (12). Fasten off and weave in end. Sew a snap button at the back, to close the sweater.
Info :
Finishing touches model 1: Using color 057 (chocolate) embroider 2 lines on the front of the sweater and using color 064 (mustard) embroider a small heart above the lines on the left side (heart embroidered in 2 loop stitches). Finishing touches model 2: pumpkin appliqué instructions: using color 024 (smokey orange) and the 2.5 mm hook, make a magic ring and follow the rounds to form the pumpkin, change to color 057 for details; fasten off and sew the pumpkin applique on the front of the sweater.
— Long Overalls :
Info :
Note: the overalls are crocheted from the bottom up. Using color 078 khaki (model 1) or 064 mustard (model 2) and the 2.5 mm hook, chain 14 and close with a slip stitch:
Round 01-02 :
(2 rounds) sc around (14)
Round 03 :
FLO sc around (14)
Round 04-07 :
(4 rounds) sc around (14)
Info :
1st leg of the overalls: fasten off and weave in end. 2nd leg of the overalls: don't fasten off, continue with the body! Fold over on round 3 to make a cuff.
Round 08 :
sc 14 on the 2nd leg of the overalls, ch 2, insert your hook in any stitch from leg 1: sc 14, sc 2 on the other side of ch 2 (32)
Round 09 :
(sc 7, inc) x4 (36)
Round 10-11 :
(2 rounds) sc around (36)
Round 12 :
sc 32, ch 4, skip 4 stitches (= tail hole) (36)
Round 14 :
(sc 7, dec) x4 (32)
Info :
Fasten off and weave in end. Top of the overalls: mark the 9 central stitches then insert your hook in the 1st marker: 01-04 (4 rows) sc 9, ch 1, turn (9). 05 sl st across (9). Don't fasten off! Continue with the straps: 1st strap: ch 12 then fasten off, leaving a tail for sewing. 2nd strap: insert the hook at the other end of the front part, chain 12, fasten off, leaving a tail for sewing. Cross the straps in the back and sew them to the back of the overalls, on either side of the tail hole.
Info :
Finishing touches model 1: Using color 002 (cream), embroider a heart on the front of the overalls. Finishing touches model 2: mushroom appliqué stem and cap instructions: Stem: using color 002 and 2.5 mm hook chain 5 begin in 2nd chain from hook: 01 dc 1, hdc 1, sc 1, sl st 1. Cap: using color 029 chain 3 begin in 2nd chain: 01 (sc 1, hdc 1, dc 1) in 1st, (dc 1, hdc 1, sc 1) in 2nd. Fasten off and sew stem and cap to the front of the overalls.
— Raincoat (Victor) :
Info :
Using color 006 (yellow) and the 3 mm hook.
Front (make 2) - Round 01-07 :
chain 8 and begin in 2nd stitch from hook: (7 rows) sc 7, ch 1, turn (7)
Round 08 :
dec, sc 5, ch 1, turn (6)
Round 09 :
sc 4, dec, ch 1, turn (5)
Round 10 :
dec, sc 3, ch 1, turn (4)
Info :
Fasten off, leaving a tail for sewing for each front panel. Back: chain 13 begin in 2nd stitch from hook: 01-07 (7 rows) sc 12, ch 1, turn (12) 08 dec, sc 8, dec, ch 1, turn (10) 09 dec, sc 6, dec, ch 1, turn (8) 10 dec, sc 4, dec, ch 1, turn (6) 11 dec, sc 2, dec (4). Fasten off.
Info :
Sleeves (make 2) note: leave a thread at the beginning (about 20 cm) Using color 006 and 3 mm hook chain 12 and begin in 2nd stitch from hook: 01-07 (7 rows) sc 11 ch 1 turn (11) 08 dec, sc 7, dec, ch 1, turn (9) 09 dec, sc 5, dec, ch 1, turn (7) 10 dec, sc 3, dec, ch 1, turn (5) 11 dec, sc 1, dec (3). Fasten off.
Assembly :
1. Assemble left front to first sleeve. 2. Assemble sleeve to back. 3. Assemble back to second sleeve. 4. Assemble sleeve to right front. 5. Then assemble under-sleeves and sides. Make an edge-to-edge seam to assemble each part. Sew 3 snap buttons on the front of the coat, one up, one in the middle and one down.
— Anna's Wardrobe - Flared Dress :
Info :
Main part: Using color 064 mustard (model 1) or 069 terracotta (model 2) and the 2.5 mm hook, chain 25 and begin in the 2nd stitch from hook:
Round 01 :
sc 24, ch 1, turn (24)
Round 02 :
(sc 2, inc) x8, ch 1, turn (32)
Round 03 :
(sc 3, inc) x8, ch 1, turn (40)
Round 04 :
sc across, ch 1, turn (40)
Round 05 :
sc 6, ch 4, skip 8 stitches (=1st armhole), sc 12, ch 4, skip 8 stitches (=2nd armhole), sc 6, ch 1, turn (32)
Round 06 :
sc across, close with a sl st in 1st stitch (32)
Round 07 :
BLO (ch 2, hdc 1, ch 2, hdc 2) in 1st stitch, skip 2 stitches, ([hdc 2, ch 2, hdc 2] in next, skip 2 stitches) x10 (11 clusters)
Round 08-10 :
(3 rounds) start with 2 sl st to get to the 1st space created by the ch 2 of the previous round, then (ch 2, hdc 1, ch 2, hdc 2) in this 1st space, (hdc 2, ch 2, hdc 2) in each space created by the ch 2 of the previous round x10 (11 clusters). Fasten off and weave in end.
Info :
Sleeves (make 2) and Collar instructions follow earlier sleeve method using color 064/069 and color 002 for collar. Finishing touches: Using color 002 (cream) embroider a line between rounds 6 and 7 of the dress. To make the bow chain 25 and tie, then sew to the embroidered line slightly to the side.
These tiny friends are perfect for gifting or decorating your autumn home with handmade charm. They come with multiple outfit options for endless play and customization. Make Victor in fox tones and Anna in warm pastels for a cozy seasonal pair. 🧶✨