🧢 Beautiful ✨ Detailed πŸ’ Adorable

Twinkling Snowflakes Crochet Pattern

Twinkling Snowflakes Crochet Pattern
4.2β˜… Rating
2-3 Hours Time Needed
3.4K Made This
βœ‚οΈ

Intermediate Level

Ideal for those with basic crochet experience, featuring slightly more advanced stitches and techniques to expand your skills.

⏱️

Bite-Sized Project

Finishes in 2-4 hoursβ€”perfect for an afternoon of creative relaxation.

🏑

Cozy Accent

A warm touch for your space that transforms ordinary corners into inviting nooks filled with handmade charm.

About This Twinkling Snowflakes Crochet Pattern

This pattern includes step-by-step instructions to crochet three different snowflake sizes with Bernat Handcrafter Holidays yarn. Each snowflake is worked in rounds from a center ring and finished with optional starching for a crisp shape. The designs include clusters, chains and picot-style edges to create a twinkling motif.
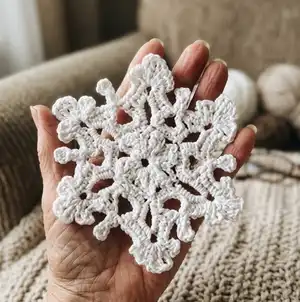
Twinkling Snowflakes Crochet Pattern crochet pattern - detailed view of completed project

Charts and written rounds are provided so you can follow the format you prefer. The finished snowflakes are great for ornaments, garlands, or festive gift toppers.

Why You'll Love This Twinkling Snowflakes Crochet Pattern

I absolutely love this pattern because it turns simple stitches into elegant, lacy snowflakes that catch the light. I enjoy how each round builds texture and dimension, creating a delicate finished piece that feels special. The pattern offers three sizes so I can make a set with just one ball of yarn, which is both economical and satisfying. Blocking and a light starch finish always make them look professionally made, and sharing them as gifts is a joyful way to spread handmade cheer.

Twinkling Snowflakes Crochet Pattern step 1 - construction progress Twinkling Snowflakes Crochet Pattern step 2 - assembly progress Twinkling Snowflakes Crochet Pattern step 3 - details and accessories Twinkling Snowflakes Crochet Pattern step 4 - final assembly and finishing

Switch Things Up

I love customizing these snowflakes by changing yarn weight and hook size to make different scales β€” try finer thread and a smaller hook for delicate doily-style ornaments.

I also switch colors for a festive look; metallic or colored sparkle yarns make striking variations for garlands and gift toppers.

For a sturdier ornament, I often coat the finished and blocked snowflake with diluted fabric stiffener instead of spray starch to hold shape longer.

To make a set, I create two of each size and string them on ribbon for a multi-size garland β€” it looks beautiful over a mantel.

I sometimes add a small bead or sequin at each point before blocking for an extra twinkle when hung near lights.

Try combining different stitch textures by substituting clusters with picot-edged points for a more frilly look β€” test on a sample first.

If you want hanging loops, I crochet a small chain loop and secure it during the final pressing so it sits perfectly at the top.

To create a vintage feel, use natural-colored or ecru yarn and tea-stain the finished snowflakes lightly for an antique appearance.

I recommend making a tension sample and blocking it to see how your chosen yarn behaves before committing to a full set.

Finally, I enjoy gifting these as sets in a clear box with tissue; adding a tiny description tag with care instructions (pin flat, light starch) makes them user-friendly and beautiful.

Common Mistakes & How to Fix Them

βœ— Skipping the join when forming the initial ring can distort the center; always join the starting chain with a slip stitch to form a neat ring. βœ— Not fastening off or changing colors at the correct point can leave visible tails; fasten off exactly where the pattern instructs and weave in ends securely. βœ— Ignoring stitch counts after clusters will create uneven points; count clusters and chain spaces at the end of each round to keep the snowflake symmetrical. βœ— Failing to block and starch the finished snowflake will leave it floppy; pin it to measurements and lightly spray starch and steam iron for crisp shaping.
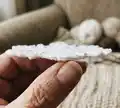
Twinkling Snowflakes Crochet Pattern

Make delicate, sparkling snowflakes to decorate your home or gifts with this detailed crochet pattern. You can create three sizes of snowflakes β€” perfect for garlands, tree ornaments, or window decor. The pattern includes full round-by-round instructions, charted diagrams, and finishing tips for a crisp, twinkling look. Grab some sparkle yarn and a small hook to get started on these pretty seasonal motifs.

Intermediate 2-3 Hours

Materials Needed for Twinkling Snowflakes Crochet Pattern

β€” Main Fabric

  • 01
    Bernat Handcrafter Holidays (2.8 oz/80 g; 138 yds/126 m) - White Sparkle (48005) - 1 ball will make approx 4 snowflakes

β€” Tools Required

  • 01
    Crochet hook size U.S. F/5 (3.75 mm) or size needed to obtain gauge
  • 02
    Spray starch (optional) for finishing
  • 03
    Pins for blocking and pinning to measurements
  • 04
    Steam iron (lightly) for finishing - optional
  • 05
    Scissors
  • 06
    Yarn needle for weaving in ends
  • 07
    Blocking surface or foam board

Progress Tracker

0% Complete

β€” Snowflake 1 :

Info :

Ch 6. Join with sl st to first ch to form a ring.

Round 1 :

*Ch 4. [(Yoh) twice and draw up a loop in ring. (Yoh and draw through 2 loops on hook) twice] twice. Yoh and draw through all loops on hook - Tr cluster made. Ch 4. Sl st in ring. Rep from * 5 times more. Fasten off.

Round 2 :

Ch 3. Join yarn with sl st to first Tr cluster. (Ch 9. Sl st in same sp as previous sl st. Ch 3. Sl st in next Tr cluster) 5 times. Ch 9. Sl st in same sp as previous sl st. Join with sl st to first ch.

Round 3 :

Ch 1. *1 sc in each of next 3 ch. [(3 sc. Ch 3) 3 times. 3 sc] in next ch-9 loop. Rep from * 5 times more. Join with sl st to first sc. Fasten off.

Round 4 :

Join yarn with sl st to first ch-3 sp. Ch 1. 2 sc in same sp as sl st. *1 sc in each of next 3 sc. (1 sc. Ch 3. 1 dc. Ch 3. 1 sc.) in next ch-9 sp. Ch 1. 2 sc in same sp as sl st. Rep from * 5 times more. Fasten off.

Round 5 :

Join yarn with sl st to first ch-3 sp. Ch 1. 1 sc in each of next 3 sc. *1 sc in next ch-3 sp. Ch 3. 1 sc in each of next 3 sc. 2 sc in next ch-3 sp. Ch 4. (1 hdc. Ch 2. Sl st) in 2nd ch from hook. Ch 2. Skip next 9 sc. 2 sc in next ch-3 sp. Rep from * 5 times more. Fasten off.

β€” Snowflake 2 :

Info :

Ch 7. Join with sl st to first ch to form a ring.

Round 1 :

Ch 1. (3 sc. Ch 9) 6 times in ring. Join with sl st to first sc. Fasten off.

Round 2 :

Join yarn with sl st to any ch-9 loop. Ch 3. (2 dc. Ch 3. 3 dc) in same sp as sl st. Ch 1. (3 dc. Ch 3. 3 dc) in next ch-9 loop. Rep from previous bracket 5 times. Ch 1. Join with sl st to top of ch 3.

Round 3 :

Sl st back into last ch-1 sp. Ch 1. 1 sc in same sp as sl st. *Ch 1. 6 dc in next ch-3 sp. Ch 6. Sl st to first ch. Turn. (Ch 4. 2 tr. Ch 4. Sl st) 3 times in last ch-6 sp made - top cluster made. Turn. 6 dc in same ch-3 sp as last 6 dc. Ch 1. 1 sc in next ch-1 sp. Rep from * 4 times more, then from * to ** once. Join with sl st to first sc. Fasten off.

β€” Snowflake 3 :

Info :

Ch 6. Join with sl st to first ch to form a ring.

Round 1 :

Ch 6 (counts as dc and ch 3). (1 dc. Ch 3) 11 times in ring. Join with sl st to 3rd ch of ch 6. 12 ch-3 sps.

Round 2 :

Sl st in next ch-3 sp. Ch 3. (Yoh and draw up a loop. Yoh and draw through 2 loops on hook) twice in same sp as last sl st. Yoh and draw through all loops on hook - beg cluster made. Ch 5. (Yoh and draw up a loop. Yoh and draw through 2 loops on hook) 3 times in next ch-3 sp. Yoh and draw through all loops on hook - cluster made. Rep from brackets 11 times. Ch 5. Join with sl st to top of first cluster.

Round 3 :

(Sl st. Ch 1. 1 sc. Ch 5. 1 sc) in next ch-5 sp. *(Sl st. Ch 3. Cluster) in next cluster. (Ch 3. Cluster in top of cluster just made) twice. (Ch 3. Sl st. Ch 6. Sl st. Ch 3. Sl st) all in top of last cluster. Working down towards 2nd rnd, (Ch 3. Sl st to base of cluster) 3 times. (1 sc. Ch 5. 1 sc) in next ch-5 sp. Rep from * 4 times more then from * to ** once. Join with sl st to first sc. Fasten off.

Finishing :

Pin Snowflake to measurements. Apply spray starch if desired and steam iron lightly.

Assembly Instructions

  • Pin each snowflake to the specified measurements (Snowflake 1: approx 7" [18 cm], Snowflake 2: approx 8Β½" [21.5 cm], Snowflake 3: approx 10" [25.5 cm]) on a blocking surface to shape evenly.
  • Apply spray starch lightly to the pinned snowflake, then steam iron gently from a distance to set and stiffen the lace shape.
  • Fasten off and weave in all ends neatly on the reverse side so the front shows clean, tidy stitches.
  • If making ornaments, attach a small loop of thread or ribbon at the top before final pressing so hangers are secure.
  • Store flat between sheets of tissue to retain shape, or display immediately as garland or tree decorations.

Important Notes

  • πŸ’‘Use the recommended hook size or adjust to obtain the gauge for the correct finished sizes.
  • πŸ’‘Block and lightly starch the finished snowflakes for best shape and crisper points before use.
  • πŸ’‘One ball of Bernat Handcrafter Holidays White Sparkle makes approximately four snowflakes, so plan quantities accordingly.

Create a set of twinkling snowflakes to brighten your holiday dΓ©cor and gift wrap! These lacy motifs sparkle with white sparkle yarn and block beautifully for a crisp finish. Make a garland, tree ornaments, or window display β€” each snowflake adds handmade charm. β„οΈπŸ§Ά

You ask,

we answer.

FAQs

What size will the finished snowflakes be?

Snowflake 1 measures approximately 7" (18 cm), Snowflake 2 measures approximately 8Β½" (21.5 cm), and Snowflake 3 measures approximately 10" (25.5 cm) using the recommended yarn and hook.

Can I use other yarns or hook sizes?

Yes, you can use different yarns and hooks but the finished size and drape will change; check your gauge and adjust hook size to obtain similar results.

Do I need to block and starch the snowflakes?

Blocking and a light spray starch are recommended to open the lace and set crisp points, especially if you want a stiff ornament or display piece.

How long does it typically take to make one snowflake?

Each snowflake usually takes between 2 and 3 hours depending on the size and your crochet speed; smaller ones will take less time.