About This Tick the Rabbit Amigurumi Pattern
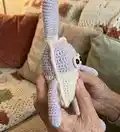
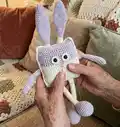
This pattern teaches you how to crochet a stretchy rabbit toy with long ears and mobile limbs that move up and down. It uses two yarn types and small hooks to create a compact, soft amigurumi suitable for ages 2 and up. The pattern focuses on shaping and assembly so you can create a durable, playful companion.

Clear, numbered rounds and photo hints make assembly straightforward and satisfying. The finished toy measures approximately 30 cm from ears to feet with recommended materials.
Why You'll Love This Tick the Rabbit Amigurumi Pattern
I absolutely love this pattern because it combines playful design with practical construction — the stretchy limbs are such a fun feature. I enjoy how the square body is simple to sew together yet creates a unique silhouette. The pattern uses small hooks and fine yarns to produce a neat, durable finish that feels special to hold. I also like that it is a great project for practicing shaping, invisible joins, and precise assembly.
Switch Things Up
I love how easy it is to customize this pattern by changing colors — try pastel shades for a soft nursery toy or bright contrasting colors for a playful look.
I often swap the YarnArt Jeans for a sport weight cotton and use a slightly larger hook to create a chunkier, cuddlier version.
You can make mini versions by using finer thread and a smaller hook to create keychain-sized pocket pals.
I sometimes embroider different facial expressions or add small crocheted accessories like bow ties, scarves, or tiny hats to personalize each rabbit.
For a posable effect, consider inserting thin wire inside the arms before stuffing to allow mild shaping and posing.
If you want sturdier limbs, crochet an additional inner tube and insert it before finishing to make the legs and arms less floppy.
I recommend experimenting with eye styles — small safety eyes, embroidered eyes, or felt circles all give different personalities.
To make the toy machine washable, secure seams tightly and use washable stuffing and eyes that are rated for machine washing.
Try mixing yarn textures — a boucle or slightly fuzzy yarn for the body while keeping smooth cotton for ears and limbs gives a delightful tactile contrast.
When scaling up or down, keep proportions in mind: change chain counts and stitch repeats proportionally to maintain the square body shape and ear-to-leg ratios.
Common Mistakes & How to Fix Them
✗ Skipping stitch markers during joining can misalign body parts; place markers at corners and attachment points before sewing to ensure symmetry.
✗ Stuffing too early or too much can distort shape and seams; stuff gradually during assembly and shape as you go to maintain clean edges.
✗ Changing yarn color without securing ends neatly leaves loose tails showing after finishing; weave in ends between rows and trim flush when switching colors.
✗ Failing to count rows after increases and decreases results in mismatch when joining parts; recount after every shaping round and mark important rows for alignment.
✗ Sewing limbs in the wrong position makes the finished toy look unbalanced; pin parts in place and check photos for exact placement before permanently stitching.