This collection brings together quick holiday makes you can finish with stash yarn and basic tools. You will find patterns for large crochet-covered foam ornaments, layered ombre trees, playful garlands, and a reusable gift bag — all with clear photo-driven instructions. Perfect for using leftover yarn and making festive decorations and gifts that look handmade and thoughtful.
Progress Tracker
0% Complete
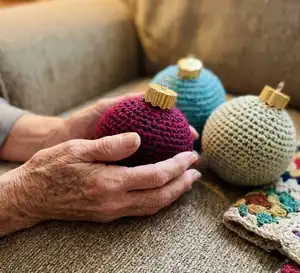
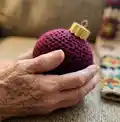
— Christmas Balls (Ornaments) :
Infos :
Working in the CONTINUOUS Round: *I do not join and chain, but continue to work in the next stitch. Use a stitch marker for this so you don’t lose your place.
Info :
Start with two strands held together if you want a thicker fabric. Use a K/6.5mm hook for my samples. Foam balls pictured are 6".
Round 1 :
Chain 2. Single crochet 6 in the second chain from the hook and work over your starting tail. (6)
Round 2 :
Starting in the first sc make 2 sc in that stitch and in each stitch around. (12) *Still work over the starting tail.
Info :
After getting done with all 12 sc for that round, pull the starting tail to cinch up the opening. You can now trim that tail or weave it in or just leave it if it will be on the inside of your work.
Info :
You want to move your stitch marker to the last stitch of each round so you know when you get to the end.
Round 3 :
(Make 1 sc in next stitch, make 2 sc in the next stitch) repeat around (18)
Round 4 :
(Make 1 sc in next 2 stitches, make 2 sc in the next stitch) repeat around (24)
Round 5 :
(Make 1 sc in next 3 stitches, make 2 sc in the next stitch) repeat around (30)
Round 6 :
(Make 1 sc in next 4 stitches, make 2 sc in the next stitch) repeat around (36)
Round 7 :
(Make 1 sc in next 5 stitches, make 2 sc in the next stitch) repeat around (42)
Round 8 :
(Make 1 sc in next 6 stitches, make 2 sc in the next stitch) repeat around (48)
Round 9 :
(Make 1 sc in next 7 stitches, make 2 sc in the next stitch) repeat around (54)
Round 10-17 :
sc in each stitch around (54)
Info :
When you get to this part you want to have your crochet fit just a little larger than your ball. Fold it around the top of your ball and see how it fits. It should look "loose" around the edges but bowl up a little so there are gaps to slide the ball inside.
Round 18 :
To go from 54 to 48: (Make 1 sc in next 7 stitches, make an inv dec over the next two stitches) repeat around
Round 19 :
To go from 48 to 42: (Make 1 sc in next 6 stitches, make an inv dec over the next two stitches) repeat around
Round 20 :
To go from 42 to 36: (Make 1 sc in next 5 stitches, make an inv dec over the next two stitches) repeat around
Round 21 :
To go from 36 to 30: (Make 1 sc in next 4 stitches, make an inv dec over the next two stitches) repeat around
Info :
***Once I got here to 30 stitches around, I inserted my foam ball. If you are using balls like mine and they have a hole make sure you put the hole facing you. It might be a little tight – just stretch it and pop it in. You will have to do the rest of the decreases with the foam inserted. Just pull out the stitches a little as you work into them.
Round 22 :
To go from 30 to 24: (Make 1 sc in next 3 stitches, make an inv dec over the next two stitches) repeat around
Round 23 :
To go from 24 to 18: (Make 1 sc in next 2 stitches, make an inv dec over the next two stitches) repeat around
Round 24 :
To go from 18 to 12: (Make 1 sc in next stitch, make an inv dec over the next two stitches) repeat around.
Round 25 :
make one sc in each stitch around (12) and leave a tail to weave opening shut. I use only one of my two tails to weave shut and then when you come back around tie the two together and hide tails with your needle under a few stitches.
Info :
This blue and teal ball pictured was worked with the exact same pattern as above, but worked in the Back Loop Only (BLO) all the way around for a ridged look.
— Trees ("Deck the Halls with Boughs of Holly": Trees #2 & #3) :
Infos :
Yarn: I used assorted greens from my stash; discs are worked with I/5.5mm hook for discs (except topper) and H/5.0mm or J/6mm for some parts as noted. For ombre look use multiple shades. Steam each disc to relax and shape.
Info :
Decide how many layers/discs you want for your tree. I chose 6 for the small one and 7 for the larger one. Use multiples of 5 for starting chains for discs.
Round 1 :
Chain the number of chains you want for where you want it to sit on your cone. Join around and then chain up 3 (for this pattern chain 3 DOES count as a double crochet) – after you chain up 3 double crochet around in each chain join to the top of the chain 3 and that completes the first round.
Round 2 :
Chain up 3 and make 2dc in each double crochet around. Join to the top of the chain 3 and chain up 3 again (do this for each round).
Round 3 :
Double crochet one double crochet in double crochet around.
Info :
You can decide now if you want to continue to do an increase round (Round 2) or work straight a few rounds until you reach the length you want. Most discs had 5 rounds and then I did a final round of half double crochet. The increase rounds are what makes the discs "wavy" at the end and helps them drop down.
Info :
Steam your discs about 1-2" away from the fabric on an ironing board to relax the stitches and create a soft drape. Let dry and stack on your cone.
— Tree Top (small pointed top) :
Info :
The top of the tree is made a little different. Use your smaller hook for the top and the method below.
Round 1 :
Starting with your smaller hook, chain 2. In the 2nd chain from the hook make 4 sc. (4 sc)
Round 2 :
Join and chain up 1 and make 1 sc in each stitch around. (4 sc)
Round 3 :
Join and chain up 1 and make 2sc in the 1st sc and then sc in each of the rest of the stitches around. (5 sc)
Round 4 :
Join and chain up 1 and make a sc in each stitch around. (5)
Round 5 :
Join and chain up 1 and make 2sc in the 1st sc and then sc in each of the rest of the stitches around. (6 sc)
Round 6 :
Join and chain up 1 and make a sc in each stitch around. (6 sc)
Round 7 :
Join and chain up 1 and make 2sc in the 1st sc and then sc in each of the rest of the stitches around. (7 sc)
Round 8 :
Join and chain up 1 and make 2sc in the 1st sc and then sc in each of the rest of the stitches around. (8 sc)
Round 9 :
Join and chain up 1 and make 2sc in the 1st sc and then sc in each of the rest of the stitches around. (9 sc)
Round 10 :
Join and chain up 1 and make 2sc in the 1st sc and then sc in each of the rest of the stitches around. (10 sc)
Round 11 :
Join and chain up 1 and make 2sc in the 1st sc and then sc in each of the rest of the stitches around. (11 sc)
Round 12 :
Join and chain up 1 and make 2sc in the 1st sc and then sc in each of the rest of the stitches around. (12 sc)
Round 13 :
Join. Chain up 3 and make 2dc in each double crochet around. Join to the top of the chain 3 and chain up 3 again (do this for each round) (24 dc)
Round 14 :
Double crochet one double crochet in double crochet around. (24)
Round 15 :
Repeat Round 13 *you may decide you don’t want to increase again and just work straight up.
Round 16 :
Repeat Round 14 *repeat this row for the length you want.
Info :
Assemble. Stack steamed discs on your cone from largest to smallest, secure with a dab of hot glue or stitch through centers to fix layers in place. Add the pointed top and tuck ends.
— Garlands :
Garland #1 (P1) :
String on pony beads before starting and pull one up on the last round for ornaments. Use two strands held together and a yarn needle to thread about 250 pony beads. Use L/8mm hook. Chain 10, pull up a bead, chain 10, pull up a bead and repeat until all beads are used. Fold or twist, add knots to keep shape.
Garland #2 (P1) :
Hold two skeins together (variegated holiday yarn) and use L/8mm hook. Start with chain 5; work back and forth rows of HDC (4 hdc in each row starting in chain 5) until you run out of yarn. Steam and stretch along the length to bias and lengthen. Example: finished 114" then stretched to ~160" after steaming and stretching.
Garland #3 (P1) :
Use leftovers held together and J/6mm hook. Chain 10 then work HDC back down/up the chain, then repeat: (chain 25, slip on 3 beads, hdc in the 3rd chain from the hook and in the next 13-15 chains)* to create dangly curls with beads. Use beads from stash and thread as you go.
Garland #4 (P1) :
If you have leftover beads, chain 20, slip up a bead and repeat until you run out of stash. Fold in half, knot along length for a faux popcorn look or twist into a long strand.
— Gift Bag #2 :
Infos :
This bag is a formula to make custom-sized reusable gift bags. Use any yarn but for a sturdy bag use two strands of 4-ply worsted and a J/6mm hook. You will also need a stiff base (plastic canvas or cardboard) trimmed to fit.
Info :
Decide measurements: width (left to right), depth (front to back), and height. Chain the desired width. Note: your chain will grow by as much as 1/2" after you start crocheting into it, so start slightly smaller (example: to get a 10" wide bag start with a 9.5" chain).
Instruction :
I worked in HDC with two strands held together. Work a long rectangular piece that will become the front, back and bottom. Example calculation: for a 12" high bag that is 6" deep you will add 12+12+6+30 = first piece approximately 30" high (this is the formula example provided in pattern).
Instruction :
The second piece of fabric is worked in rows where the width equals the depth of your bag. For a 6" depth the chain should be about 5.5". The length for this side piece should equal the width of your bag plus side allowances (photo examples used 14" width + 6" each side = 30").
Instruction :
Cut plastic canvas slightly smaller than your side/gusset piece and insert it between the two overlapping bottom layers for support. Trim jagged edges and smooth sides before inserting.
Instruction :
Use running stitches to hold the canvas in place or a few hot glue dabs if using cardboard. Stitch bottom pieces together first along all four sides (easiest before sewing up sides).
Instruction :
Flip your side piece with plastic canvas attached under your main piece. Position canvas between the two layers so it is not visible. Pin and measure to ensure all height pieces match.
Instruction :
Stitch bottom pieces together, then pin up all four sides evenly and stitch using matching yarn or a contrasting decorative stitch. Make handles by braiding or making 6 strips (3 per side), pull through and knot on opposite sides to secure.
Info :
Weave in ends and secure all seams. Optionally make a drawstring or lining for a more finished look.
— Assembly :
Info :
Insert foam caps/topper into the finished ornament before securing the last stitches. Steam and shape tree discs, then stack and sew or glue onto the painted cone. Sew plastic canvas into bag base before stitching layers together for a professional, sturdy finish.
This holiday collection is all about using your stash to create beautiful seasonal decor and gifts with minimal waste and maximum charm. Whether you make a set of crochet-covered ornaments, a stacked ombre tree, playful garlands, or a reusable gift bag, these projects celebrate creativity and handmade joy. Grab your yarn, pick a movie, and enjoy making something festive and heartwarming this season! 🎄🧶✨