🧢 Beautiful ✨ Detailed πŸ’ Adorable

The Snowman Mug Amigurumi Pattern

The Snowman Mug Amigurumi Pattern
3.9β˜… Rating
5-7 Hours Time Needed
3.9K Made This
βœ‚οΈ

Intermediate Level

Ideal for those with basic crochet experience, featuring slightly more advanced stitches and techniques to expand your skills.

⏱️

Weekend Treat

Takes 5-7 hours, making it an enjoyable project to finish over a couple of days.

🧸

Cute Companion

An adorable friend to cherish, handcrafted with love to bring comfort and joy for years to come.

About This The Snowman Mug Amigurumi Pattern

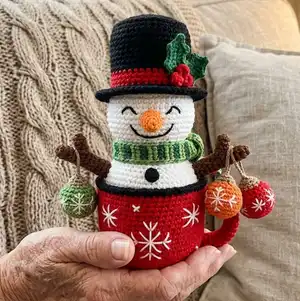
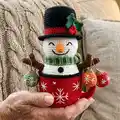
This pattern creates a festive snowman that sits inside a crocheted mug, complete with a hat, twig-like arms, leaves and berries. The set uses DK weight yarn (Yarn Art Jeans and Alize Cotton Gold) and includes instructions for wire frame handles and embroidered snowflakes. Photographic step-by-step guidance and shaping notes help you complete each piece with confidence.

The Snowman Mug Amigurumi Pattern crochet pattern - detailed view of completed project

You will learn to crochet in spirals, work front loop rounds for shaping, create bobble stitches for berries and secure a simple wireframe for stable handles. The finished toy measures about 6 inches (15 cm) without the hat and about 7.8 inches (20 cm) with the hat.

Why You'll Love This The Snowman Mug Amigurumi Pattern

I absolutely love this pattern because it combines practical crochet techniques with holiday charm and personality. I enjoy creating small scenes, and the snowman-in-a-mug always brings a smile when finished. The mix of embroidery, bobble stitches and simple wireframing lets me use lots of different techniques in one compact project. I also love how customizable the design is β€” you can change yarn colors and embellishments to make each snowman unique. Finishing the embroidered snowflakes is my favorite relaxing part of the process.

The Snowman Mug Amigurumi Pattern step 1 - construction progress The Snowman Mug Amigurumi Pattern step 2 - assembly progress The Snowman Mug Amigurumi Pattern step 3 - details and accessories The Snowman Mug Amigurumi Pattern step 4 - final assembly and finishing

Switch Things Up

I love how versatile this snowman mug is for customization β€” you can change the mug color and embroider different snowflake patterns for unique looks.

Want a softer, bigger version? Use a bulkier yarn and a larger hook to scale up the whole piece for a chunky holiday decoration.

Make it into a keychain-sized mini by using thinner yarn and a smaller hook β€” perfect for tiny gifts or ornament hangers.

I often add extra accessories like a tiny crocheted scarf, a little broom or a miniature gift to give each snowman personality.

Try swapping the berry color or making metallic embroidered snowflakes for a more elegant holiday table centerpiece.

For a play-safe version, avoid wire and use felt or stuffed handles sewn securely inside the mug instead.

I also experiment with different embroideries around the mug β€” polka dots, stars, or initials make a personal touch for gifting.

Make a set in coordinating colors for a table display, or create matching hats and mittens in contrasting shades.

If you want a posable toy, use thicker craft wire inside the limbs and secure well with tape and stuffing for safe adjustment.

Consider adding a tiny LED tea light inside the mug under the cardboard base (securely fixed) for a warm glowing effect on display.

Common Mistakes & How to Fix Them

βœ— Skipping stitch markers during rounds can easily lead to lost stitch counts; place a marker at the start of each round and move it as you go. βœ— Crocheting too loosely makes stuffing show through the stitches and weakens the shape; maintain a moderately tight, consistent tension for a neat finish. βœ— Forgetting to stuff gradually will create lumps and poor shaping; add small amounts of fiberfill while you shape the piece to ensure even distribution. βœ— Not securing wireframe ends properly can cause poking and instability; bend the wire edges, secure with adhesive tape and hide ends inside stuffing for safety and durability.

The Snowman Mug Amigurumi Pattern

Make a charming snowman-in-a-mug with this friendly crochet pattern. You will create a detailed mug, a cuddly snowman body, hat, arms, leaves and decorative berries β€” all written step-by-step. The pattern uses DK/cotton blend yarn and clear photos to guide you through shaping and assembly. Perfect for handmade holiday gifts or a cosy display piece.

Intermediate 5-7 Hours

Materials Needed for The Snowman Mug Amigurumi Pattern

β€” Main Fabric

  • 01
    DK weight yarn - Yarn Art Jeans (55% cotton/45% acrylic; 50 g/160 m)
  • 02
    Yarn Alize Cotton Gold (55% cotton/45% acrylic; 100 g/330 m)
  • 03
    Yarn Art Jeans No. 51 (cherry) - about one skein for the mug and handles
  • 04
    Yarn Art Jeans No. 28 (dark grey) - small amount for rim, hat and button
  • 05
    Yarn Art Jeans No. 90 (red) - small amount for berries and decorations
  • 06
    Yarn Art Jeans No. 35 (yellow) - small amount for nose
  • 07
    Yarn Art Jeans No. 70 (dark brown) - small amount for arms
  • 08
    Yarn Art Jeans No. 69 (green) - small amount for leaves
  • 09
    Alize Cotton Gold No. 62 (white) - main snowman body, approx 100 g

β€” Tools Required

  • 01
    Crochet hook size 2.0 mm or 2.25 mm
  • 02
    Stuffing material (fiberfill/polyester)
  • 03
    Tapestry needle
  • 04
    Scissors
  • 05
    Stitch markers (a scrap of contrasting yarn)
  • 06
    Pins
  • 07
    Two cardboard circles for the bottom of a mug, about 5.8-6 cm (2.3-2.4 inches)
  • 08
    A piece of wire 7-8 cm (3 inches) long, 3 pieces - for a handle of the mug and arms of a snowman
  • 09
    Adhesive tape to secure the wireframe ends
  • 10
    Pliers
  • 11
    Sewing black thread for the embroidery of the eyes

Progress Tracker

0% Complete

β€” Mug :

Rnd 1 :

8 into MR

Rnd 2 :

8 inc (16)

Rnd 3 :

(1 sc, inc)*8 (24)

Rnd 4 :

(2 sc, inc)*8 (32)

Rnd 5 :

(3 sc, inc)*8 (40)

Rnd 6 :

(4 sc, inc)*8 (48)

Rnd 7 :

(5 sc, inc)*8 (56)

Rnd 8 :

(6 sc, inc)*8 (64)

Rnd 9 :

(7 sc, inc)*8 (72)

Rnd 10 :

(8 sc, inc)*8 (80)

Rnd 11-28 :

80 sc (18 rounds)

Info :

* Crochet the next round through front loops only.

Rnd 29 :

80 sc

Info :

* Crochet the next round through both loops.

Rnd 30 :

80 sc

Info :

Trace the bottom of the mug on the cardboard and cut it out. Put the template inside.

Rnd 31 :

80 sc

Info :

* Crochet the next round through front loops only.

Rnd 32 :

80 HDC

β€” Snowman :

Info :

Attach white yarn to round 29. (Alize Cotton Gold No. 62)

Rnds 1-5 :

80 sc (5 rounds)

Rnd 6 :

(8 sc, dec)*8 (72)

Rnd 7 :

(7 sc, dec)*8 (64)

Rnd 8 :

64 sc

Rnd 9 :

(6 sc, dec)*8 (56)

Rnd 10 :

(5 sc, dec)*8 (48)

Rnd 11 :

48 sc

Rnd 12 :

(4 sc, dec)*8 (40)

Rnd 13 :

40 sc

Info :

Stuff it with fiberfill.

Info :

Insert the wireframe for arms as instructed in ARMS section before continuing with the head shaping.

Rnd 14 :

(4 sc, inc)*8 (48)

Rnd 15 :

(5 sc, inc)*8 (56)

Rnd 16 :

(6 sc, inc)*8 (64)

Rnd 17 :

64 sc

Rnd 18 :

(7 sc, inc)*8 (72)

Rnds 19-26 :

72 sc (8 rounds)

Rnd 27 :

(7 sc, dec)*8 (64)

Rnds 28-29 :

64 sc (2 rounds)

Rnd 30 :

(6 sc, dec)*8 (56)

Rnd 31 :

(5 sc, dec)*8 (48)

Rnd 32 :

48 sc

Rnd 33 :

(4 sc, dec)*8 (40)

Info :

Stuff with fiberfill.

Rnd 34 :

40 sc

Rnd 35 :

(3 sc, dec)*8 (32)

Rnd 36 :

32 sc

Rnd 37 :

(2 sc, dec)*8 (24)

Rnd 38 :

(1 sc, dec)*8 (16)

Rnd 39 :

(2 sc, dec)*4 (12)

Info :

Break yarn, leaving a long tail for tightening the hole. Stuff it with fiberfill. Do not tighten the hole!

β€” Nose :

Yarn :

Yarn Art Jeans No. 35 - (yellow)

Rnd 1 :

4 into MR

Rnd 2 :

4 inc (8)

Rnds 3-4 :

8 sc (2 rounds)

Rnd 5 :

(1 sc, inc)*4 (12)

Rnd 6 :

12 sc, 2 sl st

Info :

Break yarn, tighten the hole, and hide the tail inside. Stuff the nose with fiberfill.

β€” Arms (make 2) :

Yarn :

Yarn Art Jeans No. 70 - (dark brown)

Rnd 1 :

6 into MR

Rnd 2 :

(1 sc, inc)*3 (9)

Rnds 3-5 :

9 sc (3 rounds)

Rnd 6 :

4 sc, (DC5tog cluster), 4 sc (9)

Rnds 7-20 :

9 sc (14 rounds), 2 sl st

Info :

INSERT THE WIREFRAME. Mark the position on the sides symmetrically using pins. Insert the wireframe into the pinned points. Bend the edge of the wire using the pliers. Secure the ends with adhesive tape. Curl the ends of the wireframe and secure with adhesive tape. Stuff with fiberfill.

β€” Button :

Yarn :

Yarn Art Jeans No. 28 - (dark grey)

Rnd 1 :

6 into MR, 1 sl st

Info :

Break yarn.

β€” Assembly :

Step 1 :

Sew the nose. (Insert the needle and draw it out in the hole on the top of the head). Pin the nose. Split yellow yarn in half and sew it on.

Step 2 :

Embroider the eyes and mouth. Pin the position of the eyes. (I mark between rounds 22-23 from the mug. The distance between the eyes is 8 sc, the length is 4 sc and the height of the eye is 1 sc). Embroider the eyes using black thread.

Step 3 :

Sew a button to the front of the snowman. Use the small dark grey button made earlier.

Step 4 :

Embroider snowflakes: Mark the borders of the snowflake. Embroider the snowflakes using a white yarn strand split in half. Follow the Snowflake parameters as a grid where 1 cell = 1 sc.

Step 5 :

Stuff with fiberfill and tighten the hole using a tapestry needle. Tighten the hole, weaving through each of the 12 front loops of the last round and pull tight. Once you weaved through 12 loops, weave through 2-3 loops at once with a tapestry needle. Repeat 3 times. Cut the excess yarn and hide the yarn tail inside the snowman.

Step 6 :

Sew the arms to the body. Secure the wireframe with adhesive tape additionally. Put the ready arms onto the wireframe and sew them to the snowman.

β€” Mug Handles :

Yarn :

Yarn Art Jeans No. 51 - (cherry)

Instructions :

Chain 12 and form a circle. Crochet in a circle:

Rnds 1-4 :

12 sc (4 rounds)

Rnd 5 :

3 sc, 3 dec, 3 sc (9)

Rnds 6-21 :

9 sc (16 rounds), 1 sl st

Info :

Prepare a wireframe with the same length as the handle. Bend the ends, and secure them with adhesive tape. Insert wireframe into the handle and stuff with fiberfill. Bend the handle and sew it to the mug.

β€” Leaf (make 2) :

Yarn :

Yarn Art Jeans No. 69 (green)

Instructions :

Chain 12, start working in the second chain from a hook in the back direction - 10 sc, 3 sc in 1 stitch. Continue crocheting on the other side of the chain foundation - 9 sc, 3 sc in 1 stitch. (25)

Rnd 2 :

(3 sc, chain 3, 1 sc in the previous stitch)*3, 3 sc, chain 3, 1 sc in the previous stitch, (3 sc, chain 3, 1 sc in the previous stitch)*3, 2 sc, 2 sl st.

Info :

Break yarn, leaving a long tail for sewing. Iron the leaves with steam through a damp cloth for a few seconds to make them flat.

β€” Berries (make 3) :

Yarn :

Yarn Art Jeans No. 90 - (red)

Instructions :

Chain 7. Start working in the second chain from a hook 3 Bobble stitches similar to the thumb for the arm of our snowman. Crochet in the second chain – ((dc4tog cluster), 1 sc)*3. Turn all bobbles inside out. Make 1 sl st in the first bobble. Tie the yarn tails together.

β€” Hat :

Yarn :

Yarn Art Jeans No. 28 - (dark grey)

Rnd 1 :

8 into MR

Rnd 2 :

8 inc (16)

Rnd 3 :

(1 sc, inc)*8 (24)

Rnd 4 :

(2 sc, inc)*8 (32)

Rnd 5 :

(3 sc, inc)*8 (40)

Rnd 6 :

(4 sc, inc)*8 (48)

Rnd 7 :

(5 sc, inc)*8 (56)

Rnd 8 :

(6 sc, inc)*8 (64)

Rnd 9 :

(7 sc, inc)*8 (72)

Info :

* In the next round, crochet through front posts. Insert the hook in the first stitch and draw it out through the front post of the second stitch, grabbing the working yarn and making sc.

Rnd 10 :

72 sc (through front posts)

Info :

* Crochet all the next rounds through both loops.

Rnds 11-20 :

72 sc (10 rounds)

Rnd 21 :

(7 sc, dec)*8 (64)

Rnds 22-24 :

64 sc (3 rounds)

Info :

Finish the hat as pictured: create the brim by working the edge in contrasting yarn and attach decorations (holly leaves and berries) as desired.

Assembly Instructions

  • Sew the nose onto the head by inserting the needle through the hole on top of the head, pinning the nose in place, splitting the yellow yarn in half and sewing securely.
  • Embroider the eyes and mouth: mark between rounds 22-23 from the mug; distance between eyes is 8 sc, eye length 4 sc, eye height 1 sc; use black thread to embroider eyes and mouth.
  • Insert and secure wireframes for the arms and handle: mark positions with pins, insert wire into pinned points, bend and curl the ends with pliers and secure with adhesive tape, then sew the arms onto the wireframe.
  • Attach mug bottom: trace and cut the cardboard circle, insert it into the mug bottom for shape, then continue crocheting and secure the rim with dark grey yarn; sew handles and embroider snowflakes and buttons as pictured.

Important Notes

  • πŸ’‘Yarn consumption, size, and appearance depend on crochet density and how you hold the yarn; swatch if exact sizing is critical.
  • πŸ’‘Crochet the toy in spirals without turning chains for a seamless finish and consistent shaping.
  • πŸ’‘Make sure you crochet tight enough otherwise the stuffing will show through the holes; adjust hook size if necessary.
  • πŸ’‘When using wireframes, always secure the ends with adhesive tape and hide them inside stuffing to prevent poking or damage.

This snowman mug pattern brings a festive touch to your home and makes a lovely handmade gift. The set combines toy-making techniques with decorative embroidery for a joyful holiday project. Have fun customizing colors, adding personal details, and gifting it to someone special. 🧢🎁

You ask,

we answer.

FAQs

What size will the finished piece be?

The finished snowman measures approximately 6 inches (15 cm) tall without the hat and about 7.8 inches (20 cm) tall with the hat when using the recommended yarn and hook size.

Can I use different yarn weights for this pattern?

Yes, you can use different yarn weights, but this will change the final size and may require a different hook size; adjust stitch counts or rounds if you want to keep proportions similar.

Do I need prior crochet experience for this pattern?

This pattern is rated intermediate β€” basic knowledge of single crochet, increases, decreases, working in spirals, and simple embroidery is recommended for best results.

How long does this project typically take to complete?

Most crocheters complete this project in 5-7 hours, though time may vary based on experience level, customization choices, and assembly work.