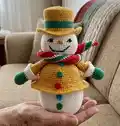
🧢 Beautiful ✨ Detailed πŸ’ Adorable

Snowman Gingerbread Amigurumi Pattern

Snowman Gingerbread Amigurumi Pattern
4.9β˜… Rating
5-7 Hours Time Needed
3.4K Made This
βœ‚οΈ

Intermediate Level

Ideal for those with basic crochet experience, featuring slightly more advanced stitches and techniques to expand your skills.

⏱️

Weekend Treat

Takes 5-7 hours, making it an enjoyable project to finish over a couple of days.

🧸

Cute Companion

An adorable friend to cherish, handcrafted with love to bring comfort and joy for years to come.

About This Snowman Gingerbread Amigurumi Pattern

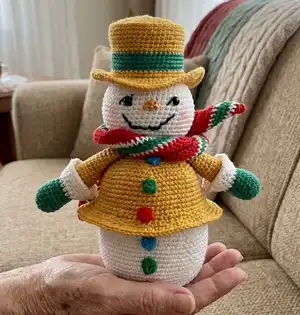
This pattern creates an adorable snowman gingerbread amigurumi with a removable hat, scarf, and three colorful buttons. The design uses cotton yarn with multiple color changes for cheerful detail. You will follow step-by-step rounds, photo guides and short video links for techniques like magic ring, BLO and FLO. The finished toy measures approximately 22 cm (8.7 inches) tall when made with the recommended yarn.

Snowman Gingerbread Amigurumi Pattern crochet pattern - detailed view of completed project

Complete, photo-illustrated instructions make shaping and assembly easy to follow. Suitable for intermediate crocheters who know basic stitches and want to practice color changes and finishing.

Why You'll Love This Snowman Gingerbread Amigurumi Pattern

I absolutely love this pattern because it balances classic amigurumi shaping with playful color details that bring the snowman to life. I enjoy the way the removable hat and tiny buttons add personality and make the piece interactive. The step-by-step photos and linked technique videos make tricky steps like BLO and FLO accessible to me and other crocheters. I also appreciate how adaptable the design is β€” you can swap colors or scale it by changing yarn weight and hook. Making this snowman always brightens my craft table during the holidays.

Snowman Gingerbread Amigurumi Pattern step 1 - construction progress Snowman Gingerbread Amigurumi Pattern step 2 - assembly progress Snowman Gingerbread Amigurumi Pattern step 3 - details and accessories Snowman Gingerbread Amigurumi Pattern step 4 - final assembly and finishing

Switch Things Up

I love how easily you can customize this snowman by swapping the yarn colors to match your holiday palette. Try pastel colors for a soft nursery decoration or bright primaries for a cheerful table centerpiece.

If you want a smaller or larger version, change the yarn weight and hook: a finer yarn with a smaller hook makes a tiny pocket-sized snowman, while bulky yarn gives a chunky, cuddly version.

I often add tiny accessories like a crocheted mini-broom, a small felt scarf, or tiny safety-eye beads for variation β€” these personal touches make each one unique.

Try embroidering different facial expressions: moving the eyes and mouth placement slightly will change the character from mischievous to sweet. Test placement with pins first before stitching.

For a structured base, I sometimes add a cardboard or plastic disc inside the bottom to help the snowman stand straight; the pattern shows how to insert and sew around the edge.

I also like adding a small loop at the top of the hat to hang the snowman as an ornament β€” simply leave a longer tail and form a loop before finishing off.

If you enjoy sewing, consider making a matching set with a tiny hat and scarf in coordinating colors for other amigurumi or gift sets.

I recommend experimenting with textured stitches for the hat brim or scarf to create more visual interest β€” a row of dc or a picot edge changes the look significantly.

To make this toy machine-washable, use washable cotton and secure all embroidery ends well; avoid safety eyes for baby toys and embroider features instead.

Finally, have fun combining yarn types β€” a slightly fuzzy yarn for the scarf adds a cozy, tactile contrast to the smooth cotton body.

Common Mistakes & How to Fix Them

βœ— Skipping stitch markers when working in continuous rounds causes you to lose track of the beginning; place a marker at the start of every round to stay aligned. βœ— Forgetting to embroider or mark the eye and nose placement during rounds causes misaligned facial features; mark the spots between the indicated rounds and embroider before closing the head. βœ— Overstuffing the head and body can distort the shape and make sewing parts together difficult; stuff gradually and shape with your hands to keep a smooth round finish. βœ— Changing colors without securing tails leads to visible loose ends; carry yarn or weave in ends neatly and leave longer tails where the pattern instructs for sewing. βœ— Not working BLO or FLO rounds as directed will change the hat and collar profile; watch the linked video or carefully pick the back or front loop for those rounds. βœ— Sewing parts in the wrong position looks unbalanced; pin all parts (hat, head, arms) in place first and check photos to ensure correct alignment.

Snowman Gingerbread Amigurumi Pattern

Make a charming snowman gingerbread amigurumi with clear, photo-supported steps and full stitch-by-stitch rounds. This pattern uses cotton yarn and small hooks to create a neat, decorative toy perfect for holiday gifting. You will enjoy shaping the head, hat, scarf and body with simple increases, decreases and color changes. Suitable for crafters ready to explore slightly more advanced shaping and assembly.

Intermediate 5-7 Hours

Materials Needed for Snowman Gingerbread Amigurumi Pattern

β€” Main Fabric

  • 01
    Cotton yarn ST.GEORGE TANGO - Shade 0006 white (use for head and body)
  • 02
    Cotton yarn ST.GEORGE TANGO - Shade 0424 ocher (use for hat and outer body pieces)
  • 03
    Cotton yarn ST.GEORGE TANGO - Shade 0420 red (accent/buttons/scarf)
  • 04
    Cotton yarn ST.GEORGE TANGO - Shade 0015 green (mittens, scarf stripe, button)
  • 05
    Cotton yarn ST.GEORGE TANGO - Shade 0131 blue (button/accents)
  • 06
    Cotton yarn ST.GEORGE TANGO - Shade 0391 orange (nose detail)
  • 07
    Cotton yarn ST.GEORGE TANGO - Shade 0409 indigo (scarf stripe/face detail)
  • 08
    A little bit of stuffing (eg. from a pillow or combed wool) - quantity: small amount for head, arms and body cavities

β€” Tools Required

  • 01
    Crochet hook size 2.0 mm
  • 02
    Embroidery needle
  • 03
    Sewing needle
  • 04
    Scissors
  • 05
    Yarn needle for sewing and weaving ends
  • 06
    Stitch markers
  • 07
    Pins for assembly
  • 08
    Polyester stuffing (small amount)
  • 09
    Cardboard or plastic insert discs for base stiffening (optional)

Progress Tracker

0% Complete

β€” Head :

Round 1 :

start 6 sc in a magic ring (6)

Round 2 :

(inc) x6 (12)

Round 3 :

(sc,inc) x6 (18)

Round 4 :

(sc,inc,sc) x6 (24)

Round 5 :

(3 sc,inc) x6 (30)

Round 6 :

(2 sc,inc,2 sc) x6 (36)

Round 7 :

(inc,5 sc) x6 (42)

Round 8 :

(5 sc,inc,sc) x6 (48)

Round 9 :

BLO 48 sc around (48) (Picture 2)

Round 10 :

(3 sc,inc,4 sc) x6 (54)

Round 11-19 :

54 sc around (54)

Info :

While crocheting from round 11 to round 19 mark with a different color yarn spots intended for eyes, nose and mouth. Mark the spot for the eyes between rows 12 and 13. The space between the eyes counts 8 loops. The spot for the nose between rows 14 and 15; the nose is 2 loops wide. Mark the spot for the mouth between rows 18 and 19; the mouth is 2 loops wide. We shall embroider them later (Picture 3, Picture 4).

Round 20 :

(3 sc,dec,4 sc) x6 (48)

Round 21 :

(5 sc,dec,sc) x6 (42)

Round 22 :

(dec,5 sc) x6 (36)

Round 23 :

(2 sc,dec,2 sc) x6 (30)

Round 24 :

(3 sc,dec) x6 (24)

Info :

Stuff the head. The remaining part of the head fill with stuffing material. Feel free to stuff it well and shape it with your hands until it becomes round (Picture 5). Leave the yarn thread longer (around 40 cm). Do not sew the bottom opening of the head. We shall later sew the head to the body.

Info :

Embroider the eyes by pulling the needle with cotton yarn 8 times through the marked stitches slowly to get a round shape (Picture 6). Embroider the nose vertically 10 times with orange yarn (Picture 7). Embroider the lips following the pattern grid; use lip balm as a snowman blush (Picture 8).

β€” Hat :

Info :

Use the ocher color yarn.

Round 1 :

start 6 sc in a magic ring (6)

Round 2 :

(inc) x6 (12)

Round 3 :

(sc,inc) x6 (18)

Round 4 :

(sc,inc,sc) x6 (24)

Round 5 :

(3 sc,inc) x6 (30)

Round 6 :

(2 sc,inc,2 sc) x6 (36)

Round 7 :

(inc,5 sc) x6 (42)

Round 8 :

(5 sc,inc,sc) x6 (48)

Round 9 :

(3 sc,inc,4 sc) x6 (54)

Round 10 :

BLO 54 sc around (54) (Picture 9)

Round 11 :

54 sc (54)

Round 12 :

(3 sc,dec,4 sc) x6 (48)

Round 13-15 :

48 sc (48) Use the green color yarn (Picture 10)

Round 16 :

48 sc (48)

Round 17-19 :

48 sc (48) Use the ocher color yarn (Picture 11)

Round 20 :

48 sc (48)

Round 21 :

48 sc (48)

Round 22 :

FLO 48 sc (48) (Picture 12,13)

Round 23 :

(sc,inc) x24 (72)

Round 24 :

72 sc (72)

Round 25 :

(2 sc,inc) x24 (96)

Round 26 :

96 sc (96) Leave the yarn thread longer (around 40 cm).

Info :

The hat is completed (Picture 14). Fill up the hat (Picture 16). Attach the hat to the head with pins (Picture 17). Sew the hat to the head (Picture 18). Finished hat (Picture 19).

β€” Arm (MAKE 2) :

Info :

Use the green color yarn.

Round 1 :

start 6 sc in a magic ring (6)

Round 2 :

(inc) x6 (12)

Round 3 :

(sc,inc) x6 (18)

Round 4-5 :

18 sc (18)

Round 6 :

16 sc,dec (17)

Round 7 :

7 sc,dec,8 sc (16)

Round 8-9 :

16 sc (16)

Round 10 :

Use the white color yarn - 16 sc (16) (Picture 20)

Round 11 :

BLO 16 sc (16) (Picture 21)

Round 12 :

Use the ocher color yarn - 16 sc (16) (Picture 22)

Info :

Fill the arm with stuffing material (Picture 23). R13-26: 16 sc (16). Fill the arm with stuffing material. Fasten off, leave the yarn thread longer (30 cm) so that we can later sew arms to the body.

Item Name (P1) :

Making the lace around the sleeve: Use the white color yarn. Pattern for the lace around the arm R1=16 sc. R2=(sc,inc) x8. R3=24 sc. R4=(2 sc,inc) x8. R5=32 sc.

β€” Body 1 :

Info :

Use the white color yarn.

Round 1 :

start 6 sc in a magic ring (6)

Round 2 :

(inc) x6 (12)

Round 3 :

(sc,inc) x6 (18)

Round 4 :

(2 sc,inc) x6 (24)

Round 5 :

(3 sc,inc) x6 (30)

Round 6 :

(4 sc,inc) x6 (36)

Round 7 :

(5 sc,inc) x6 (42)

Round 8 :

(6 sc,inc) x6 (48)

Round 9 :

BLO 48 sc (48) (Picture 27)

Round 10 :

(7 sc,inc) x6 (54)

Round 11 :

(8 sc,inc) x6 (60)

Round 12 :

(9 sc,inc) x6 (66)

Round 13 :

(10 sc,inc) x6 (72)

Round 14-25 :

72 sc (72)

Round 26 :

FLO 72 sc (72) (Picture 28,29)

Info :

Leave the yarn thread longer (around 40 cm). Button (make 3) Use the red, green and blue color yarn. R1 = 6 sc in magic ring, slip stitch. Make 3 small buttons and sew them to the body as pictured (Picture 30-33).

Info :

Crochet the second piece snowman body 1 using ocher color yarn where indicated (Picture 35). The second piece follows similar rounds: start 6 sc in magic ring and increase similarly to create the outer shell. R1 start 6 sc in magic ring (6). R2 (inc) x6 (12). R3 (sc,inc) x6 (18). R4 (2sc,inc) x6 (24). R5 (3sc,inc) x6 (30). R6 (4sc,inc) x6 (36). R7 (5sc,inc) x6 (42). R8 (6sc,inc) x6 (48). R9 BLO 48 sc (Picture 34). R10 (7sc,inc) x6 (54). R11 (8sc,inc) x6 (60). R12 (9sc,inc) x6 (66). R13 (10sc,inc) x6 (72). R14-24 72 sc. Fasten off, leave yarn thread longer (40 cm) so that we can later sew to the body (Pictures 34-35).

Info :

Cut the pad out of cardboard or plastic (Picture 36,37). Put plastic or cardboard inserts (Picture 38). Insert the second piece snowman into the first and sew 72 sc in a circle on both sides of the two pieces (Picture 39,40). Resulting assembly with buttons (Picture 41).

β€” Body 2 :

Info :

Use the white color yarn.

Round 1 :

start 6 sc in a magic ring (6)

Round 2 :

(inc) x6 (12)

Round 3 :

(sc,inc) x6 (18)

Round 4 :

(2sc,inc) x6 (24)

Round 5 :

BLO 24 sc (24) (Picture 42)

Round 6 :

Use the ocher color yarn (3sc,inc) x6 (30) (Picture 43)

Round 7 :

(4sc,inc) x6 (36)

Round 8 :

(5sc,inc) x6 (42)

Round 9 :

(6 sc,inc) x6 (48)

Round 10 :

(7sc,inc) x6 (54)

Round 11 :

(8sc,inc) x6 (60)

Round 12 :

(9sc,inc) x6 (66)

Round 13 :

(10sc,inc) x6 (72)

Round 14-20 :

72 sc (72)

Round 21 :

FLO 72 sc (72) (Picture 44,45)

Round 22 :

72 sc (72)

Round 23 :

BLO 72 sc (72) (Picture 47)

Info :

We return to the 23rd row of the body. Use the ocher color yarn for the outer shell shaping: R1 72 sc; R2 (sc,inc) x36; R3-4 108 sc as pictured.

Info :

Button (make 3) - Use red, green and blue color yarn: R1=6 sc in magic ring, slip stitch. Make 3 buttons and attach to body as shown (Pictures 50-53).

Info :

Crochet the second piece snowman body 2 using ocher color yarn following same rounds as the first piece where indicated; R5 BLO 24 sc (Picture 54). Continue rounds through R13 (10sc,inc)x6 (72). Fasten off, leave the yarn thread longer (40 cm). Insert the second piece into the first and sew 72 sc in a circle on both sides of the two pieces (Picture 56,57). Final assembled piece pictured (Pictures 58-61).

Info :

Connecting the head to the body: Attach the head to the body with pins (Picture 59). Sew the head to the body (Picture 60). Finish assembly by sewing arms to sides, and attaching buttons and accessories as pictured (Pictures 61+).

Assembly Instructions

  • Attach the hat to the head using pins to position it, then sew the hat to the head securely around the brim (see Picture 17-19).
  • Sew the head to the body by aligning the head opening to the body top, use the long yarn tail left from the head and whipstitch evenly around the circle to secure (see Picture 59-61).
  • Pin and sew the arms to the sides of the body between the rounds indicated for the arm placement; angle them slightly and sew through several stitches for a strong join.
  • Insert the second ocher body piece inside the white body piece, place cardboard/plastic discs if using, then sew 72 sc around both edges to join the two halves securely (Pictures 36-41).
  • Sew the three small crocheted buttons (red, green, blue) onto the front of the body aligned vertically, using the long tails left from each button to secure them in place (Pictures 30-33).

Important Notes

  • πŸ’‘Use stitch markers to mark the beginning of each round and special placement marks for eyes, nose and mouth to keep features symmetrical.
  • πŸ’‘Work the BLO and FLO rounds precisely where noted to achieve the correct hat brim and collar effects; consult the linked photos or videos if unsure.
  • πŸ’‘Leave long yarn tails (30-40 cm) when instructed for sewing parts together; these make assembly and attaching pieces much easier.
  • πŸ’‘Stuff firmly but gradually; overstuffing can make seams bulge and under-stuffing will cause a flat or misshapen toy.

This sweet Snowman Gingerbread amigurumi brings festive charm and handcrafted warmth to your home! It combines neat shaping and colorful accents for a delightful holiday keepsake. Make one for a friend or display it proudly as a handmade holiday decoration. πŸ§Άβ„οΈπŸŽ

You ask,

we answer.

FAQs

What size will the finished piece be?

The finished amigurumi measures approximately 22 cm (8.7 inches) tall when using the recommended cotton yarn and a 2.0 mm hook.

Can I use different yarn weights for this pattern?

Yes, you can use different yarn weights but your finished size will change; choose a compatible hook and expect proportions to varyβ€”adjust stuffing and assembly accordingly.

Do I need prior crochet experience for this pattern?

This pattern is rated intermediate because it uses continuous rounds, BLO/FLO techniques, and detailed assembly; basic single crochet and increases/decreases are required.

How long does this project typically take to complete?

Most crocheters complete this project in 5-7 hours, depending on experience, color changes and assembly time.

Are there tutorials for special techniques like BLO/FLO?

Yes, the pattern references video links and step photos for magic ring, BLO and FLO techniques to help you master those steps.